Table of contents of user guide
Uploading and encrypting data
On this page:
- 1. Uploading and encrypting data: overview
- 2. Uploading and encrypting data: step-by-step
- 2.1 Plan bucket names
- 2.2 Accept cookies
- 2.3 Upload and encrypt files to a new bucket
- 2.4 Create an empty bucket
Files uploaded to SD Connect are automatically encrypted during upload and decrypted during download using the service’s integrated key management system. This functionality supports all file types and formats, with a maximum upload size of 100 GB. Larger files can be uploaded programmatically.
-
Note
All members of a CSC project can upload and download files via SD Connect. To restrict access, files can be shared with another CSC project (Academic type) using Read to SD Desktop permission. For assistance, please contact servicedesk@csc.fi (subject: SD Connect).
1. Uploading and encrypting data: overview
SD Connect is built on a cloud object storage infrastructure. Files can only be uploaded into a bucket, created with SD Connect. Bucket is a top-level 'box' used to store files or folders. This has several implications for how your data should be organized and managed:
-
Once files are uploaded to SD Connect, they cannot be edited or modified. It is therefore important to plan the bucket structure in advance. To simplify data management and avoid issues, it is recommended to create a separate bucket for each dataset or experiment. Avoid placing too many files in a single bucket, each bucket can contain up to 500.000 segmented files.
-
Uploading files into folders is not supported.
-
Upload duration: Uploading large files or large batches may take several hours. Uploads are automatically stopped after 8 hours.
-
File segmentation: Uploaded files are automatically split into segments to optimize storage and performance. This segmentation is not visible in the user interface but can affect performance.
-
The user interface might be slower when there are more than 2500 files in each folder. In this case please use the command-line tools for upload and automated key management.
2. Uploading and encrypting data: step-by-step
2.1 Plan bucket names
When creating buckets in SD Connect, specific naming rules must be followed to ensure compatibility, which requires some planning. These rules apply only to buckets created in the service, not to folders or files uploaded from a local computer.
-
Bucket names must:
- start with a lowercase letter or a number.
- be between 3 and 63 characters long.
- use Latin alphabets (a-z), numbers (0-9) and dash (-).
- be unique across all existing buckets in all projects in SD Connect and Allas. If you can't create a new bucket, another project may already use the name you have chosen. To avoid this situation, it is good practice to include project specific identifiers (e.g., project ID number or acronym) in the bucket name.
-
Bucket names must not contain:
- uppercase letters, underscore (_) and accent letters with diacritics or special marks (åäöe') are not allowed.
- any confidential information. All bucket names are public.
- Bucket names can't be modified afterwards.
2.2 Accept cookies
This action is required only once: File uploads are supported in Google Chrome and Mozilla Firefox (incognito mode not supported) browsers. On first use, a browser pop-up may request cookie consent. Accepting cookies enables file and folder uploads.
2.3 Upload and encrypt files to a new bucket
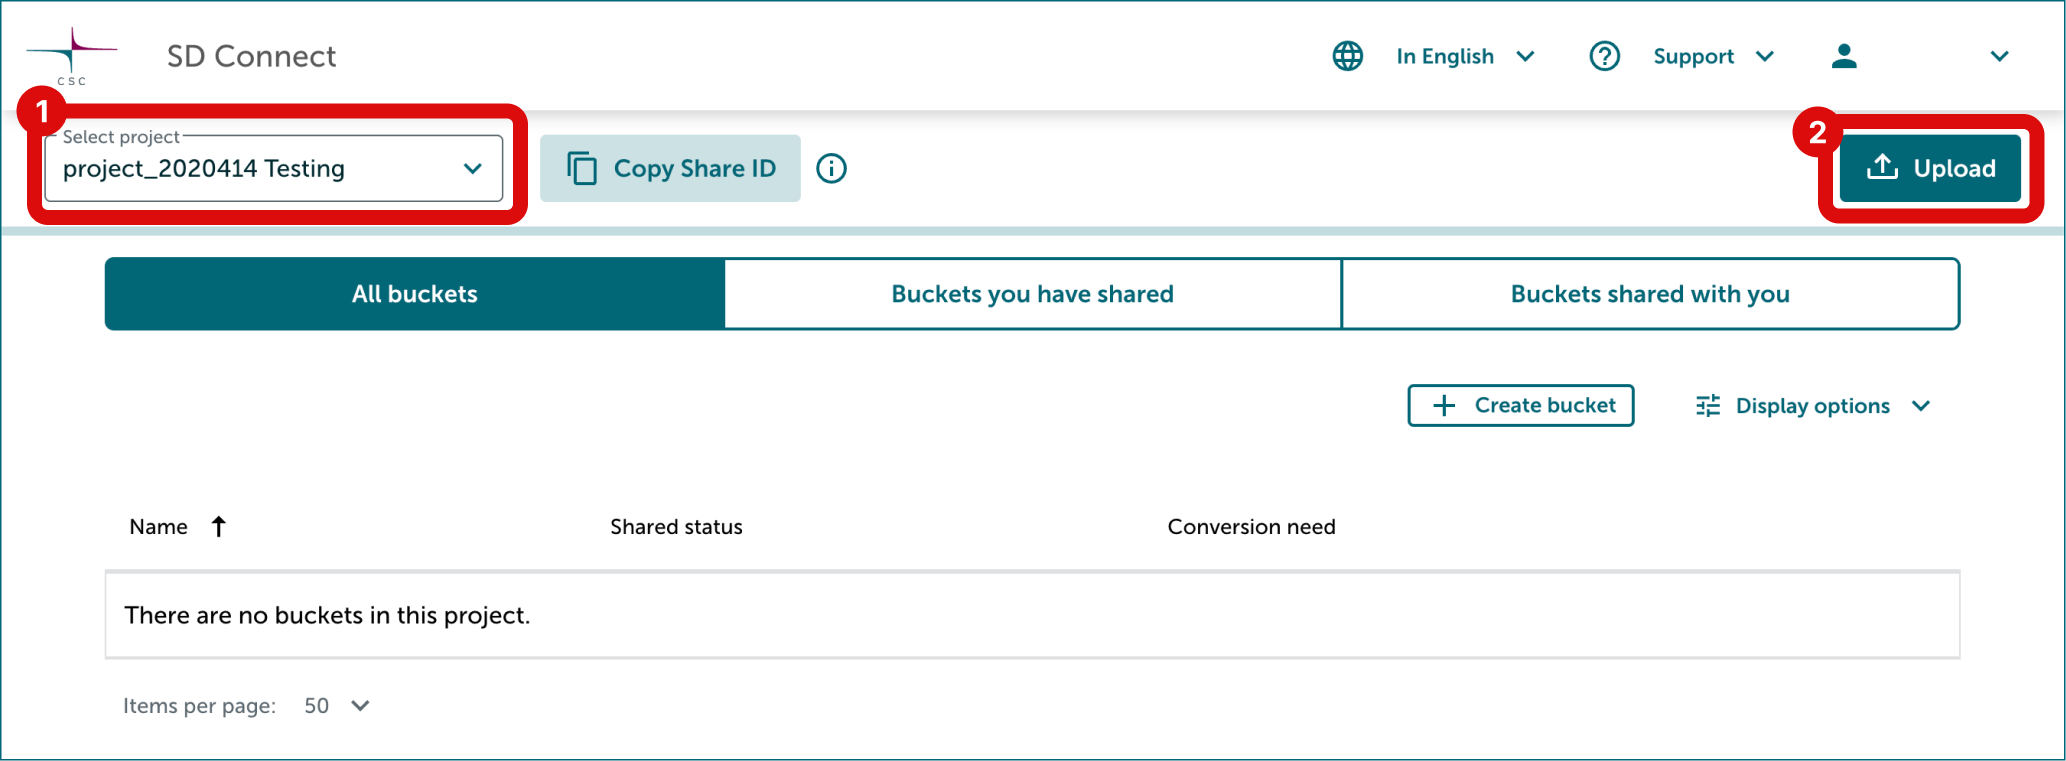
- Log in to SD Connect and select the correct CSC project in the top left corner.
- Click Upload in the top right corner.
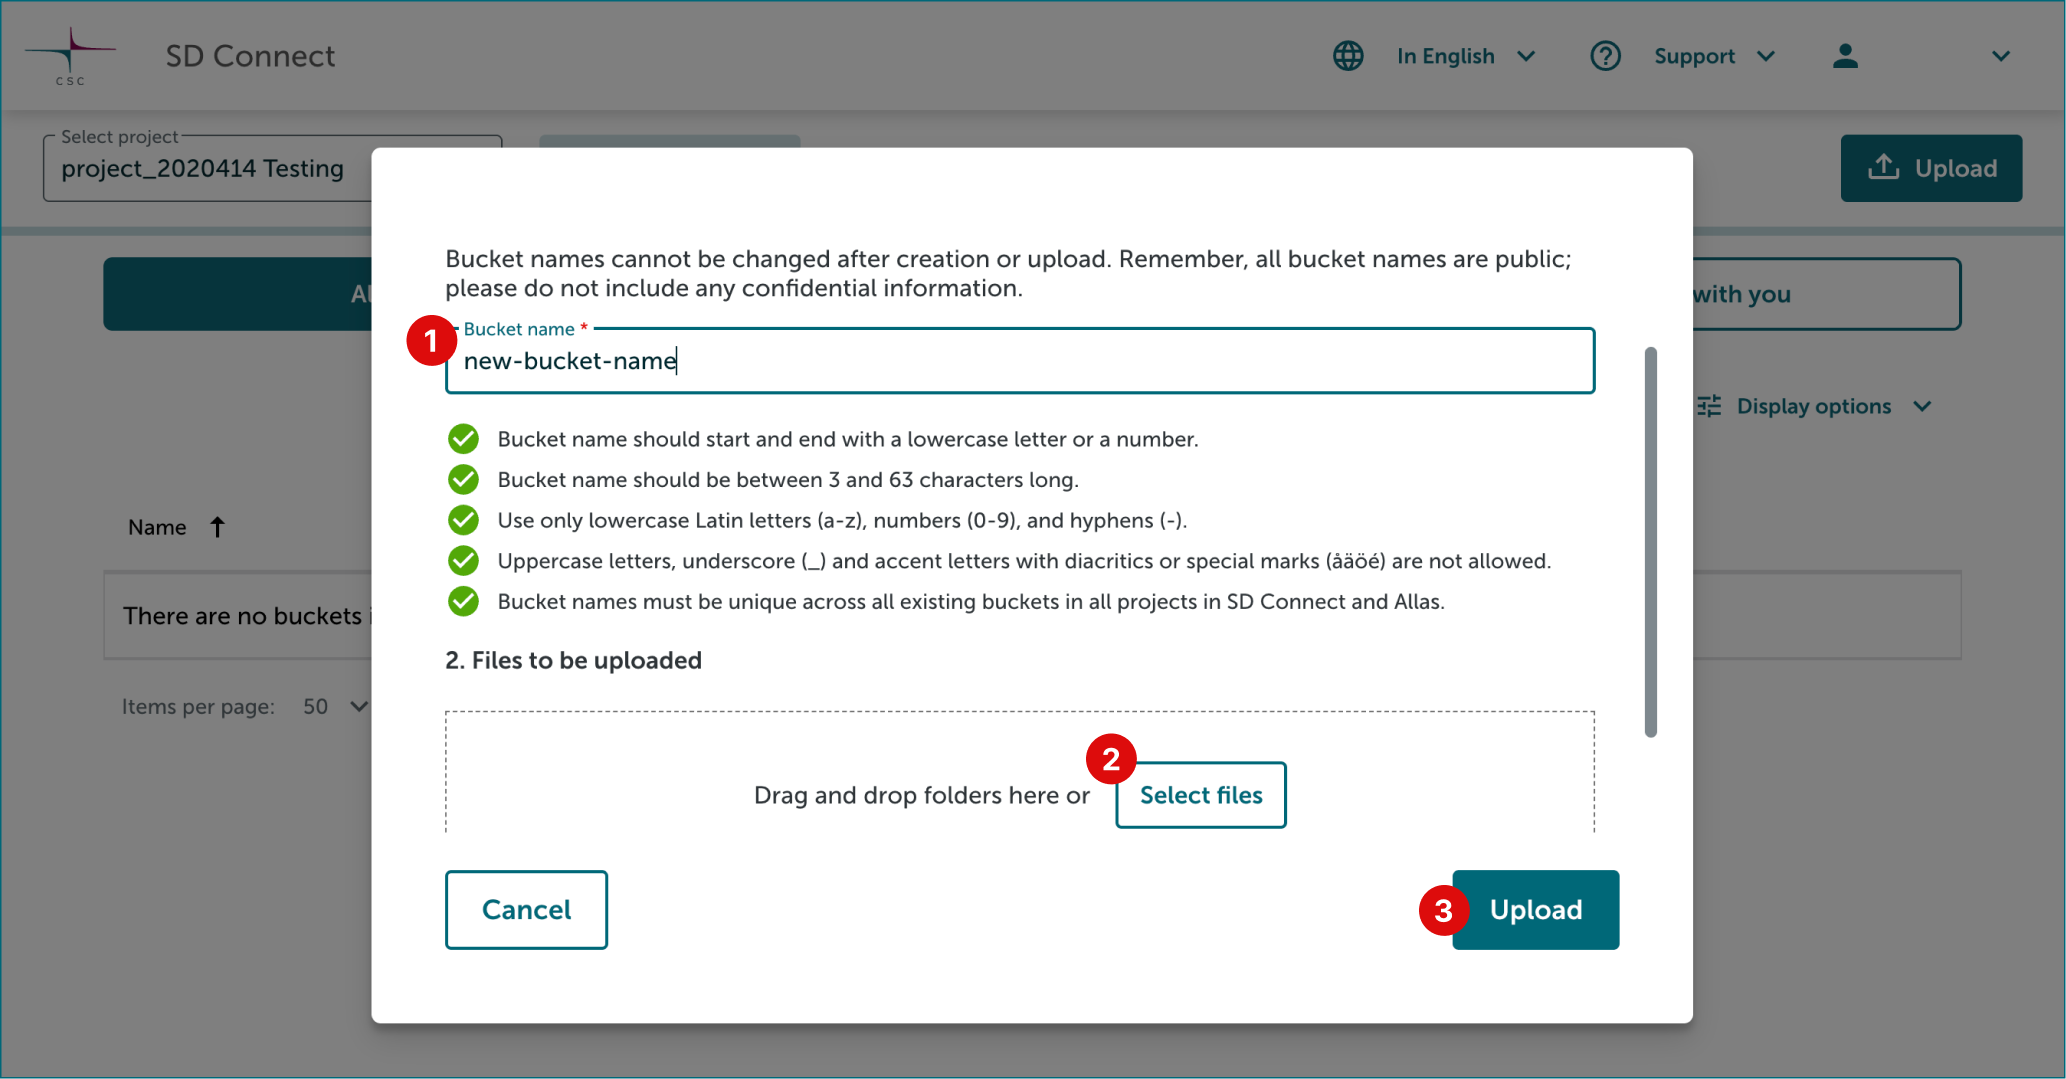
- In the new window, name the destination bucket for your files taking into consideration that some characters are not allowed: uppercase letters, underscores (_), and letters with diacritics or special marks (e.g., å, ä, ö, é). Detailed instructions are available in the previous paragraph
- Click Select Files to open a browser window and choose files for upload. If you want to upload folders, drag and drop them into the window.
- Click Upload to start automatic encryption and upload.
- Notification about the status of upload will appear and be visible until the upload is completed. Notification also includes a link to the destination bucket.
- Once the upload is finished, the encrypted files will display the extension .c4gh, this means that they have been successfully encrypted.
Now the files are accessible for downloading and sharing via SD Connect or for analysis, editing or annotation once imported via SD Desktop. Once files are uploaded and stored, the service begins consuming Billing Units. The default storage quota is 10 TB. When this limit is reached, uploads will no longer be accepted until additional storage is allocated.
2.4 Upload and encrypt files to an existing bucket
-
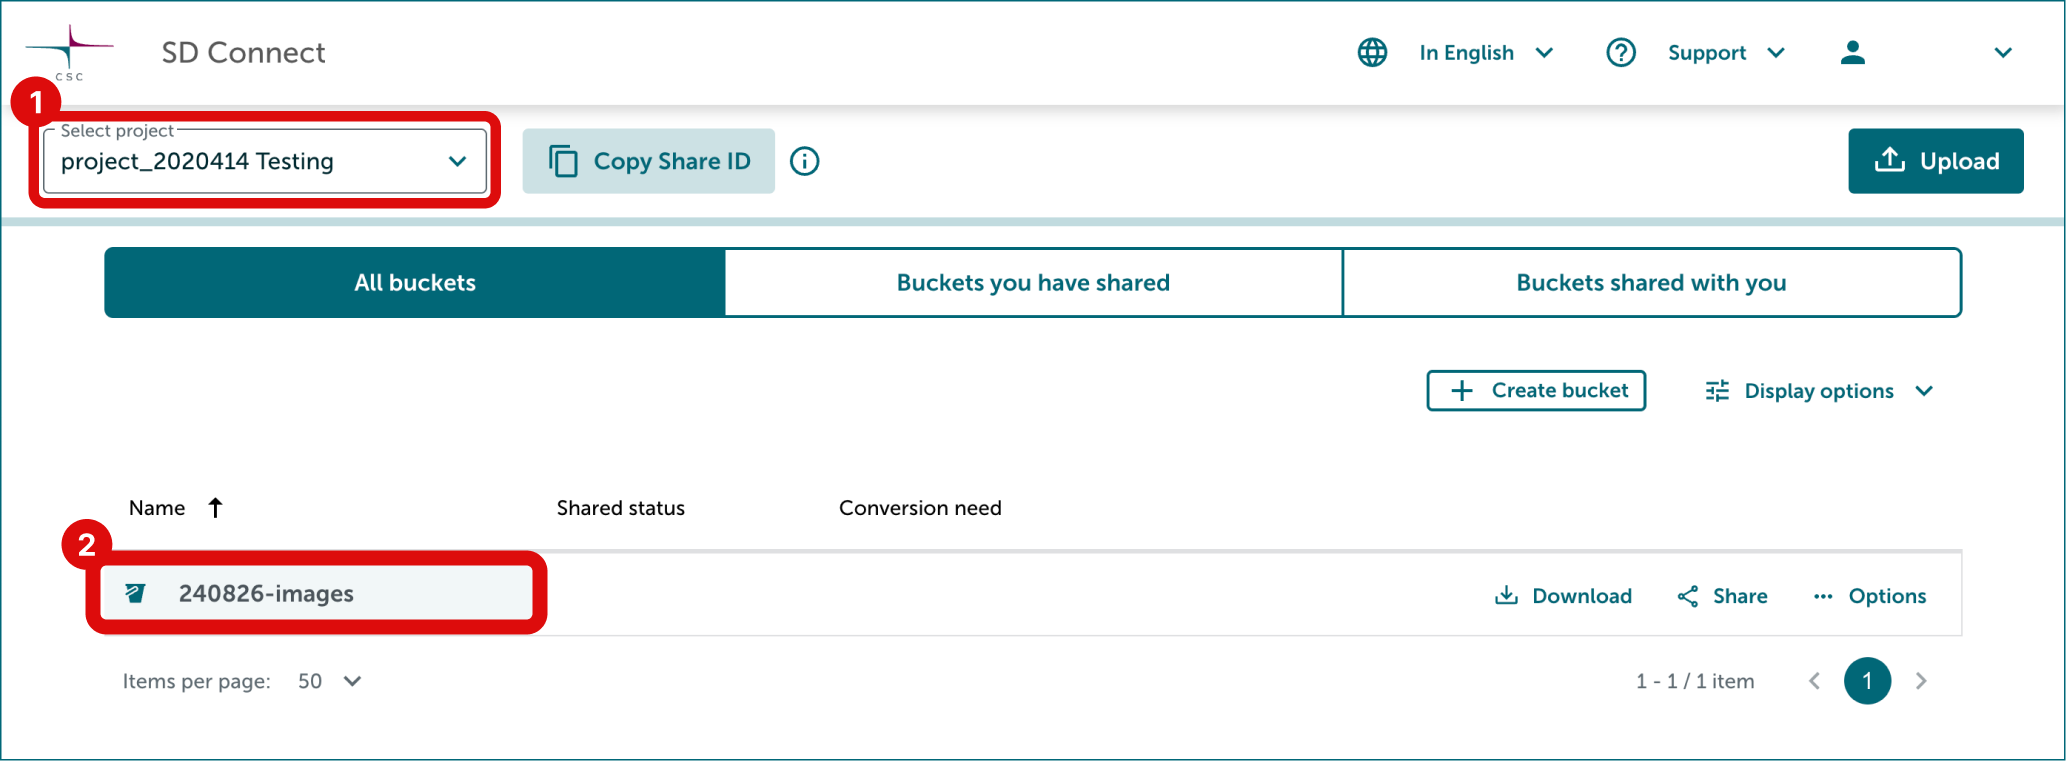
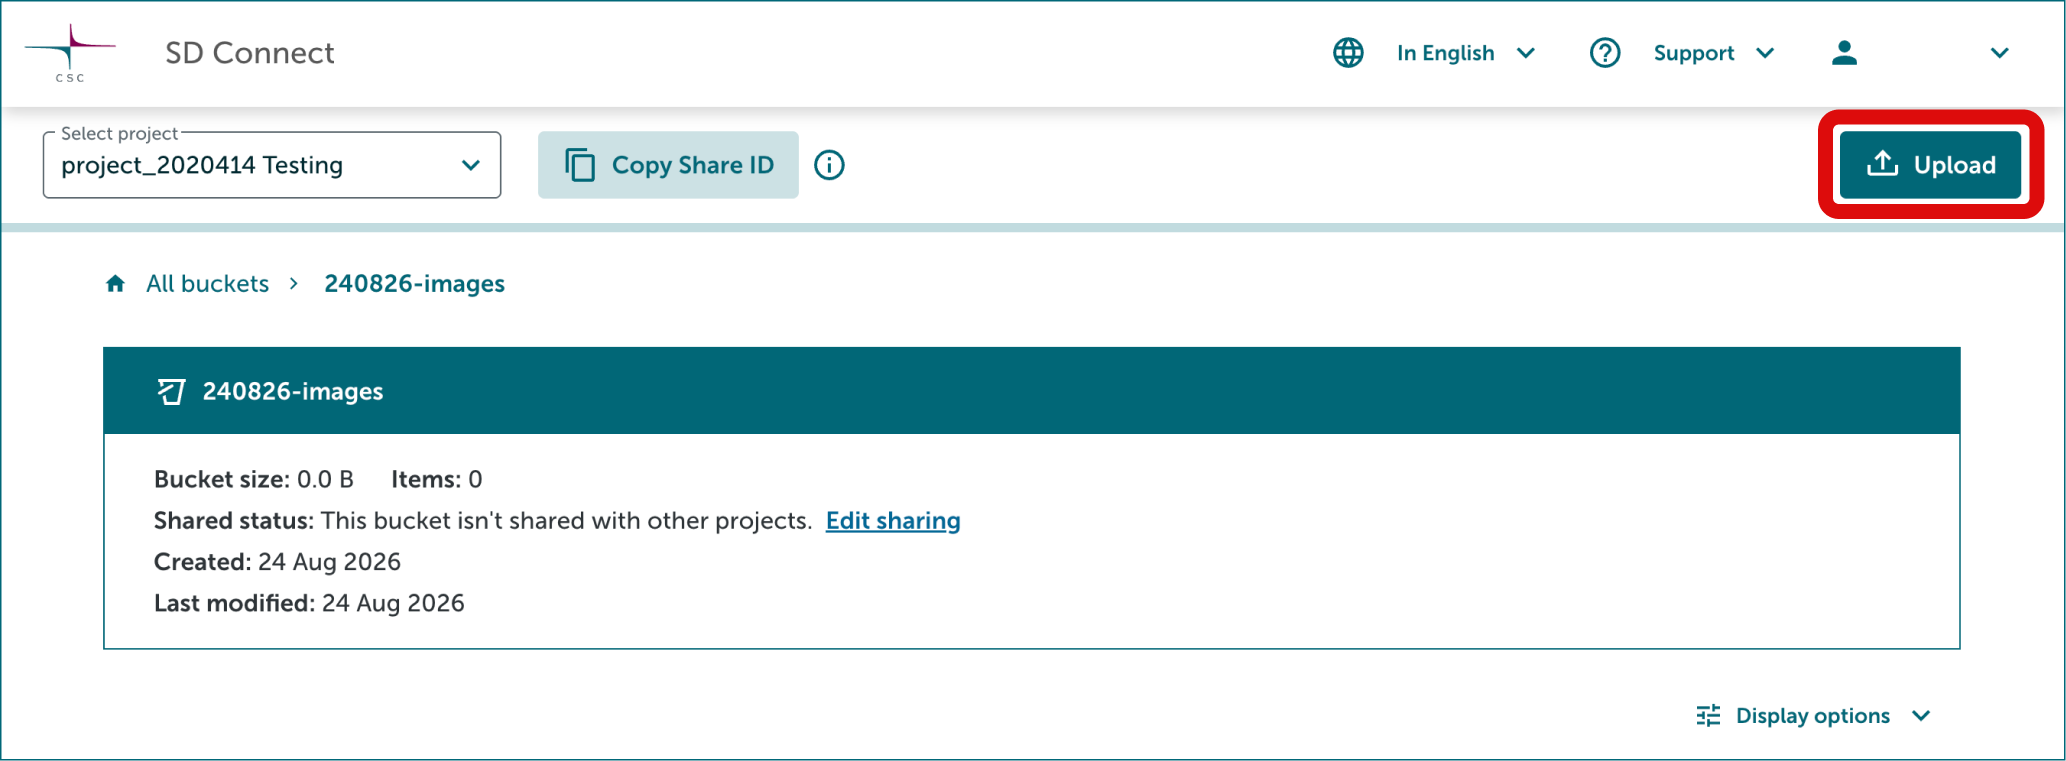
Select the correct project and bucket.
-
Click Upload in the top right corner.
-
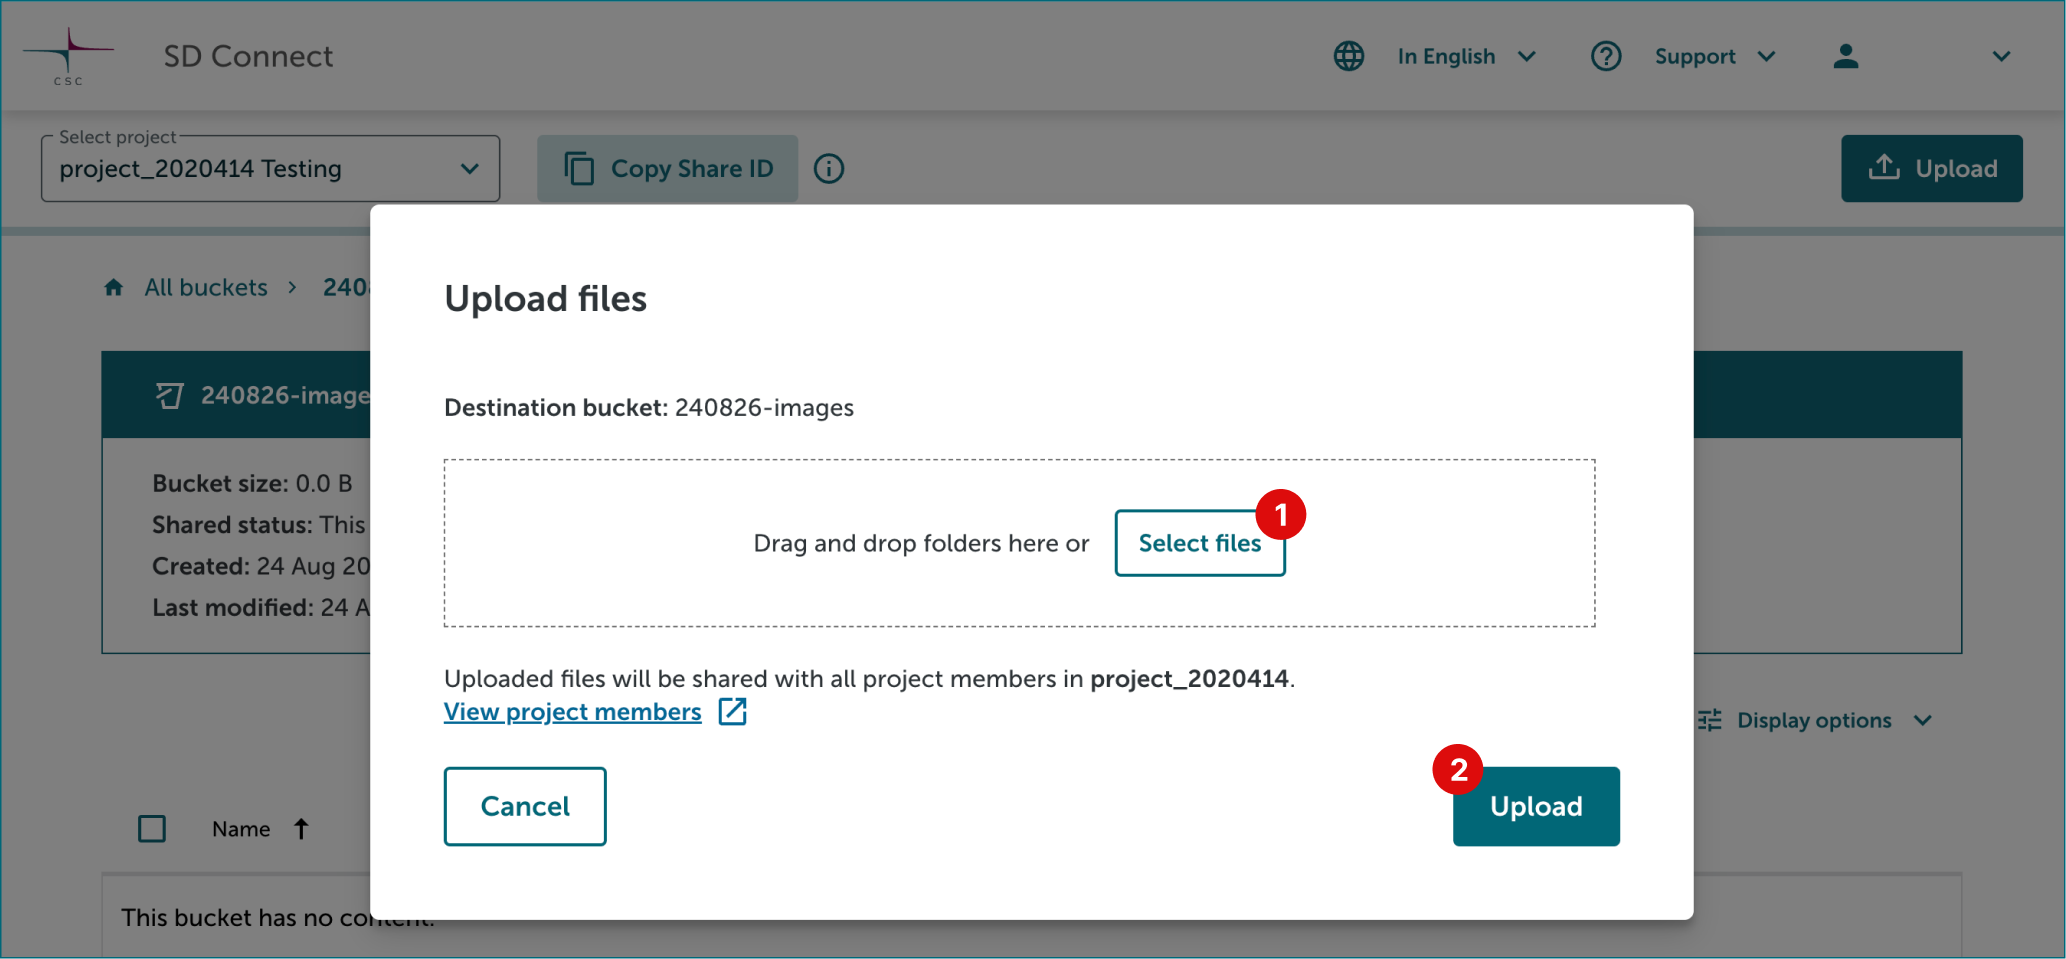
Click Select Files to open a browser window and choose files for upload. If you want to upload folders, drag and drop them into the window. Finally click Upload to start automatic encryption and upload.
2.5 Create an empty bucket
You can create an empty bucket and upload files to it later.
-
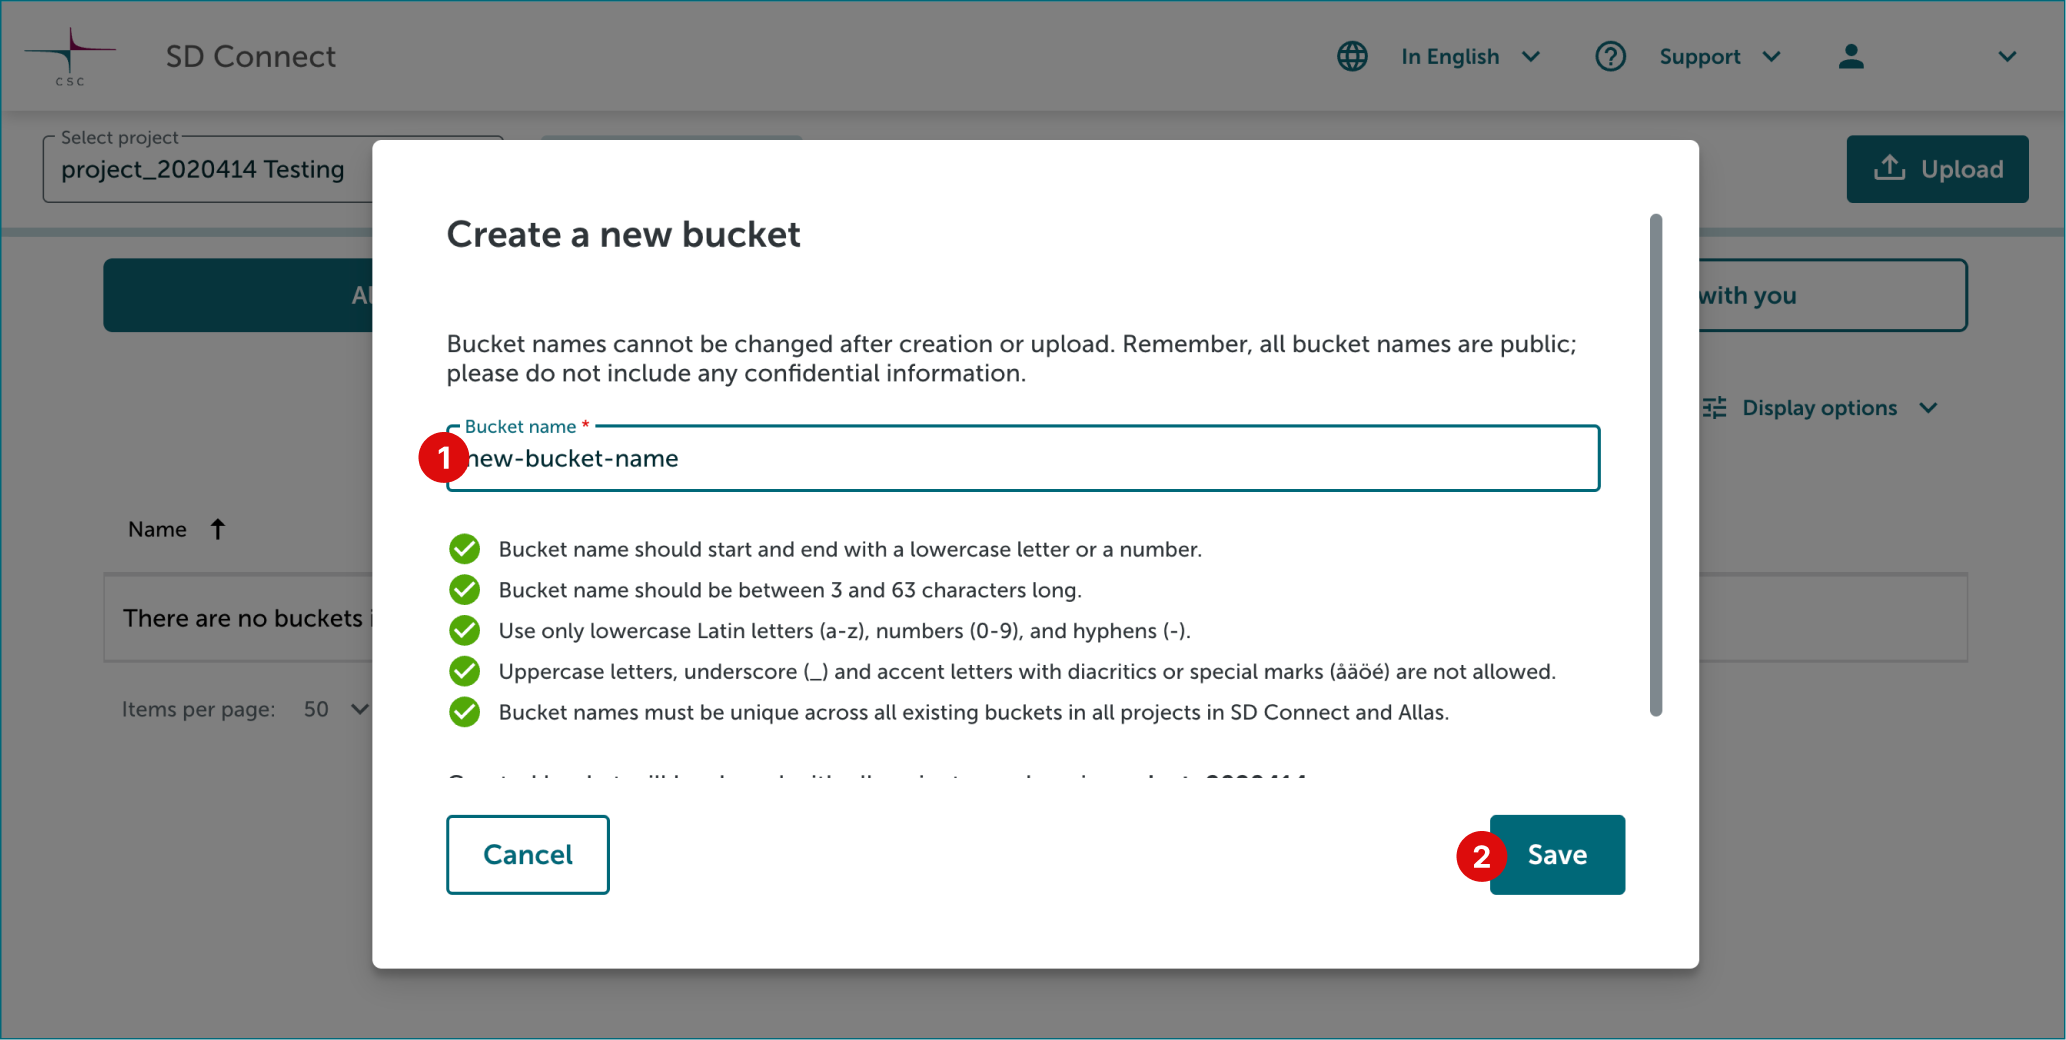
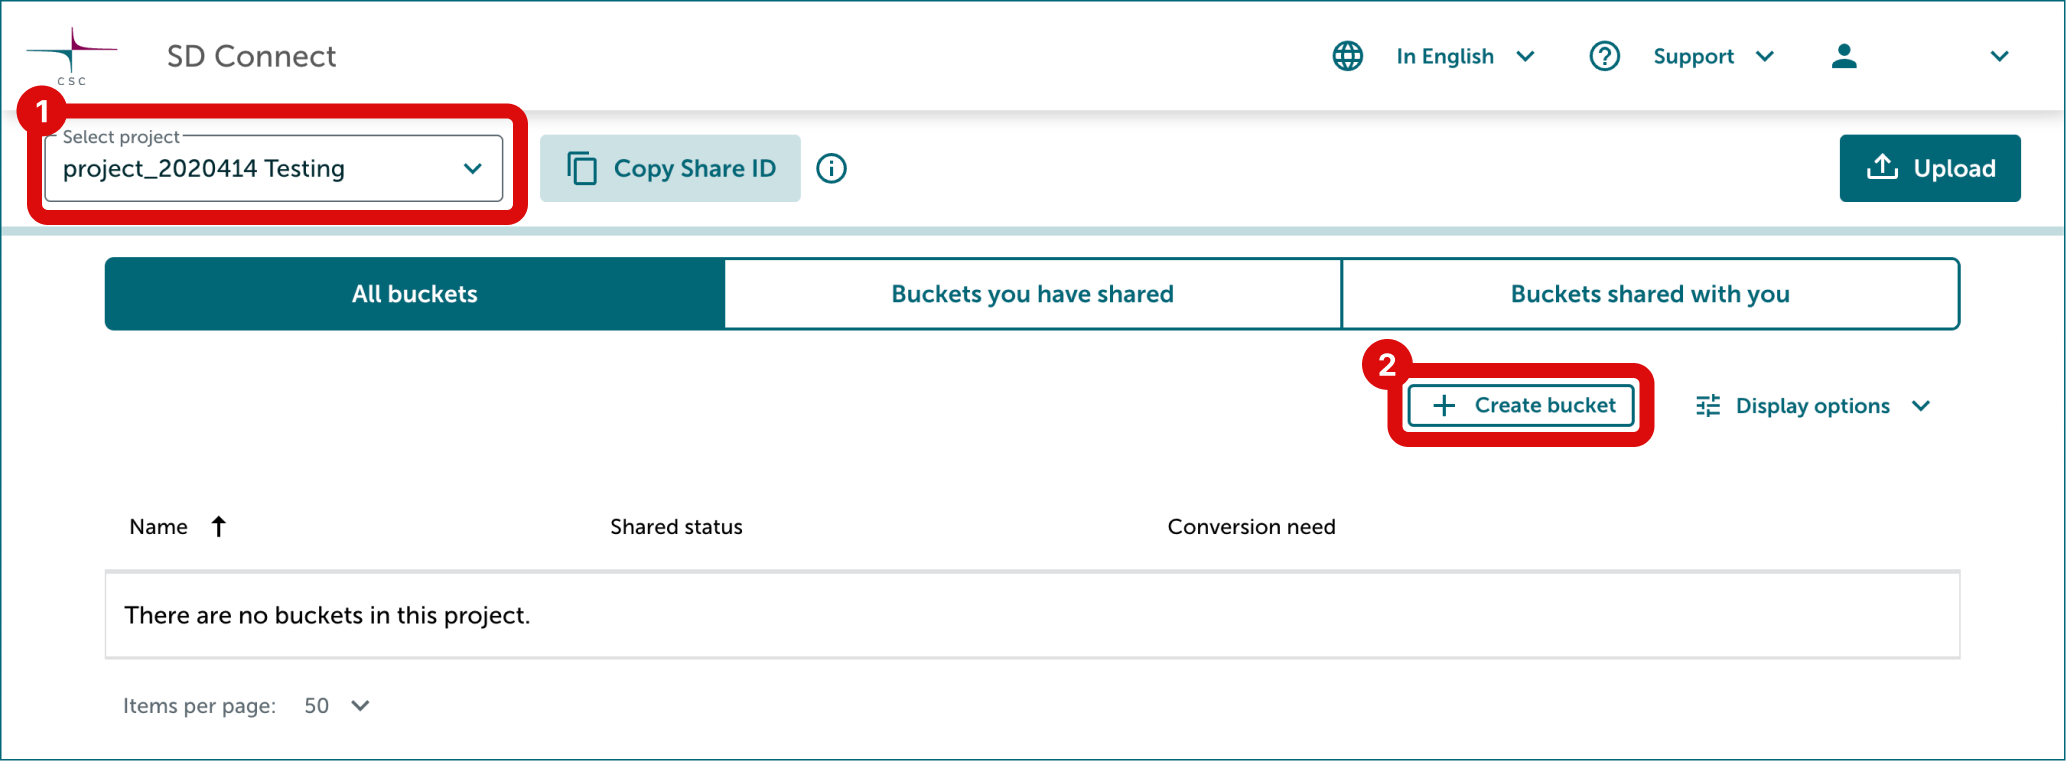
Select the correct project. Click Create bucket.
-
Name your bucket taking into consideration that some characters are not allowed: uppercase letters, underscores (_), and letters with diacritics or special marks (e.g., å, ä, ö, é). See detailed instructions. Finally click Save.