Persistent volumes
This article describes one of the options to store data in Pouta which survive turning off the virtual machine.
Persistent volumes remain even when instances are removed. They can be attached to or detached from virtual machines while they are running.
Persistent volumes use a Ceph cluster. Because data is accessed over the network, persistent volumes introduce additional latency and are therefore not recommended for latency‑critical or high‑performance workloads. See Ephemeral storage
Volume Types: Standard vs. Capacity
Pouta provides two persistent volume types: Standard and Capacity. Both use the same Ceph backend, but they differ in performance behavior and cost.
Standard Volumes
Standard volumes offer predictable performance and are suitable for workloads that require responsive storage.
Key characteristics:
- Better I/O performance
- Suitable for most general‑purpose workloads
- More expensive than Capacity volumes
Best for:
- Frequently accessed or active data
- Applications needing stable responsiveness
- Moderate database workloads
Not ideal for:
- High‑performance or latency‑critical workloads, which perform better on VM flavors with Ephemeral storage.
- Large datasets where storage cost dominates
Capacity Volumes
Capacity volumes are designed for storing large amounts of data where access frequency and performance requirements are low.
Key characteristics:
- Lower I/O performance
- Higher latency compared to Standard volumes
- Optimized for bulk and long‑term storage
- Less expensive than Standard volumes
Best for:
- Infrequently accessed (“cold”) datasets
- Long‑term archival storage
- Backups, snapshots, research datasets
- Log retention, as long as the logs are not written actively to the volume (for example, storing rotated or compressed logs after processing)
Not ideal for:
- Live databases
- Regularly accessed or performance‑sensitive workloads
- High‑throughput applications
- Storing active log files due to latency and write limits
- Any workload requiring low latency
Creating and attaching a volume in the Pouta web interface
Persistent volumes can be created using either the web interface or through the command line interface.
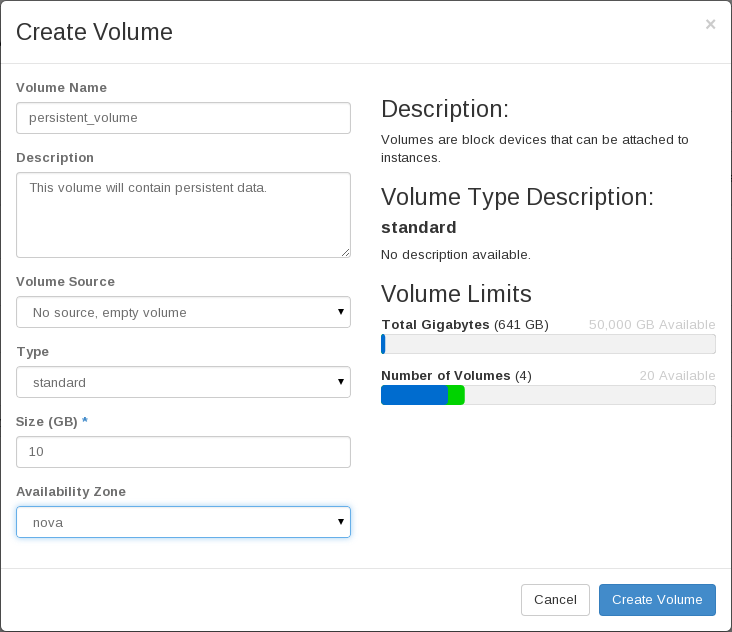
In the web interface, use the Create volume button on the Volumes page to create a new volume. You may then give a name and a size for the volume (1 GB is the minimum). The only mandatory argument is the size of the volume.
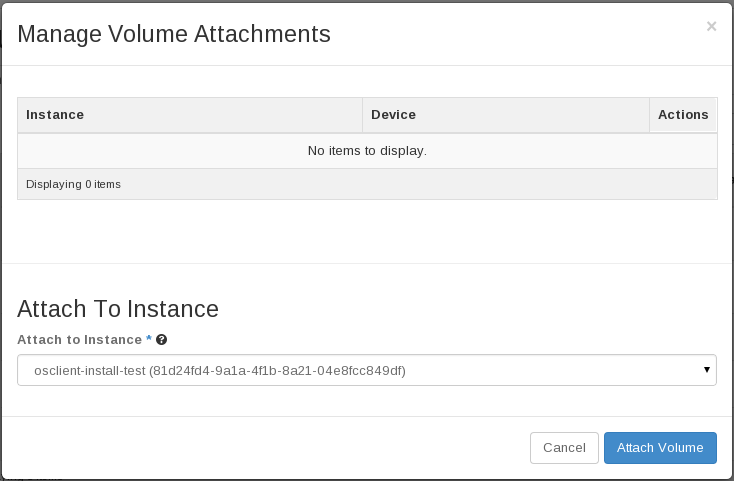
Once the volume has been created, it can be attached to a running virtual machine. One volume can be attached to only one virtual machine at a time.
To attach a volume, first select the Volumes view in the Pouta web interface. Click the arrow symbol next to the Edit Volume button for the volume you want to attach and select Manage attachments. Select the instance (i.e. virtual machine) you want to attach the volume to in the Attach to Instance selector.
Creating and attaching a volume with command line interface
Persistent volumes can also be created and attached using the command line interface:
List volume types:
List existing volumes:
List existing virtual machines to find the one to which you want to attach a volume:
When a volume's status is "available", you can attach it to a virtual machine (you can use either names or IDs to refer to the VM and the volume):
Info
Most volume types can only be attached to one virtual machine at a time.
Using attached volumes
The first time you use a attached volume it needs to be initialized. This should ONLY be done the FIRST time you use it, otherwise you overwrite all your data on the volume. First determine which device is your volume.
The following is a simple usage example for creating a filesystem on a volume and mounting the filesystem automatically after a reboot. Note that this is a simple example and there are many cooler ways to manage your file systems.
Once you have logged in to your virtual machine, you can list the volumes:
sudo parted -l
You should be able to identify the volume based on its size. For this
exercise, let us say it is /dev/vdb. First, we create a file
system on it. We are going to
use xfs because we know it works well in Pouta:
sudo mkfs.xfs /dev/vdb
Now you can start using it. For example, to mount it under
/media/volume, you first need to make sure that the path exists:
sudo mkdir -p /media/volume
Then you can mount it:
sudo mount /dev/vdb /media/volume
Finally, you need to change the ownership to be able to read and write data in it. In the following command, we are assuming the username is cloud-user.
sudo chown cloud-user:cloud-user /media/volume
After this step, you should be able to use your volume normally. If you want the volume to be available after rebooting the virtual machine, you need to add it in the /etc/fstab configuration file.
You can use the label you previously created for the partition:
sudo sh -c 'echo "/dev/vdb /media/volume xfs defaults,nofail 0 2" >> /etc/fstab'
Detaching the volume using web interface
Once you are done with your operations and you want to detach the volume, please remember to unmount the volume before detaching it!
sudo umount /dev/vdb
Detaching the volume using CLI
When you no longer need the volume to be attached, you can detach it. Before detaching, remember to unmount the volume's filesystem on the virtual machine to avoid data loss!
- When an instance with an attached volume is shelved, the volume status changes to Reserved. Unshelving the instance changes it back to In-use, and deleting the instance sets it to Available.
- For multiattach volumes, the status becomes Reserved when all attached instances are shelved, preventing the volume from being attached to another instance. It returns to In-use as soon as at least one of the attached instances is unshelved.
Volume deletion
If you want to delete a volume and the data contained on it, you can execute:
The data will be deleted forever, it cannot be recovered.If volume deletion fails in the Pouta web interface or with the command line, check the following:
- The volume status is Available
- The volume has no snapshots
- The volume is not part of a volume group
If the volume appears to be detached and shown as Available but still cannot be deleted, contact servicedesk@csc.fi and include the volume name and ID.
Transferring volumes between two Pouta projects using web interface
Occasionally, you may need to transfer your persistent volumes between two Pouta projects. For example, you may need to transfer large data sets or bootable volumes to colleagues in another Pouta project. This can be done using volume transfers. Volume transfers between projects in Pouta are fast, avoid data duplication and unnecessary data transfers over the network. Transferring a volume to another project means that your project will no longer have access to it. Please note Pouta volume transfer works within the same cloud environment i.e. you can transfer a volume from one cPouta project to another but not between a cPouta project and ePouta project or vice versa.
To transfer a volume, you must first make sure its status is Available. You can do so by detaching it from the instance to which it was initially attached. Once your volume is in the available status, you can initiate volume transfer either using Pouta Web or the command line interface.
For the Pouta Web interface, go to the Volumes view and click the arrow symbol next to the Edit Volume button of the volume you want to transfer and select Create Transfer. Name this transfer request and click on Create Volume Transfer. You will then get the volume transfer credentials (transfer ID & authorization key).
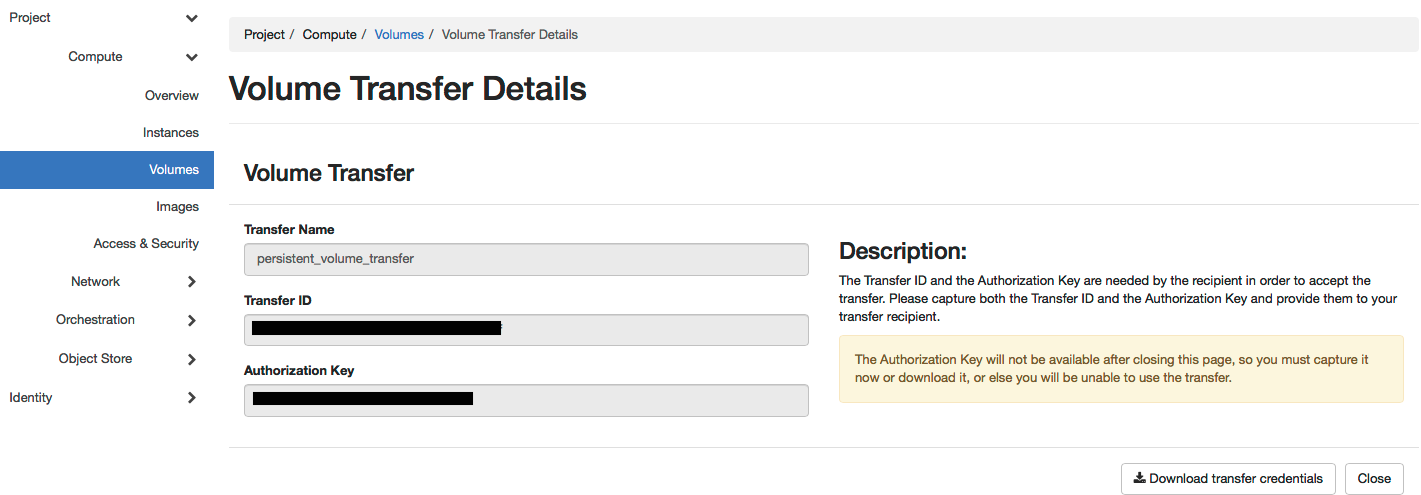
You need to provide these credentials to your colleague to whom you want to transfer this volume.
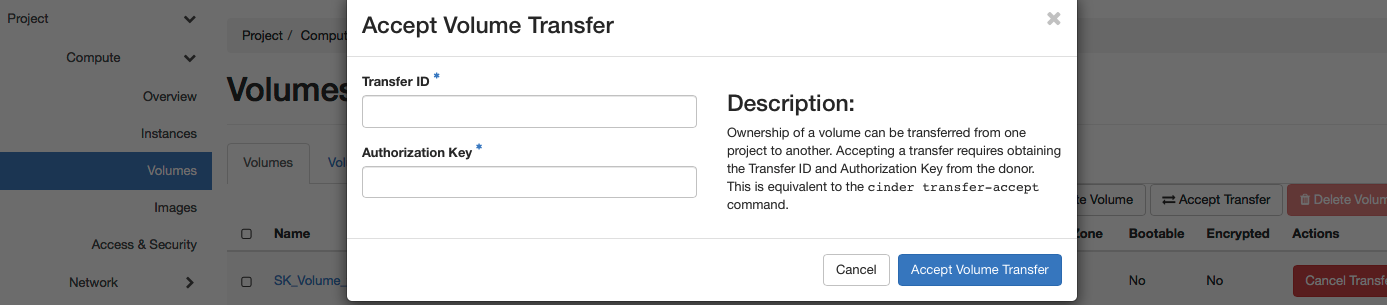
Your colleague can accept this volume transfer in his project by going to his Volumes view of the web interface and clicking the Accept Transfer button. They need to then provide the transfer credentials you generated in the previous step and Accept Volume Transfer. This will transfer the volume to your colleague's project.
Transferring volumes between two Pouta projects using CLI
Volume transfers can be also done using the command line interface:
openstack volume transfer request create <name or UUID of volume to transfer>
The output of this command will have the volume transfer credentials (transfer ID & Authorization key), note these down and pass these to your colleague to whom you want to transfer the volume.
Your colleague can accept the transfer request of this volume:
openstack volume transfer request accept <transferID> <authKey>
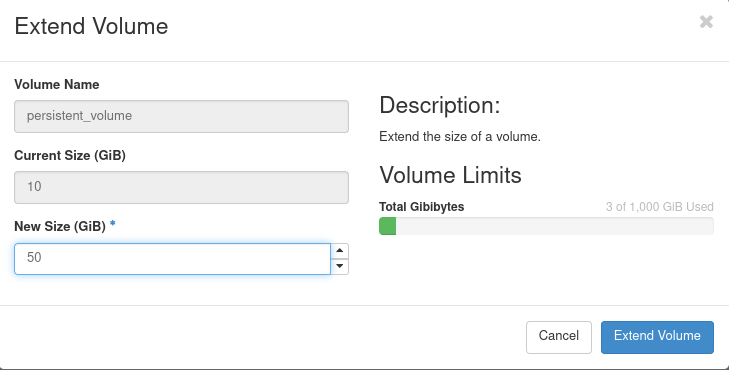
Expanding size of the attached volume in the Pouta web interface
Previously you have created and attached a volume. In this section you are going to enlarge the size of the volume attached to the instance. Before you attempt for volume expansion you have to detach the volume from the instance, please remember to unmount the volume before detaching it!
sudo umount /dev/vdb
To expand the volume, first select the Volumes view in the Pouta web interface. Click the arrow symbol next to the Edit Volume button for the volume you want to enlarge and select Extend Volume. Input the volume amount you want in "GiB" in the field New Size (GiB). Finally, click the Extend Volume button. To attach an expanded volume similar to the previous attach persistent volume, first select the Volumes view in the Pouta web interface. Click the arrow symbol next to the Edit Volume button for the volume you expanded and select Manage attachments. Select the instance (i.e. virtual machine) you want to attach the volume to in the Attach to Instance selector.
Once you have logged in to your virtual machine, you can list the volumes:
sudo parted -l
Similar to the previous persistent volume creation you can identify the volume based on its size. First mount the volume at the usual path:
sudo mount /dev/vdb /media/volume
Finally we need to grow the filesystem of the volume, so that the additional space can be used. Assuming that the filesystem in the volume is xfs, we can grow the filesystem with the following command:
sudo xfs_growfs /dev/vdb
To verify that the filesystem has now the expected size, you can use the following command:
sudo xfs_info /dev/vdb
By multiplying the block size (bs) by the number of blocks in the filesystem (blocks), you will obtain the size of the filesystem in bytes.
Expanding size of the attached volume using CLI
To expand your volume, detach it from the server with following command:
Now, check if the volume is available to expand, list the volumes: You can now expand the volume by passing the volume ID and the new size:Change your volume type using the Pouta web interface
Warning
Before changing the volume type, ensure that the volume is in the Available state. Please, unmount the volume and detach it from your machine before proceeding with the type change.
The operation may take some time depending on your volume size, during which the volume will be temporarily unavailable.
Log in to the Pouta web interface and navigate to the Volumes view. Click the arrow symbol next to the Edit Volume button for the volume you want to change the type of and select Change Volume Type.
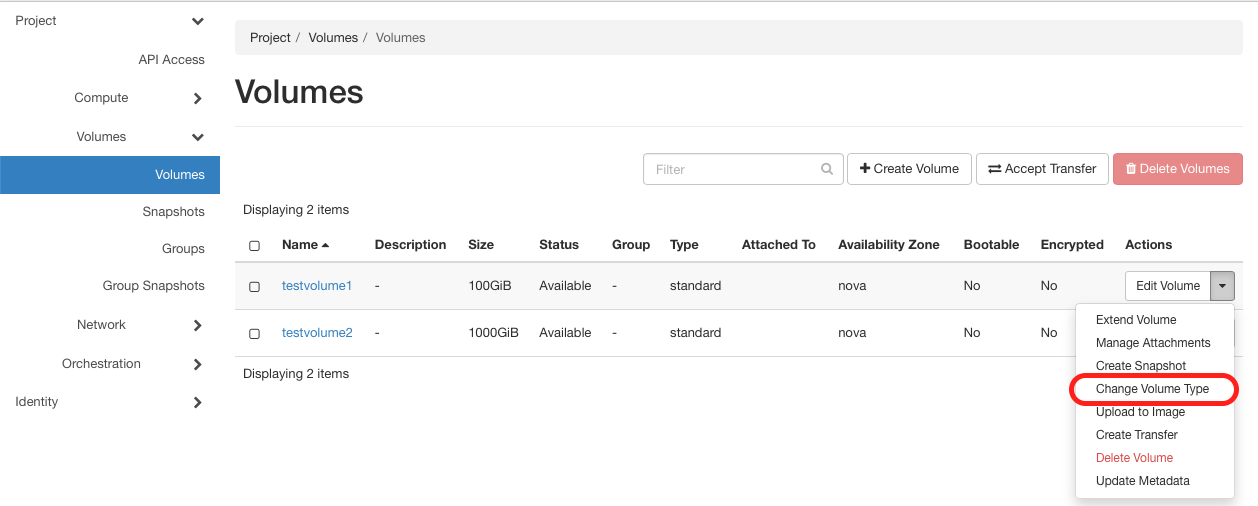
In the Volume Type selector, choose either Standard or Capacity depending on your needs and select On Demand for the Migration Policy. Finally, click the Change Volume Type button.
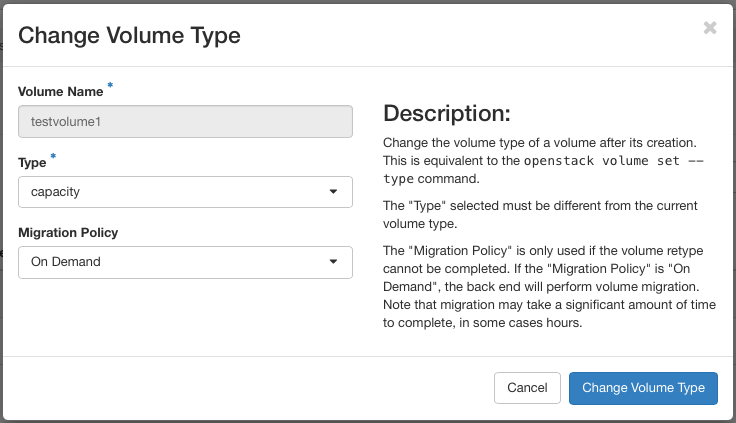
Depending on the volume size, the type change operation may take some time. You can monitor the progress in the Volumes view. Once the volume status changes back to Available or In-use, the type change has been completed.
For example, a volume of size 2 TB takes about ~15 minutes.
Change your volume type using CLI
You can realize the volume type change using the command line interface:
- First, list the type of volumes available in your project:
openstack volume type list --long
+--------------------------------------+----------------------+-----------+--------------------------------------------------------------------------+-------------------------+
| ID                                   | Name                 | Is Public | Description                                                              | Properties              |
+--------------------------------------+----------------------+-----------+--------------------------------------------------------------------------+-------------------------+
| 2a0e6c60-f717-4f38-ad8b-69faf7bb2b8d | capacity             | True      | Capacity volumes stored on a Ceph backend                                |                         |
| 025a0a92-8485-443f-bd61-d68b87389447 | standard.multiattach | True      | Multiattachable standard volumes. Available upon request to servicedesk. | multiattach='<is> True' |
| a54f3f3b-0b10-477c-a5eb-1ecce0ec082a | standard             | True      | Volumes stored on a Ceph backend                                         |                         |
+--------------------------------------+----------------------+-----------+--------------------------------------------------------------------------+-------------------------+
Now, you can change the volume type by executing: