Table of contents of user guide
Create virtual desktop and volume
On this page:
- 1. Create volume
- 2. Create virtual desktop
- 3. Attach volume and virtual desktop
- 4. Make sure your CSC project has sufficient Billing Units
- 5. Important considerations
Note
If you are new to SD services or unsure which virtual desktop or volume to choose, please contact CSC Service Desk with the subject "SD Services". We can provide general introduction to the service, guidance and, if needed, arrange an online support session.
In this section, you will start preparing your secure working environment by creating a volume to store a working copy of your data and a virtual desktop where you will analyse it. You will then connect them so your environment is ready for data import form SC Connect.
Step by step
1. Create volume
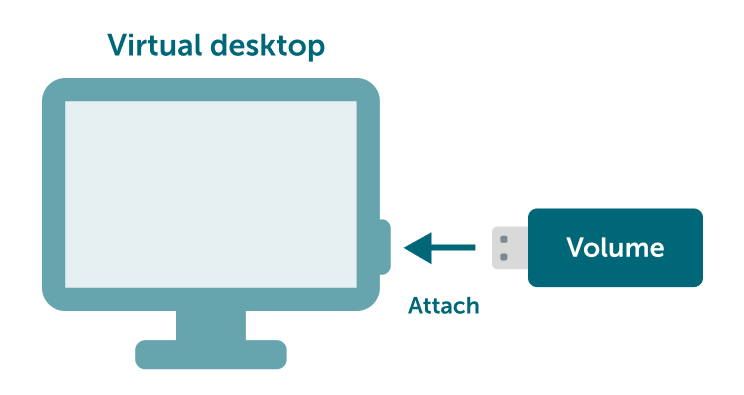
A storage volume is a secure storage space where you import and store a working copy of the data you want to analyse. Think of a volume as a virtual USB stick: you can attach it to one virtual desktop at a time and move it between virtual desktops within the same CSC project. You can create up to five volumes per CSC project.
Your data remains stored on the volume if the virtual desktop becomes unresponsive. If you delete the virtual desktop, the volume is automatically detached and remains available for you to attach to another virtual desktop (notice: this feature is available only for virtual desktops created after 28 September 2028) or for permanently deleting it in a separate step.
In the next steps, you will be guided to choose a volume size that matches the total amount of storage you expect to need for your data, scripts, and analysis results: 200 GB, 500 GB, or 1 TB. Select only the storage space you need rather than choosing the largest option by default. If you are unsure which size is suitable or need more than 1 TB of storage, contact us for support and describe the type and amount of data you plan to analyse. A volume can only be extended with additional storage before any data or files are imported on it. To request a storage extension, contact CSC Service Desk (subject: SD Desktop).
Volumes consume your CSC project resources, 4.7 Could-type Billing units /TiB/ hour, from the moment they are created, whether or not they are attached to a virtual desktop. Plan in advance how many resources your CSC project needs. Check billing unit consumption:
| Name | Size (GB) | Cost Billing Units per year |
|---|---|---|
| Small | 200 | 8 234 |
| Medium | 500 | 20 586 |
| Large | 1000 | 41 172 |
Step by step
-
Log in to SD Desktop services
-
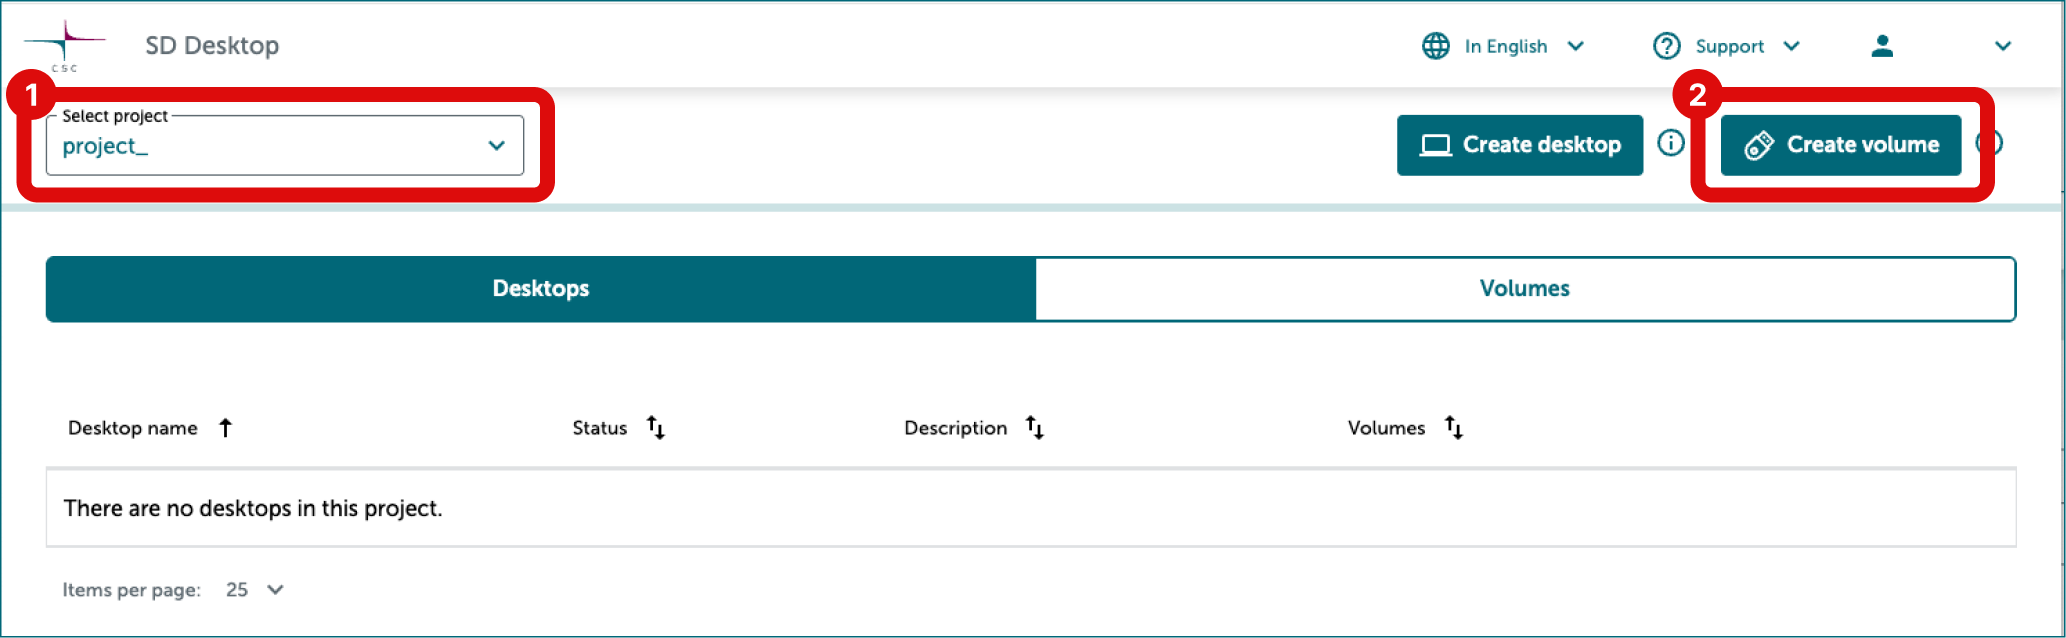
In the main page, select the CSC project you want to use from the drop-down menu on the left.
-
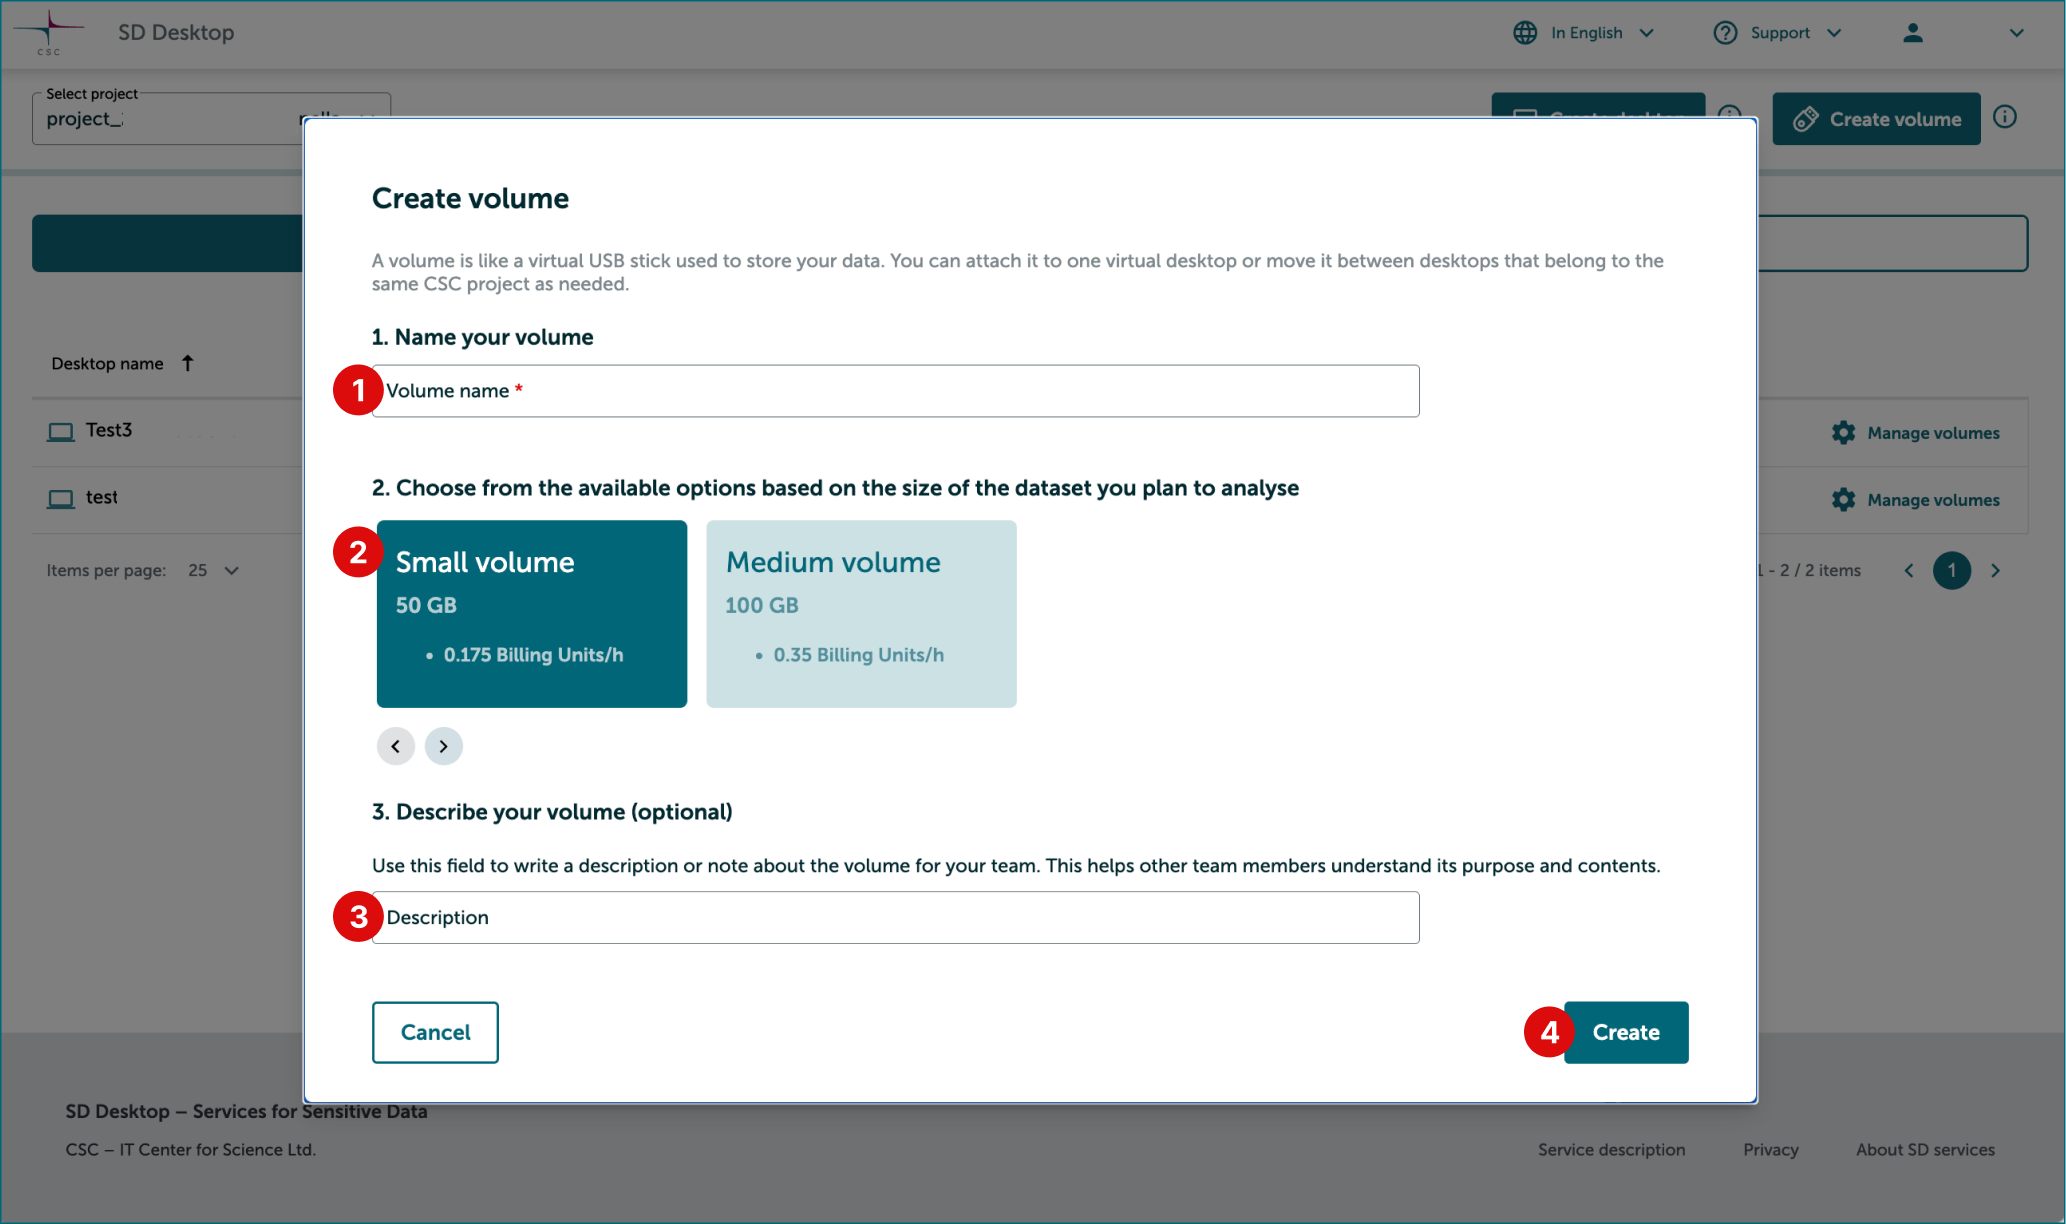
In the top-right corner, click Create volume. This opens a new Create volume window.
Here:
-
Select a name for your volume. Choose a clear and descriptive name - especially if you're working on multiple projects - and make sure it only contains letters or numbers, with no special characters or spaces.
-
Choose from the available options the one that covers the combined size of your dataset and working files: 200 GB, 500 GB, or 1 TB. Select only the storage space you need rather than choosing the largest option by default. If you are unsure which size is suitable or need more than 1 TB of storage, contact servicedesk@csc.fi (subject: SD Services) for support.
-
Write optional description or note about the volume to help your team members understand its purpose and contents.
-
Click Create. The window will now close and volume creation will start.
-
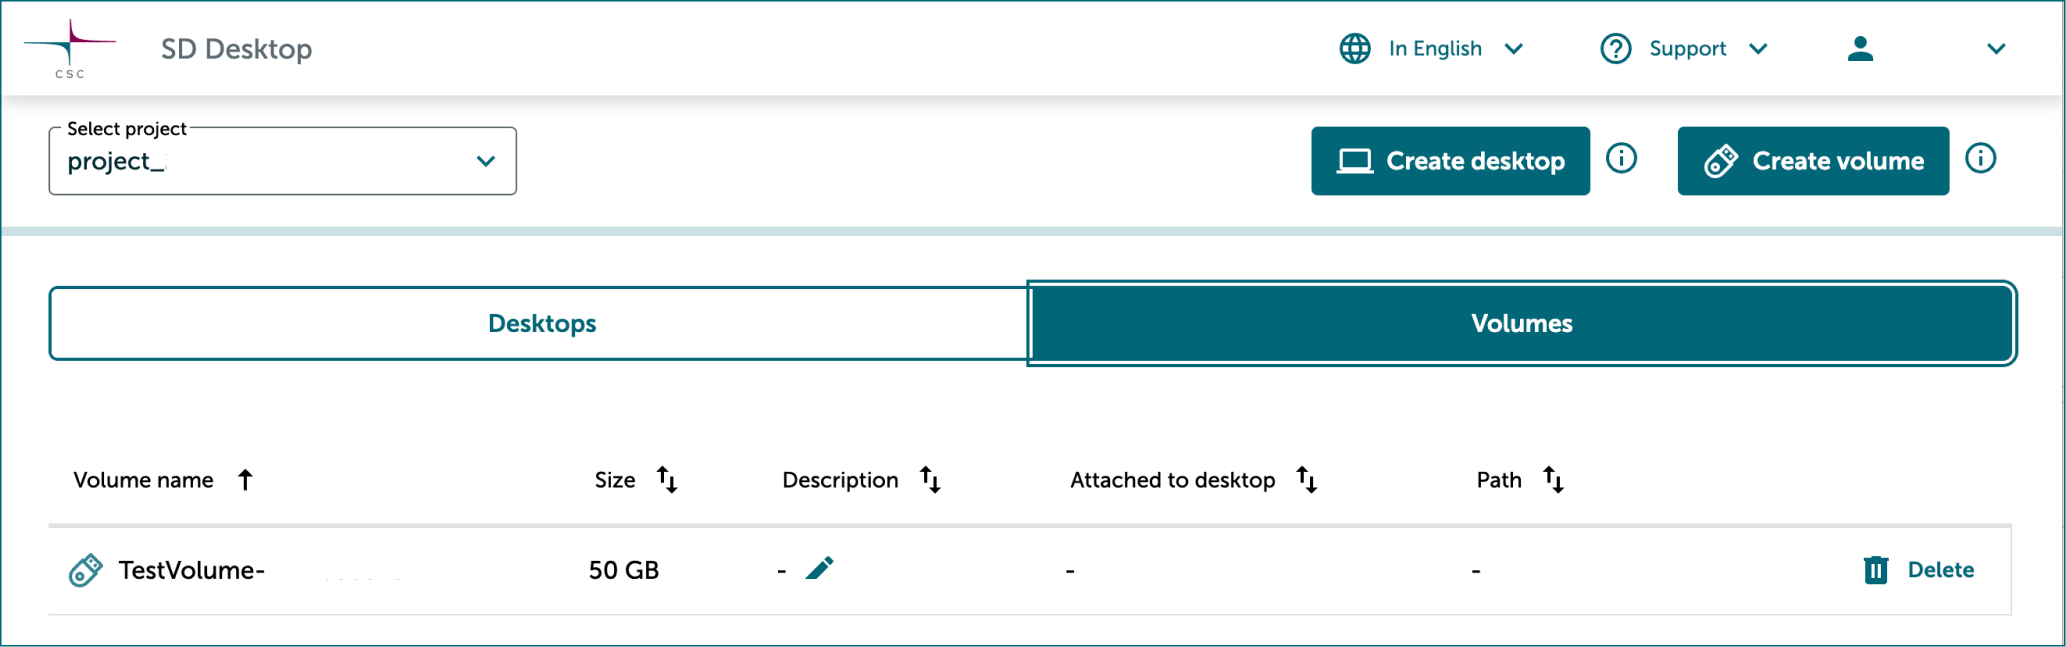
Back on the main page, you will see a list of your volumes in Volumes tab.
-
Note
A volume can only be extended with additional storage before any data or files are saved on it. To request a storage extension, contact CSC Service Desk (subject: SD Desktop).
2. Create virtual desktop
A virtual desktop is a secure computer that you access through your web browser. Like a regular computer, it has an operating system, applications, memory and storage, but it runs remotely in the SD Desktop service rather than on your own computer. You use the virtual desktop to access and analyse your sensitive research data in a secure environment.
Desktops have only 80 GB of storage by default. If you save more than 80 GB of data directly to your desktop, it becomes unresponsive and you may lose your data. To avoid this, please create and attach a volume to your desktop and save your data there, do not skip the last step.
You can create up to three desktops within a single CSC project, with up to 10 project members allowed to connect simultaneously to each desktop. As the storage volume, your virtual desktop is accessible to all project members upon creation.
You can choose between different virtual desktops options based on your needs. Desktops consume Cloud Billing Units from your CSC project while they are running. To avoid unnecessary usage, pause or delete desktops when not in use. Desktops that remain inactive trigger email notifications after 14 days of inactivity.
Virtual desktop options
| Use | Technical specifications | Corresponding Pouta Flavor | Cloud Billing Units consumption | |
|---|---|---|---|---|
| Small computation | Ideal for analyzing sensitive data using office software (for example: similar to simple statistical analysis with Excel, watching videos, listening to audio files, and working on text files). You can compare this desktop to your laptop. | Core 6; Memory 15 GB; Root disk 80 GB; | standard.xlarge | 5.2 Cloud Billing Units/h |
| Medium computation | Ideal for running complex statistical or genome analysis (for example: using the command line to run specific scripts). You can compare this desktop to a powerful laptop provided by your organization's IT unit. | Core 8; Memory 30 GB; Root disk 80 GB | standard.xxlarge | 10.92 Cloud Billing Units/h |
| Heavy computation | Ideal for running non-interactive programmatic analysis (machine learning) that requires heavy computation. Please do not choose this option for simple analysis, as it consumes considerable resources. | Core 20; Memory 87 GB; Root disk 80 GB | hpc.4.20 core | 39 Cloud Billing Units/h |
| Small GPU computation | This option is available only upon request. Please contact servicedesk@csc.fi (subject 'SD Desktop') before creation to confirm availability and receive further details | 1 GPU | 78 Cloud Billing Units/h | |
| Big Picture project | This option is available only upon request. Please contact servicedesk@csc.fi (subject 'SD Desktop') before creation to confirm availability and receive further details | 1 GPU | 195 Cloud Billing Units/h |
Note
All virtual GPU desktops created without prior approval will be deleted to ensure optimal use of limited resources. Please contact servicedesk@csc.fi (subject "Sensitive Data") for more information and planning.
Step by step
-
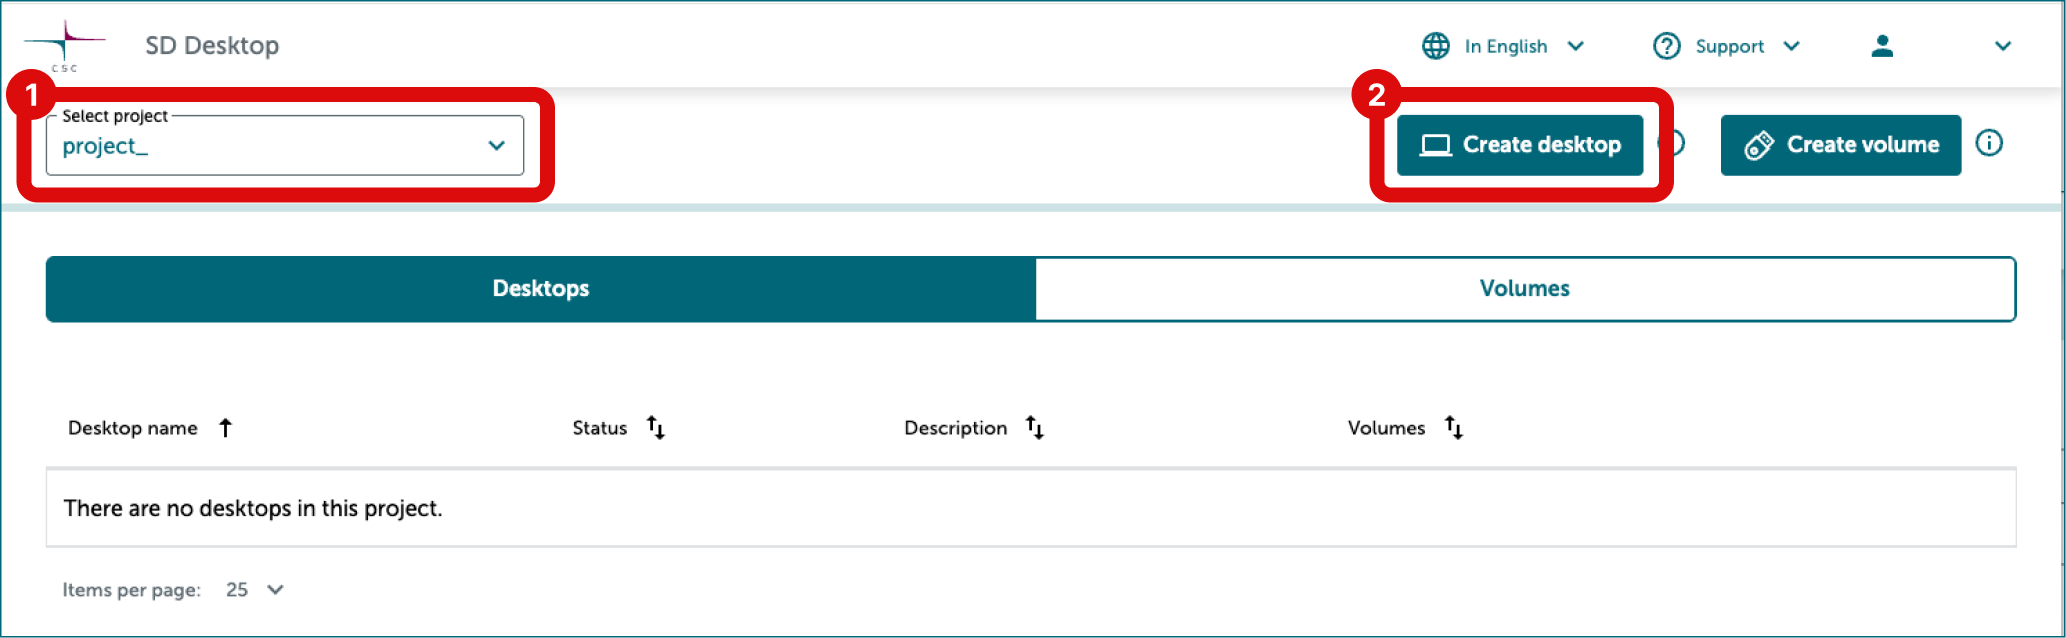
In the main Select correct CSC project from dropdown on the left side.
-
On the top right corner, Click Create desktop. This will open a new window.
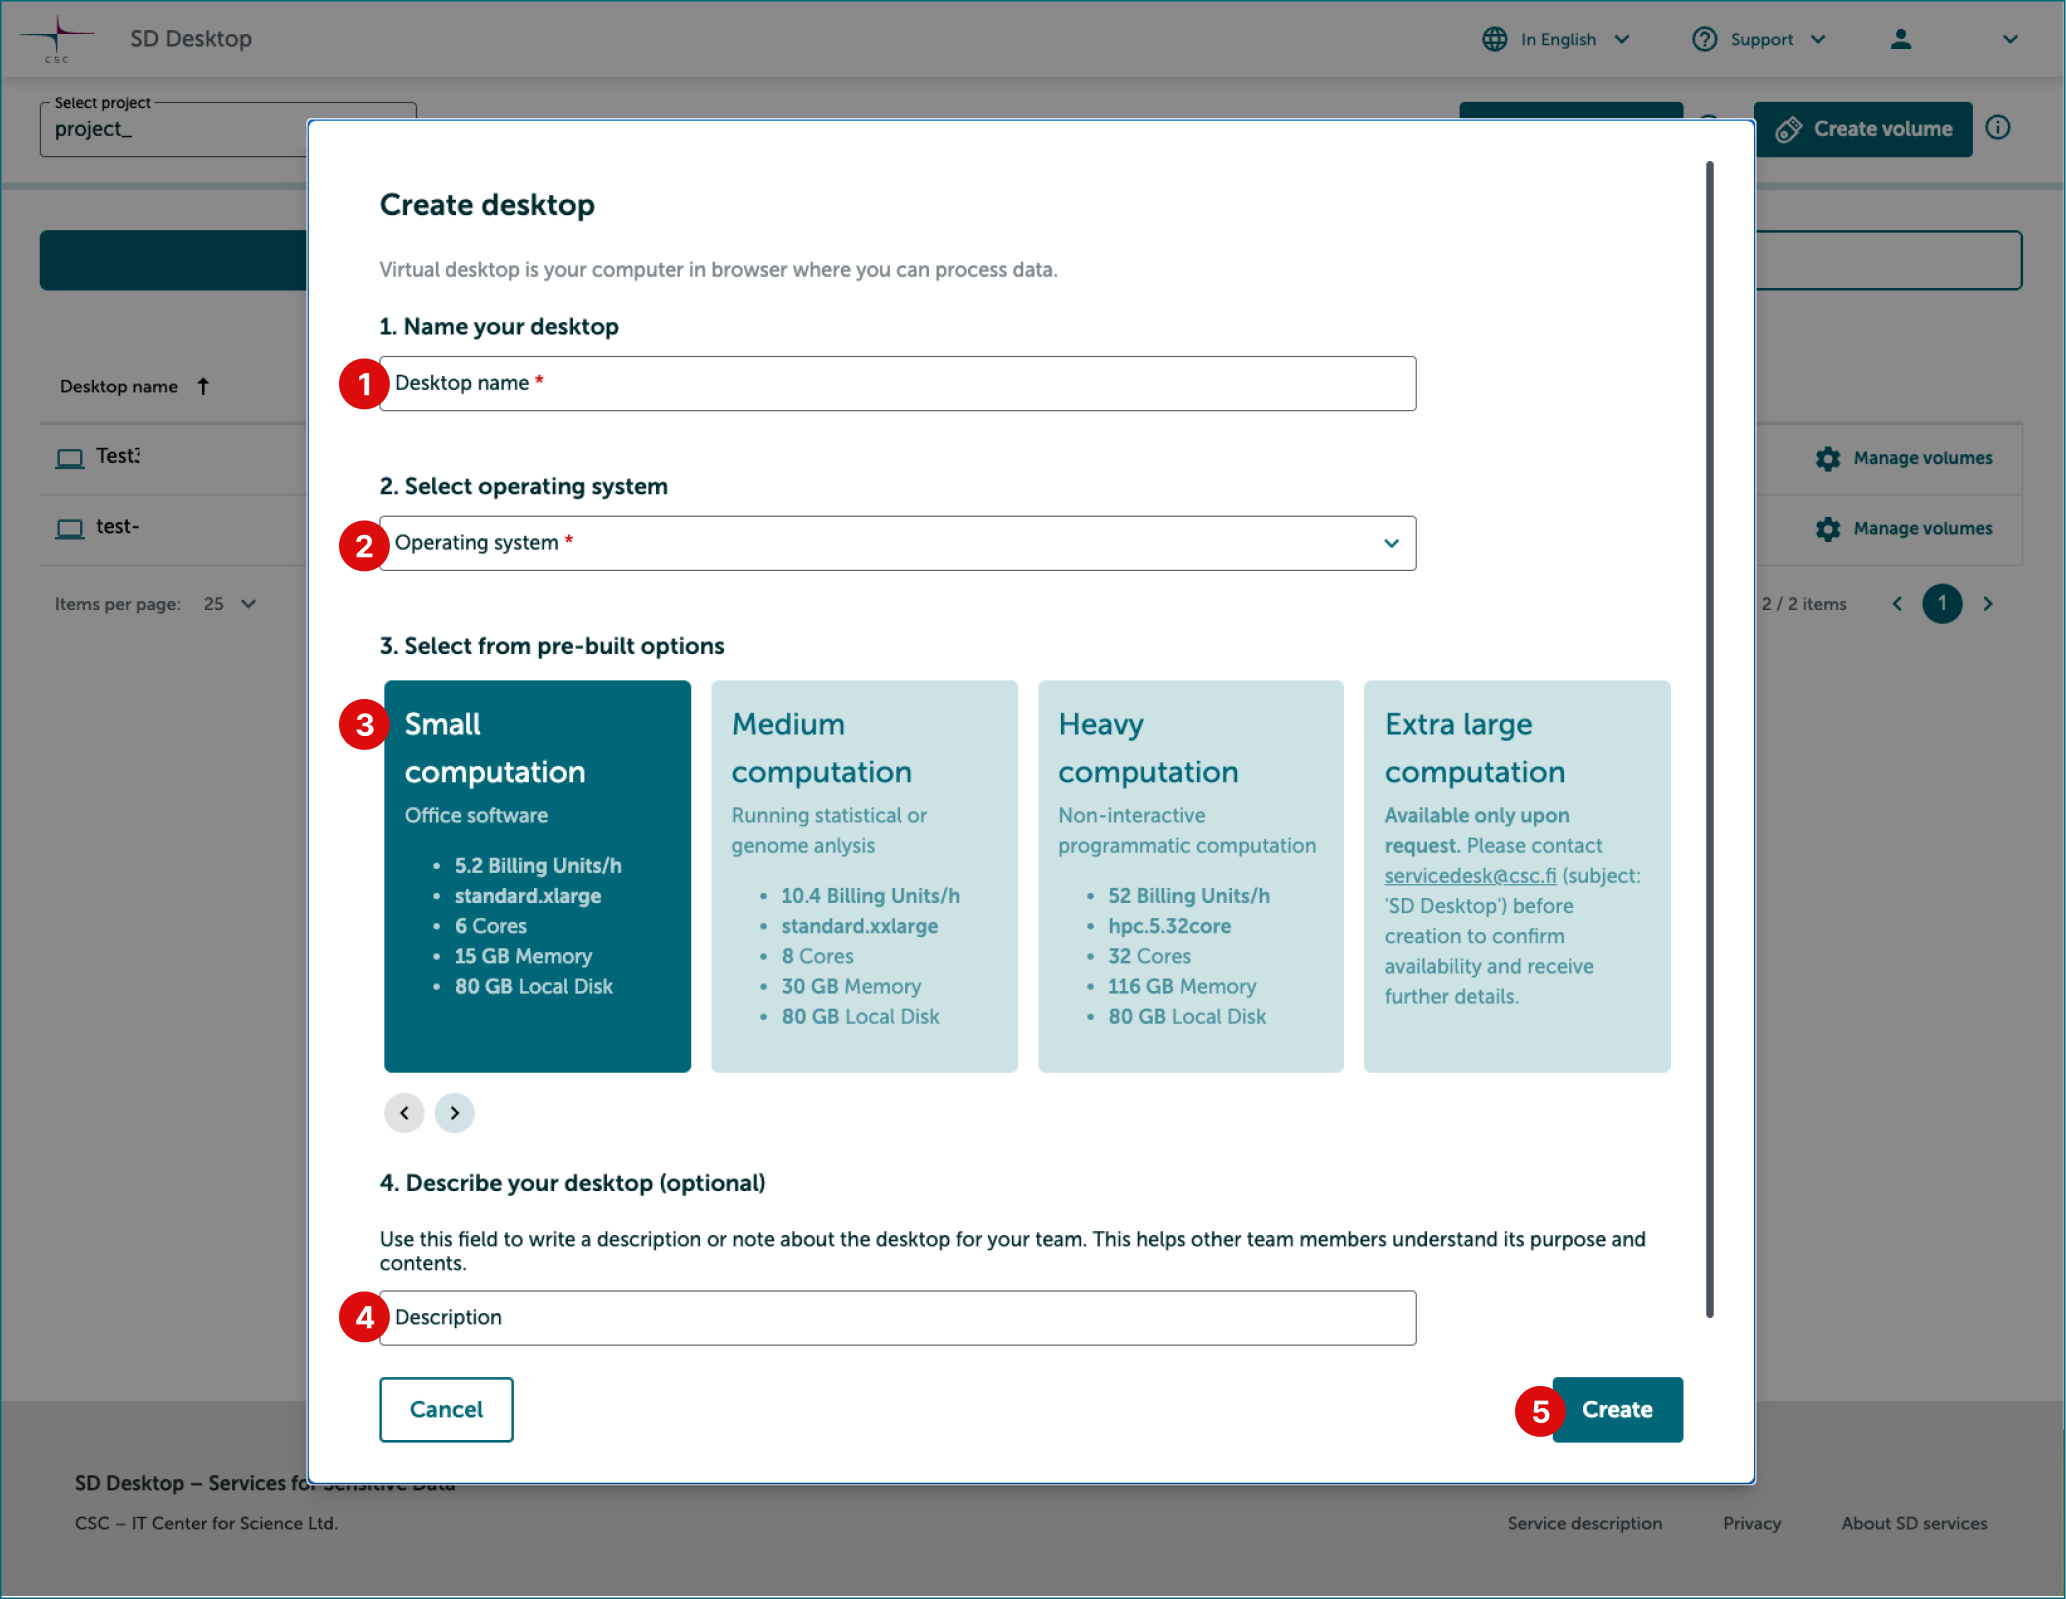
Here:
-
Select a name for your desktop. Choose a clear and descriptive name - especially if you're working on multiple projects - and make sure it only contains letters or numbers, with no special characters or spaces.
-
Operating system. Linux Ubuntu24 is already preselected by default.
-
Select a pre-built desktop option based on your needs. See options above
-
Write optional description or note about the desktop to help your team members understand its purpose and contents.
-
Click Create. The window will now close and desktop creation will start.
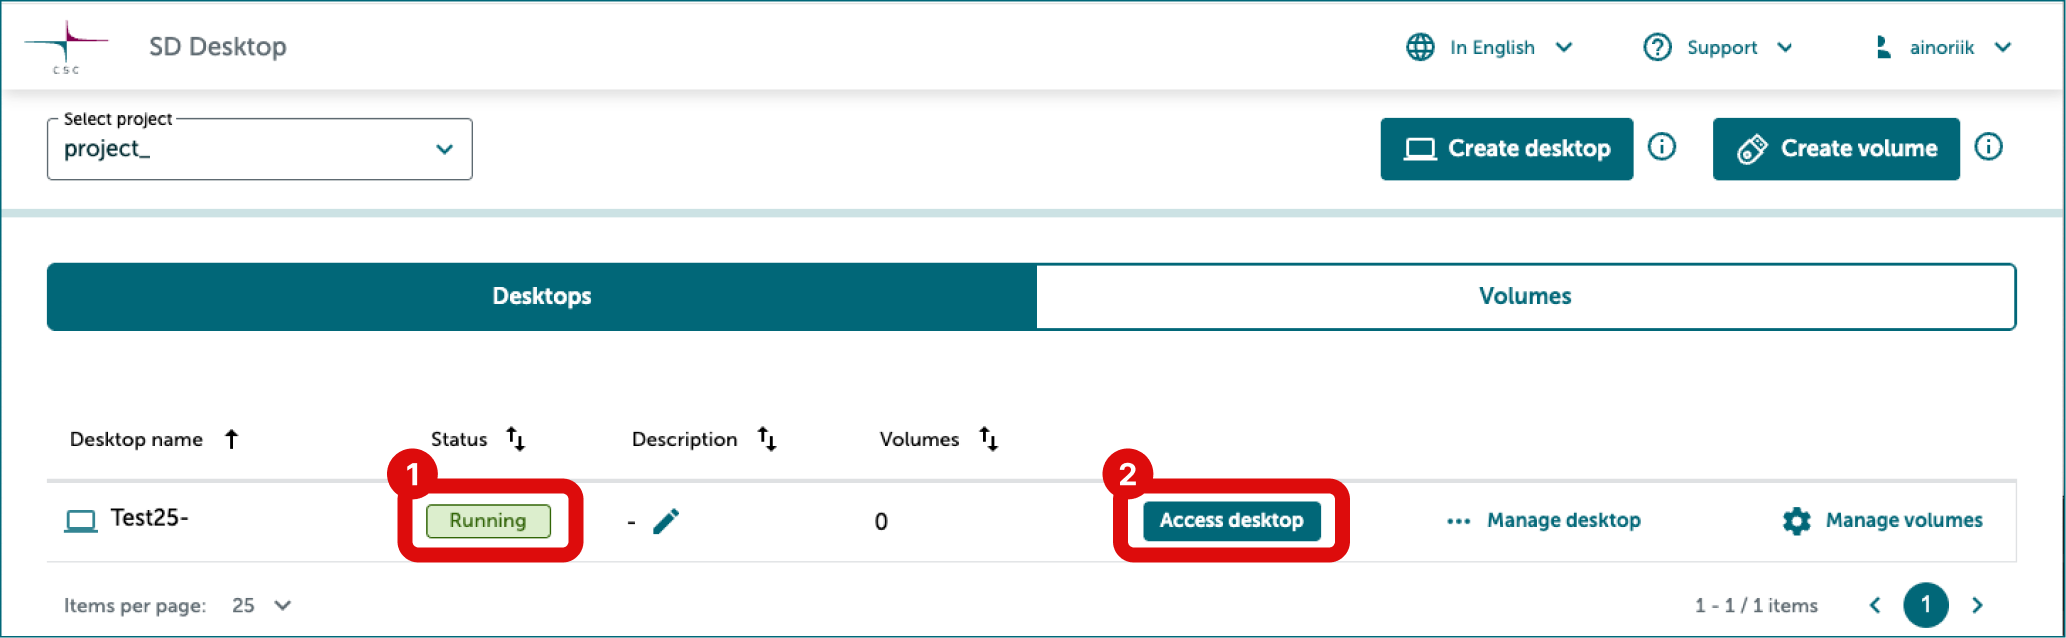
After returning to the main page, you’ll see a list of your desktops in Desktops tab. Creating a desktop can take up to 15 minutes, during which the status label Creating will appear next to its name. If you try to open it too soon, you’ll get an error message. Once the status changes to Running, the desktop is ready for the next step and for being accessed.
-
Desktop storage limit
Desktops have 80 GB of storage by default. If you save more than 80 GB of data to your desktop, it becomes unresponsive and you may lose your data. To avoid this, please create and attach a volume to your desktop and save your data there.
3. Attach the volume to the virtual desktop
Note
This option is only available for virtual desktops created after 25 September 2026.
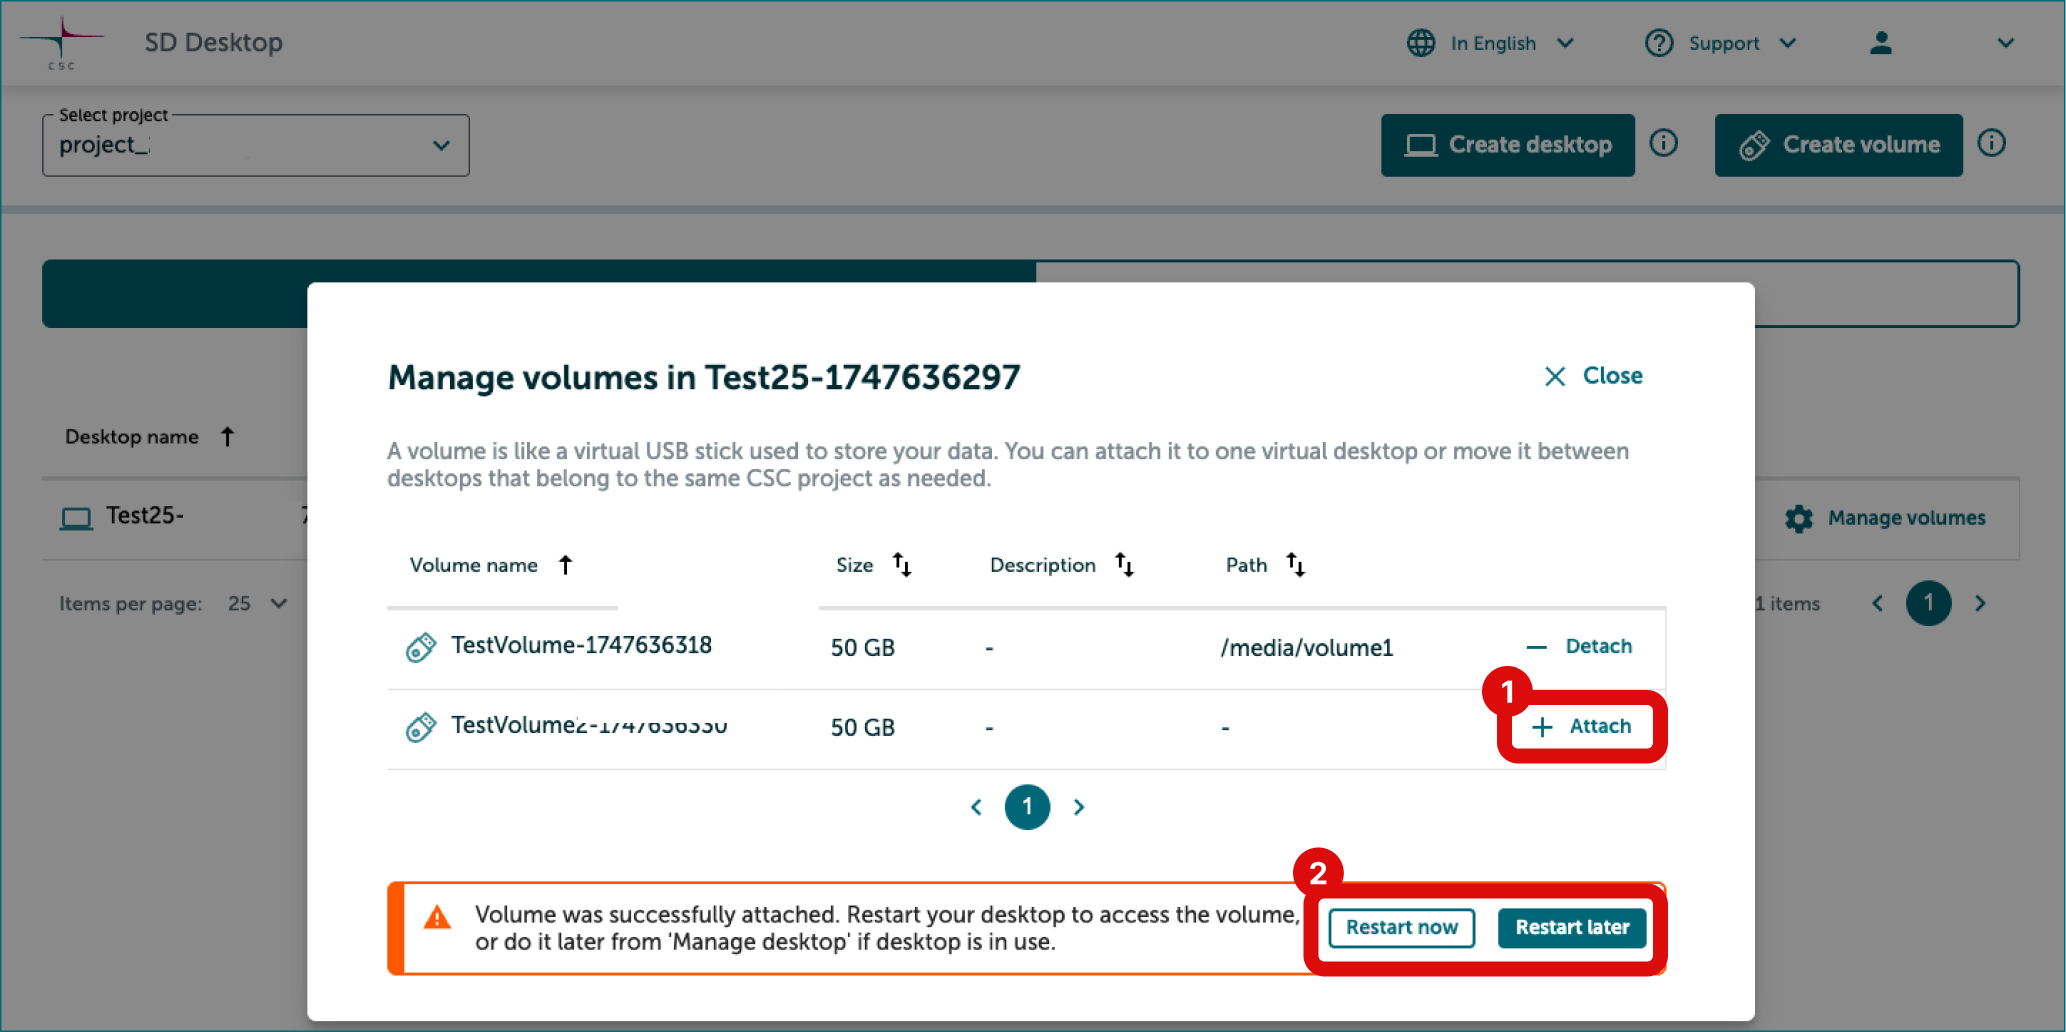
Once you have created a virtual desktop and a volume, you can connect them. Each volume can be attached to only one desktop at a time but you can attach multiple volumes to the same virtual desktop when needed.
-
On the SD Desktop homepage, locate the virtual desktop you want to attach the volume to.
-
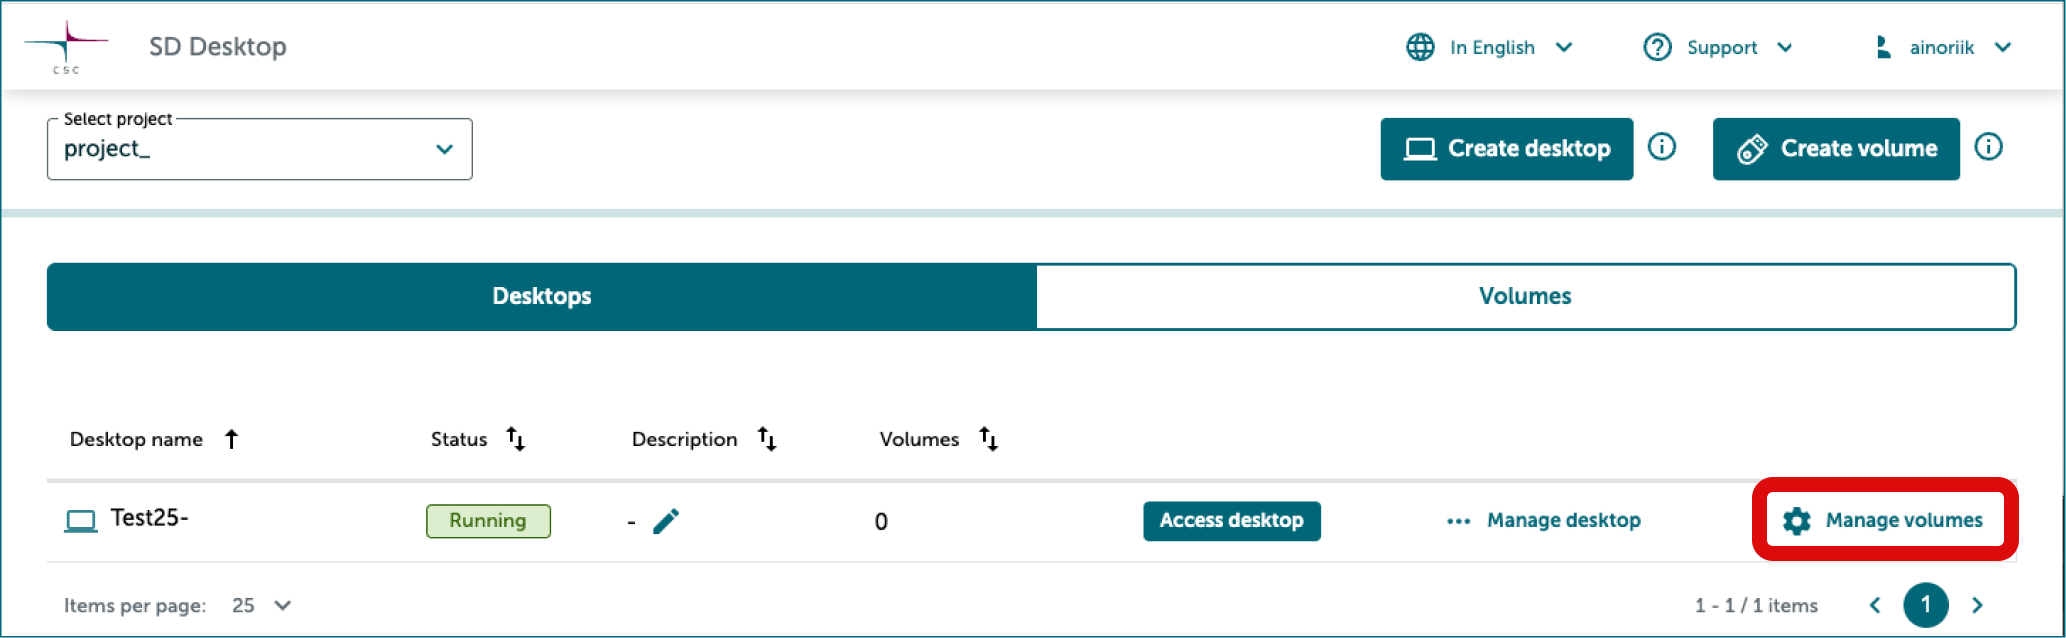
On the right side of the virtual desktop, click Manage volumes. The Manage volumes window opens.
-
Here, locate the volume you want to attach.
-
Click Attach on the right side of the volume.
-
Once the volume is attached, close the Manage volumes window.
4. Make sure your CSC project has sufficient Billing Units (BU).
Once created, your virtual desktop and any associated storage volumes begin consuming resources, measured in Cloud Billing Units (BU), from your project allocation.
Please review the following important information:
-
Ensure sufficient Billing Units (BU) are available in your project before creating a virtual desktop. If necessary, apply for additional BU by following the step-by-step guide, which includes example estimates to help you determine your requirements..
-
Virtual desktops consume Billing Units based on the selected option. When a virtual desktop is paused, consumption is significantly reduced; however, approximately 3,200 BU per year will still be charged until the virtual desktop is deleted deleted.
-
External volumes consume Billing Units continuously based on their allocated size. Charges apply regardless of whether the volume is attached to a virtual desktop or whether the desktop is running or paused. Billing continues until the volume is deleted.
-
If your project's BU balance becomes negative:
-
All virtual desktops in the project will be automatically paused.
-
You will not be able to create new virtual desktops.
-
The CSC project will be scheduled for closure after 60 days. After approximately 90 days, the project and all associated content will be permanently deleted.
You will receive automated email notifications throughout the process, including warnings, status updates, and instructions on any actions that may be required.
5. Important considerations
-
Your virtual desktop is accessible to all the CSC project members upon creation. All project members can import file, install software, permanently delete the virtual desktop and its entire content. Only the CSC project manager can export files from the secure environment.
-
Each CSC project supports up to 6 virtual desktops, with 10 project members allowed to connect simultaneously to each desktop.
-
All desktops come with a set of pre-installed open-source software managed by CSC. Read more about pre-installed software and customization..
-
Delete or pause unused desktops: Ensure to delete or pause your desktop when not in use. You will receive email notifications after 14 days of inactivity.
Need assistance?
If you're uncertain about which desktop to choose or need support for your research, contact CSC Service Desk with the subject "SD Services".