VM lifecycle & saving Cloud BUs
This article explains the different states that virtual machine instances can have and their effect on resource usage.
Similar to other cloud providers, Pouta virtual machines also have a lifecycle. Different states of virtual machines have different resource requirements for the underlying hardware and are therefore billed differently. Knowing about these different states in Pouta helps you make better decisions on how to maintain your infrastructure. This also helps you to save Cloud Billing Units.
States
The main states of virtual machines in Pouta:
Active
A virtual machine is said to be active when it is in the power on state. It remains in the active state irrespective of whether you are using it or not. Virtual machines in the active state consume computing resources on one of our compute nodes and are thus billed normally as explained in Pouta flavors and billing.
Shut off
The virtual machine is not running and is powered off. However, a shut off virtual machine still consumes Billing Units in the same way as an active one. This is because active/powered off virtual machines consume the same computing resources on one of our compute nodes as explained in Pouta flavors and billing.
Warning
A shut off virtual machine still consumes Cloud Billing Units. To stop consuming, select the shelved state.
Pause
Pausing a virtual machine pauses all processes running in the virtual machine and saves the entire state of the machine (memory, application state etc.) on the host compute node. You are not able to access your virtual machine or hosted applications when the virtual machine is in a paused state. Some applications may suffer from side effects when paused, thus this state is not recommended for production systems. Some legacy computational tasks may benefit from the paused state but modern workflows generally do not use this state. Pausing a virtual machine is billed in the same way as an active state virtual machine.
Warning
A "paused" virtual machine may be powered off during maintenance operations.
Suspend
Suspending a virtual machine saves its current state on the virtual machine's host compute node. The virtual machine can be resumed in the same state as it was before the suspension, but compute resources (actual cores, compute nodes etc.) may be different from the ones before suspending the virtual machine. You are not able to access your machine when it is in the suspended state. Virtual machines in the suspended state are billed in the same way as active state virtual machines. Suspending is not generally used in modern workflows.
Warning
A "suspended" virtual machine may be powered off during maintenance operations.
Shelved
Shelving means shutting down a virtual machine and removing it from the host compute node. This frees up the computing resources that were reserved for the virtual machine. However, the state of all other associated resources, for example the file system, floating IPs, network configuration, etc., is saved in our central storage. Please note that shelving a virtual machine will not reduce the amount of resources used by the project, only the billing for that virtual machine will stop.
Shelving works best for the standard flavors that are already backed by our central storage service. Shelving can be slow for flavors that are using local storage, especially bigger flavors since the data needs to be copied between the local and central storage. On a rare occasion, if all of our compute resources are used up, we may not be able to unshelve your virtual machine until another user frees up compute resources. N.B. that your floating IPs, volumes etc. cannot be removed from the virtual machine before it has been unshelved. If you have a floating IP quota of two and one of them is attached to a shelved virtual machine, you have only one left. Note that the ephemeral storage in the IO, or TB flavors is not shelved.
Terminate
Termination (or deletion) removes the virtual machine from your project and frees up the compute resources that were in use. They cannot be recovered, and all data stored in the virtual machine is deleted, excluding any attached volumes. Once the virtual machine is deleted, you are no longer billed for it.
Save your Cloud Billing Units
The figure below illustrates the state transitions between states.
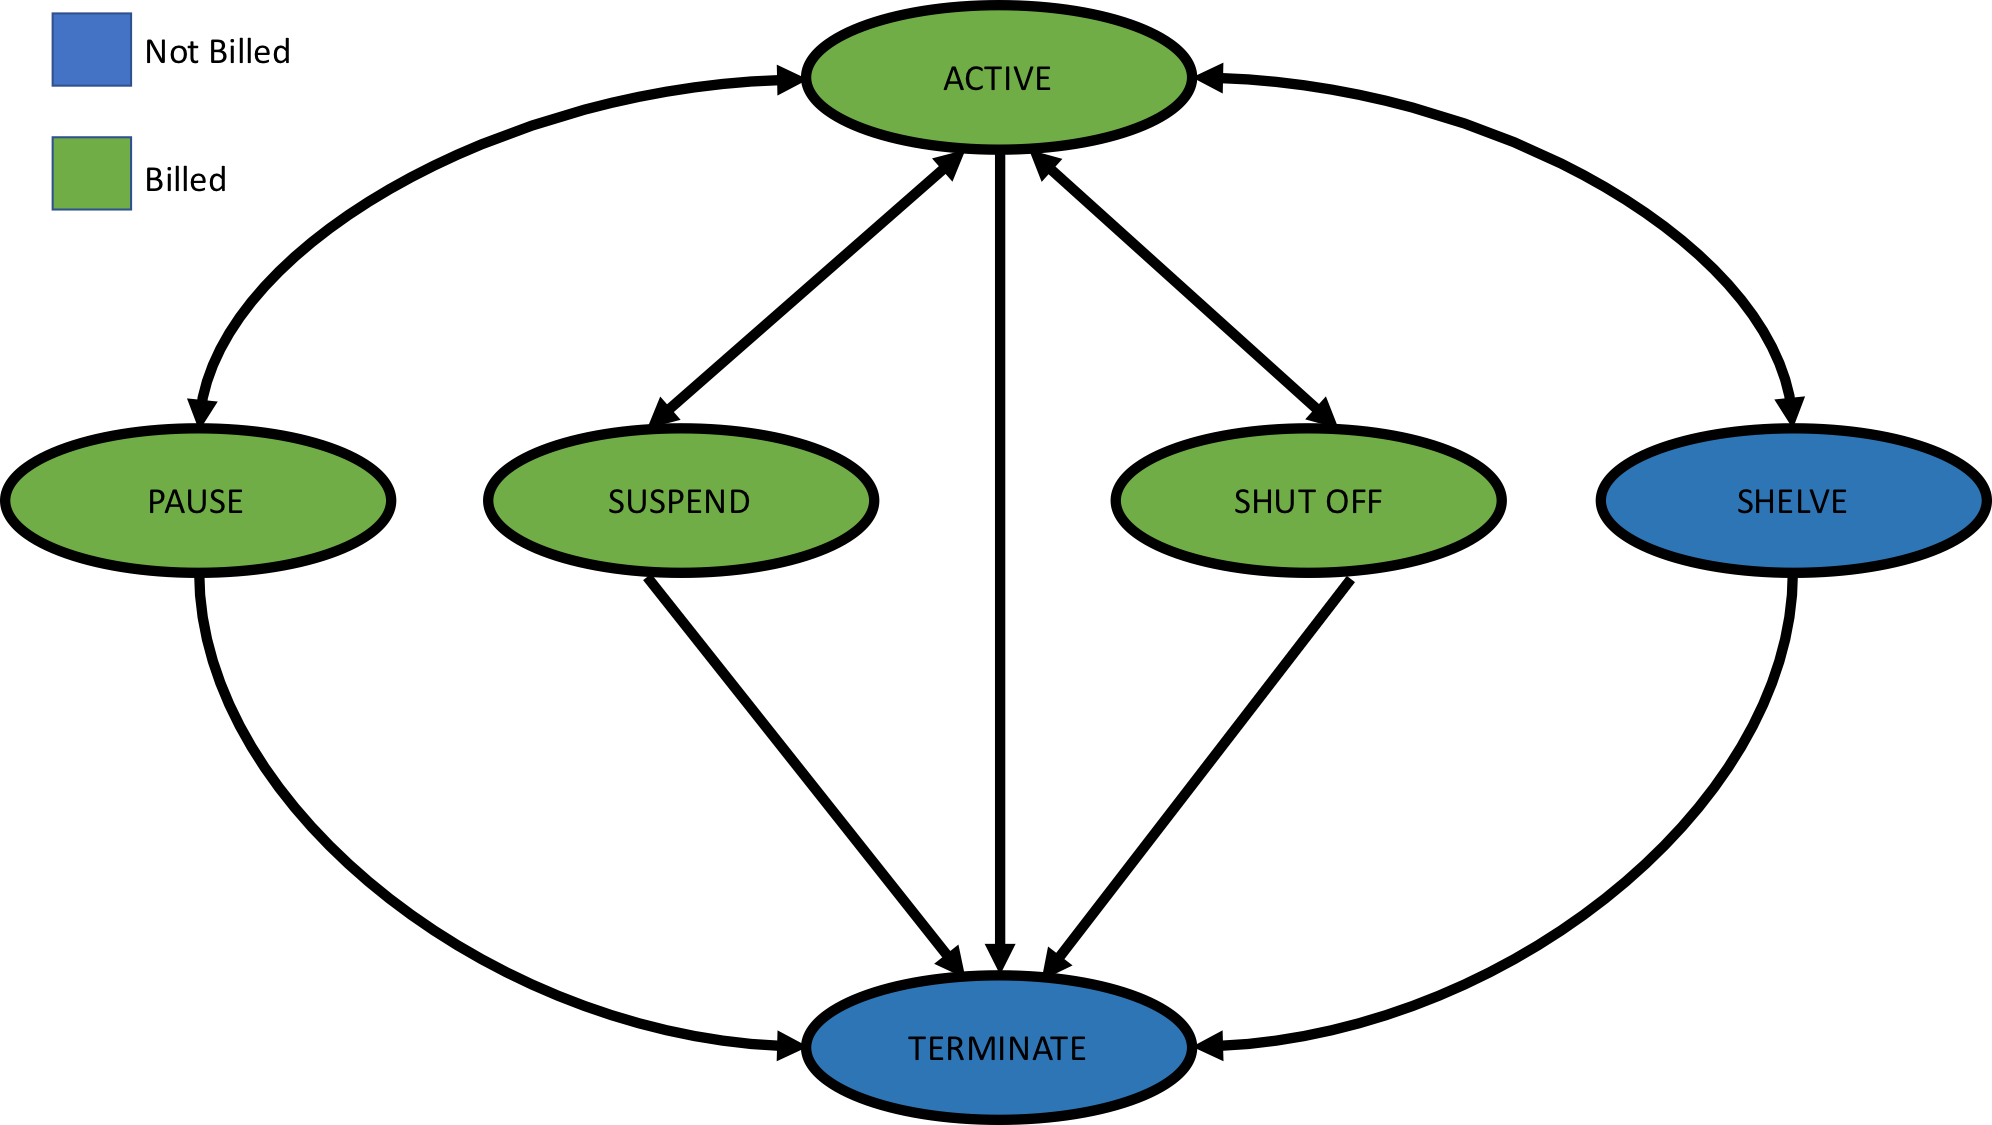
In the above section, we discussed the main states of virtual machines in Pouta. Theoretically, there are other states as well. The full list of states and their behaviors: OpenStack documentation.
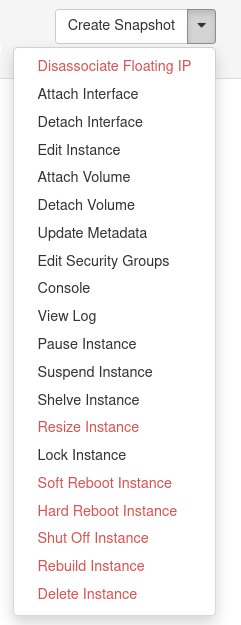
In order to transition between states, you have two main options, use the Command line client tools, or use the webinterface. From the web interface you can transition your VM to all these states. In the main page of the Pouta web interface, open the Instances view. Under the Actions column, you will be able to see a drop-down menu with all the possible options.
There are many other practices which help save Cloud Billing Units:
Automated provisioning
Automated provisioning and configuration of your virtual machines helps save Cloud Billing Units. For example, you can tear down your unused virtual machines with automatic provisioning and configuration when you no longer need them. Later when you need them again, you can provision new virtual machines from scratch. Your data should always be stored on a volume, and virtual machines should be launched when you need computation done.
An example how to automate a workflow with Heat, Ansible and Docker to deploy Etherpad containing both clustered database and Load balancing: https://github.com/CSCfi/etherpad-deployment-demo
Boot from image
A good utility in Pouta is creating your own virtual machine using the Boot from image (creates new volume) option. In this case, even if you delete your virtual machine, the entire file system state is saved on the persistent volume in our central storage service. You can boot a new virtual machine from this volume. It will have the same file system state as the previously deleted virtual machine. You can attach this volume to any other virtual machine and access the file system of the deleted virtual machine. It is billed as a normal volume in Cloud Billing Units, which is cheaper than a running virtual machine. Creating virtual machines with this utility and deleting them when not needed helps save your Cloud Billing Unit allocation. One great option is that you can easily delete your virtual machine and start a new one with the same volume and a new flavor. This makes it possible to easily scale from a smaller virtual machine flavor to the biggest virtual machine flavors.
Info
This type of scaling is not recommended for the IO, GPU or TB flavors since ephemeral storage data is lost in this process.
Select a suitable state of your virtual machine
Depending on your project requirements, you can change the state of your virtual machines:
- In case you are going on a long vacation and want to save Cloud Billing Units, you can shelve your virtual machines.
- If you no longer require your virtual machine, you can delete it after copying all essential data from it to a volume.
You can transition between different states via the Pouta dashboard, command line tools or REST APIs, depending on your project setup. The most common states for virtual machines are active, shut down, shelved and deleted. There may be occasions when your virtual machine enters the error state. Virtual machines in the error state are still billed. In case your virtual machine enters the error state and you are unable to recover it, please contact cloud-support@csc.fi.
Resize your virtual machine
Resizing a virtual machine is a
good utility in Pouta, and helps save Cloud Billing
Units. Based on your project requirements, you can scale your virtual machine up or
down to other flavors. Scaling down your
virtual machine when it has less computational workload frees up
compute resources and saves Cloud Billing Units. Later on,
depending on your computational workload, you can scale up your virtual
machines. Please note that you can resize to another flavor from another family but it's highly not recommended!.
You may lose data during this process and CSC is not responsible. We recommend to only resize to the flavors of the
same family. For example, if you are using a standard
family flavor, you can only resize it to another standard family
flavor. When the resize is complete, the virtual machine status first
displays verify resize. At this point, you need to confirm again if
your virtual machine has been resized as expected. Resizing will have
downtime for the virtual machine until the whole resize process has
been completed. Note that resizing is not as elegant as using the boot
from volume option explained above. If you know beforehand that you want change the
size of the virtual machines at some point, using boot from
volume when launching the virtual machine gives more
flexibility.
More information about how to resize an instance here