Table of contents of user guide
Managing virtual desktops and volumes
With the SD Desktop service, you can easily manage your virtual desktops and volumes.
- Attaching or detaching a volume
- Pausing or resuming a virtual desktop
- Restarting a virtual desktop
- Deleting a virtual desktop
- Deleting a volume
-
Note
These options are available only on virtual desktops created after February 2, 2023. Please contact service desk if you are working with older desktops.
Attaching or detaching a volume
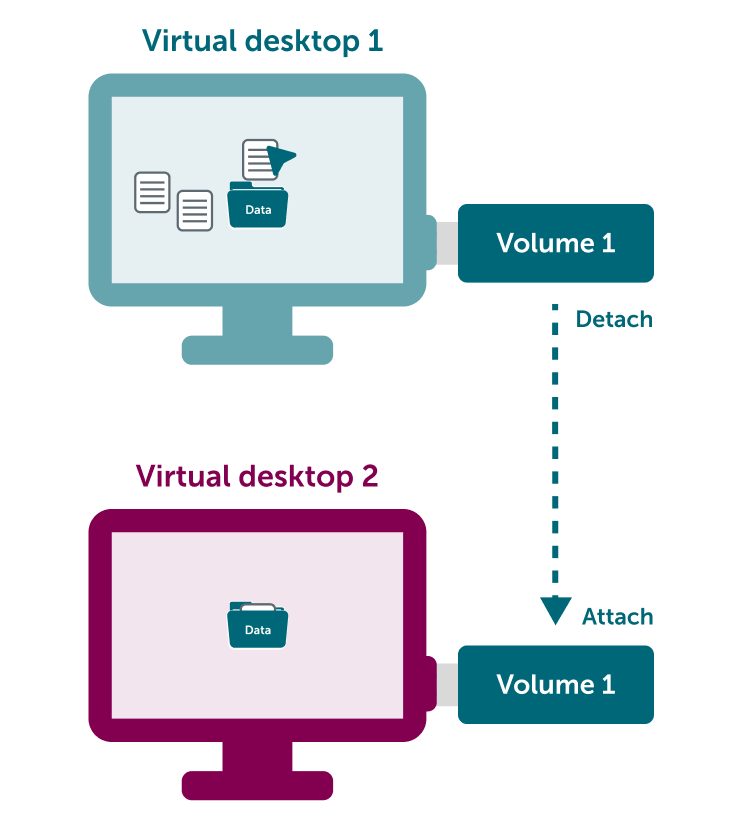
When you want to save, access or delete the data in a volume, you need to attach it to a virtual desktop that uses same operating system as the volume. This is similar to connecting a USB stick to your laptop.
Detaching a volume can be compared to disconnecting a USB stick from your laptop. The volume and its content will remain stored in the same CSC project where it was originally created. The content of a detached volume can not be accessed or deleted, you need to attach it to a virtual desktop first.
-
Note
Volumes can not be transferred between CSC projects for security reasons.
Attach a volume to a virtual desktop
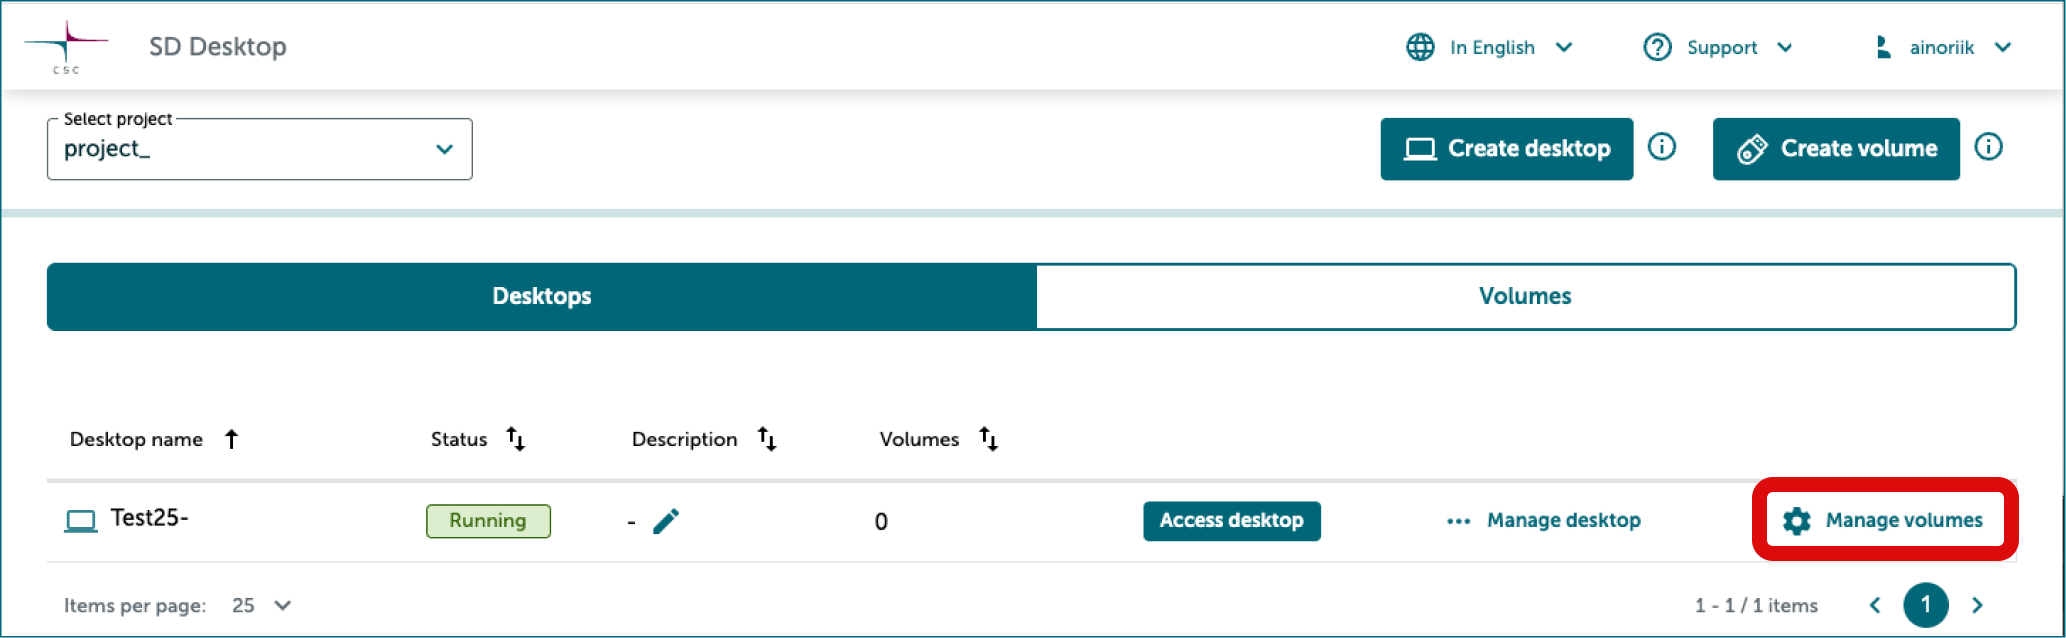
- Log in to SD Desktop. On the SD Desktop homepage, click Manage volumes on the right side of the correct desktop.
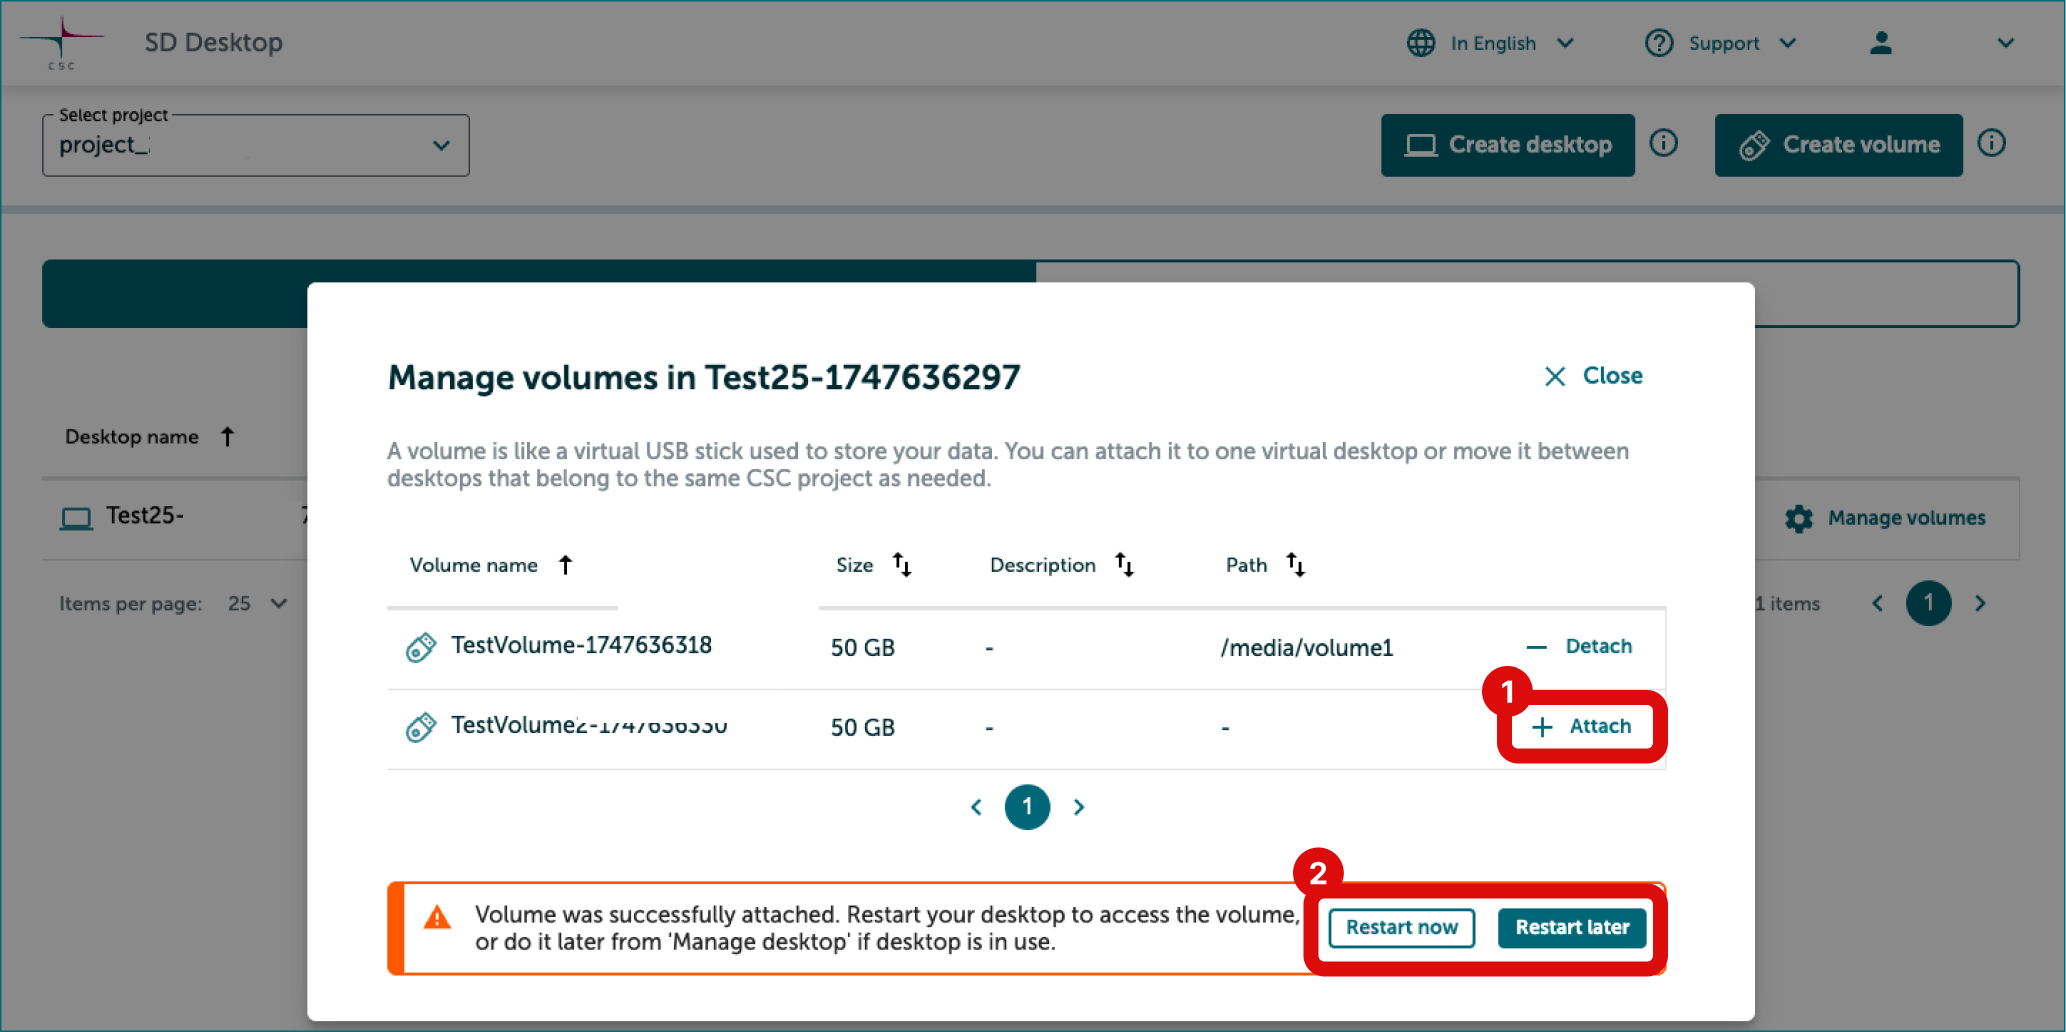
In Manage volumes window
- You will see a list of volumes that are available to be attached and/or are attached to the desktop. Click Attach on the right side of the volume you want to attach to the desktop.
- Close the window when you are ready.
Detach a volume from a virtual desktop
Step 1: Set access permissions of the volume to read and write
-
Ensuring full access to data on a volume across desktops
Before detaching a volume, make sure all files and folders have read and write access for all project members. This is due to fact that in the new virtual machine, where the volume will be used afterwards, the mappings between machine specific user ID numbers and user accounts may be different than in the original virtual machine. In practice this means that the user account that owns of the data may change on the way.
Method 1: Use CSC Tools to set access permissions
If you haven't SD Tools installer already installed on your virtual desktop, follow these instructions.
- Keep the Data Gateway connection open or launch Data Gateway:
- Select SD Connect.
- Click Continue.
- In the next view you are asked to choose a folder for accessible files. Check that Projects folder is selected.
- Click Continue.
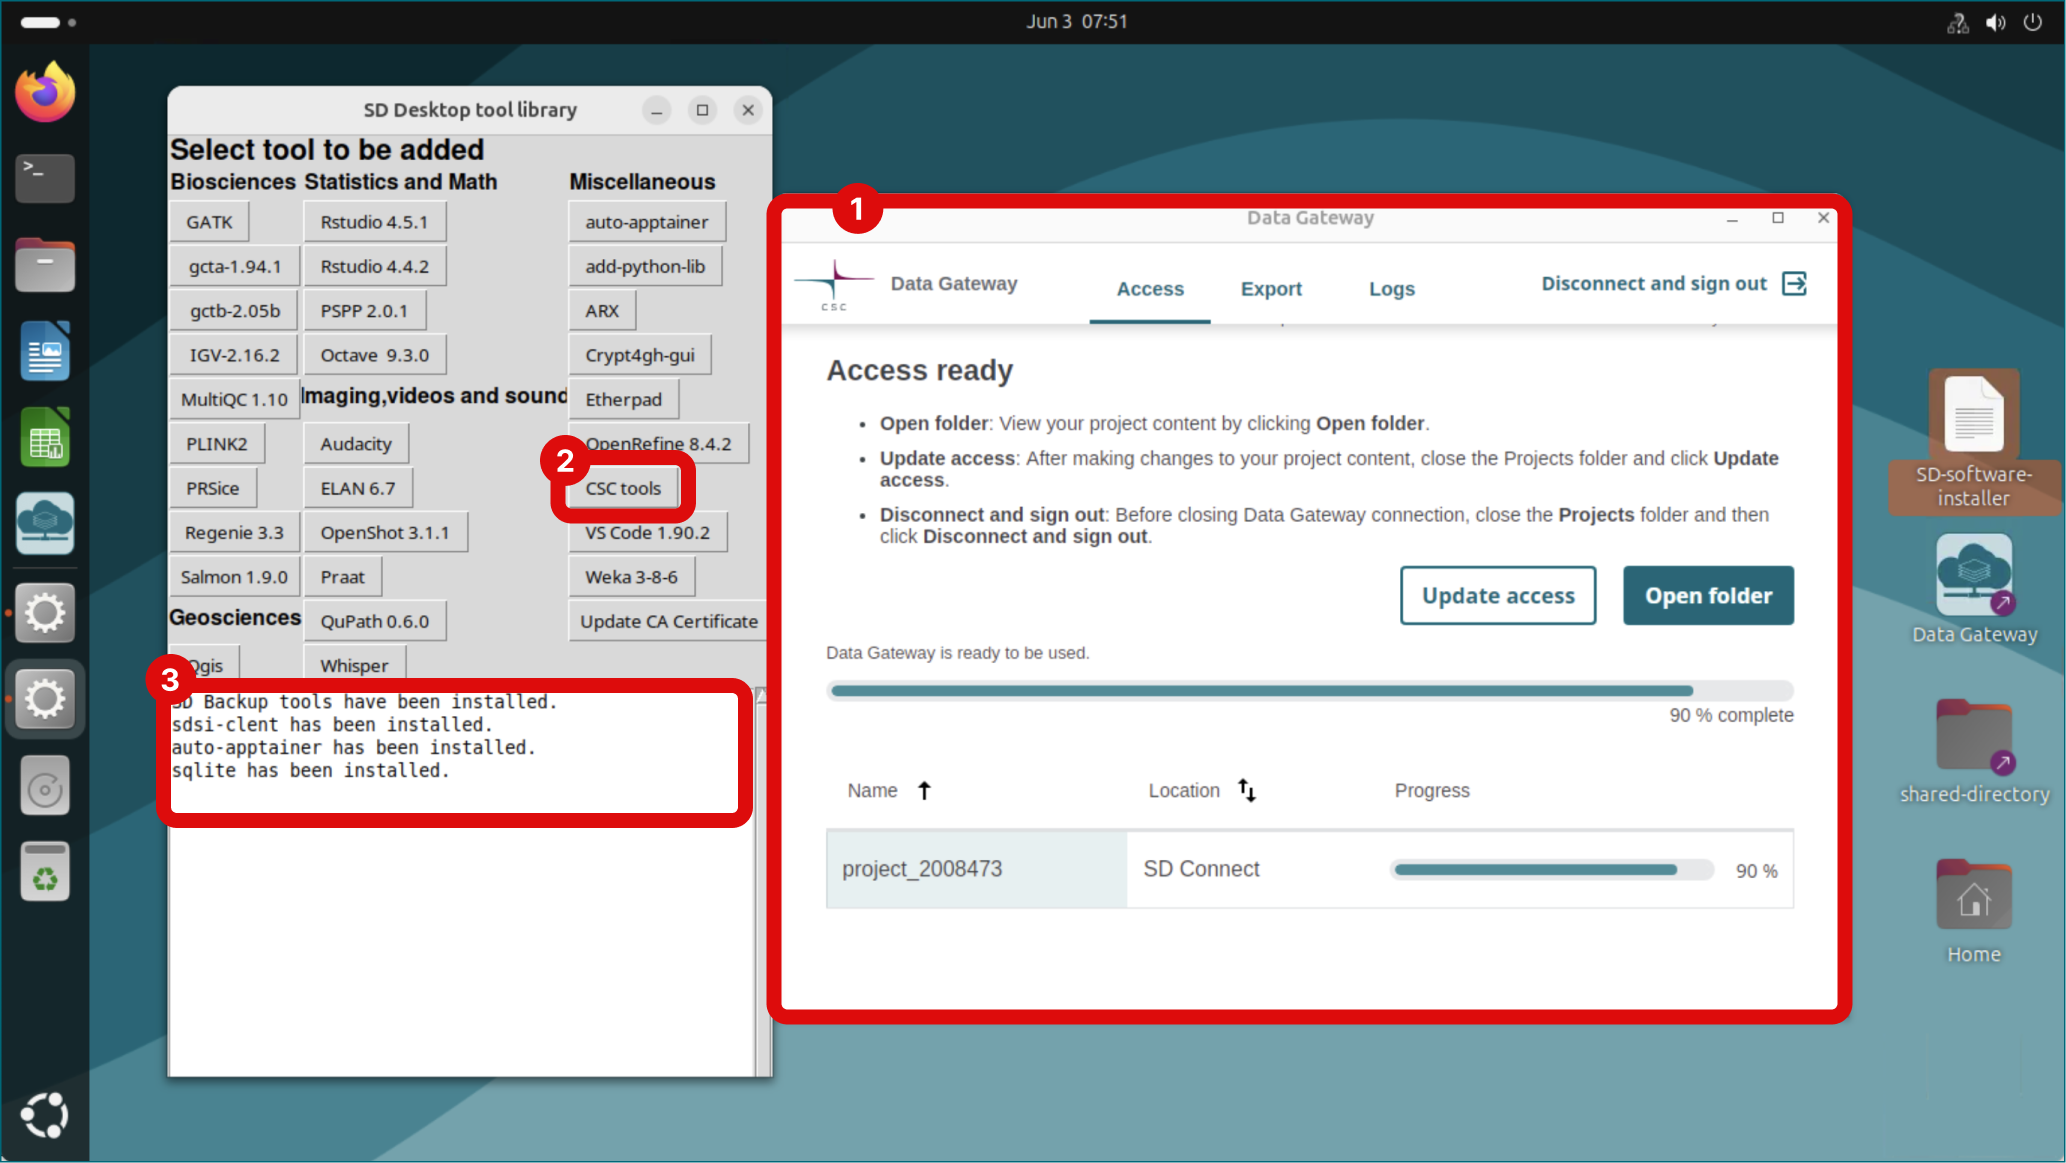
- Launch SD Software Installer by clicking the icon on your virtual desktop. The application will open and you can see the software available.
-
Install CSC Tools by clicking corresponding button. Wait for confirmation.
-
Open terminal from to left side of the desktop. Type in
pre-volume-detach. This command fixes the access permissions.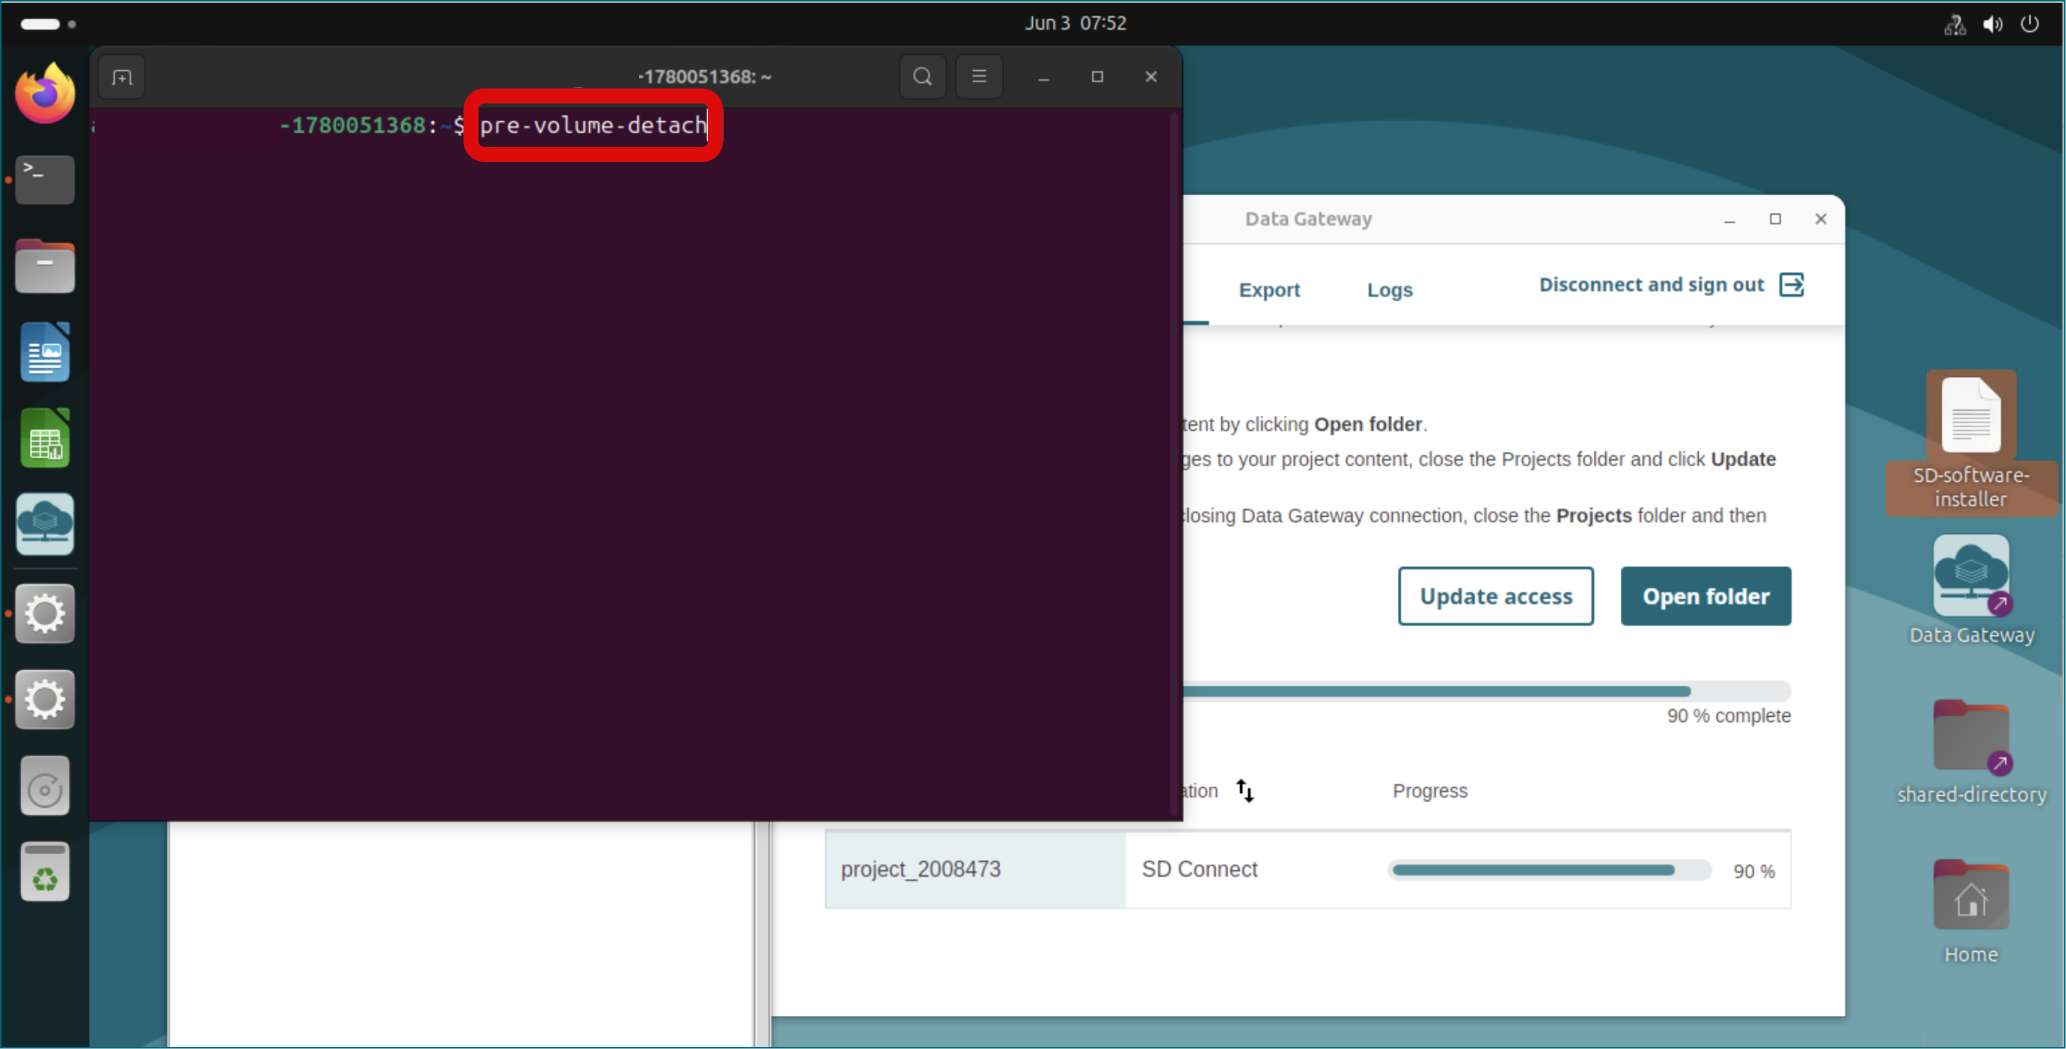
-
Next, the command tells if there are other project members who should run this command as well. You should inform them if this happens.
- You are then asked whether you want to make a backup copy of your home directory to the volume, allowing you to import its contents to the new virtual machine. Type y or n (Yes/No).
- Next, the command asks whether you want to make a backup copy of your shared directory, which contains software installations. Type y or n (Yes/No).
Method 2: Set access permissions manually
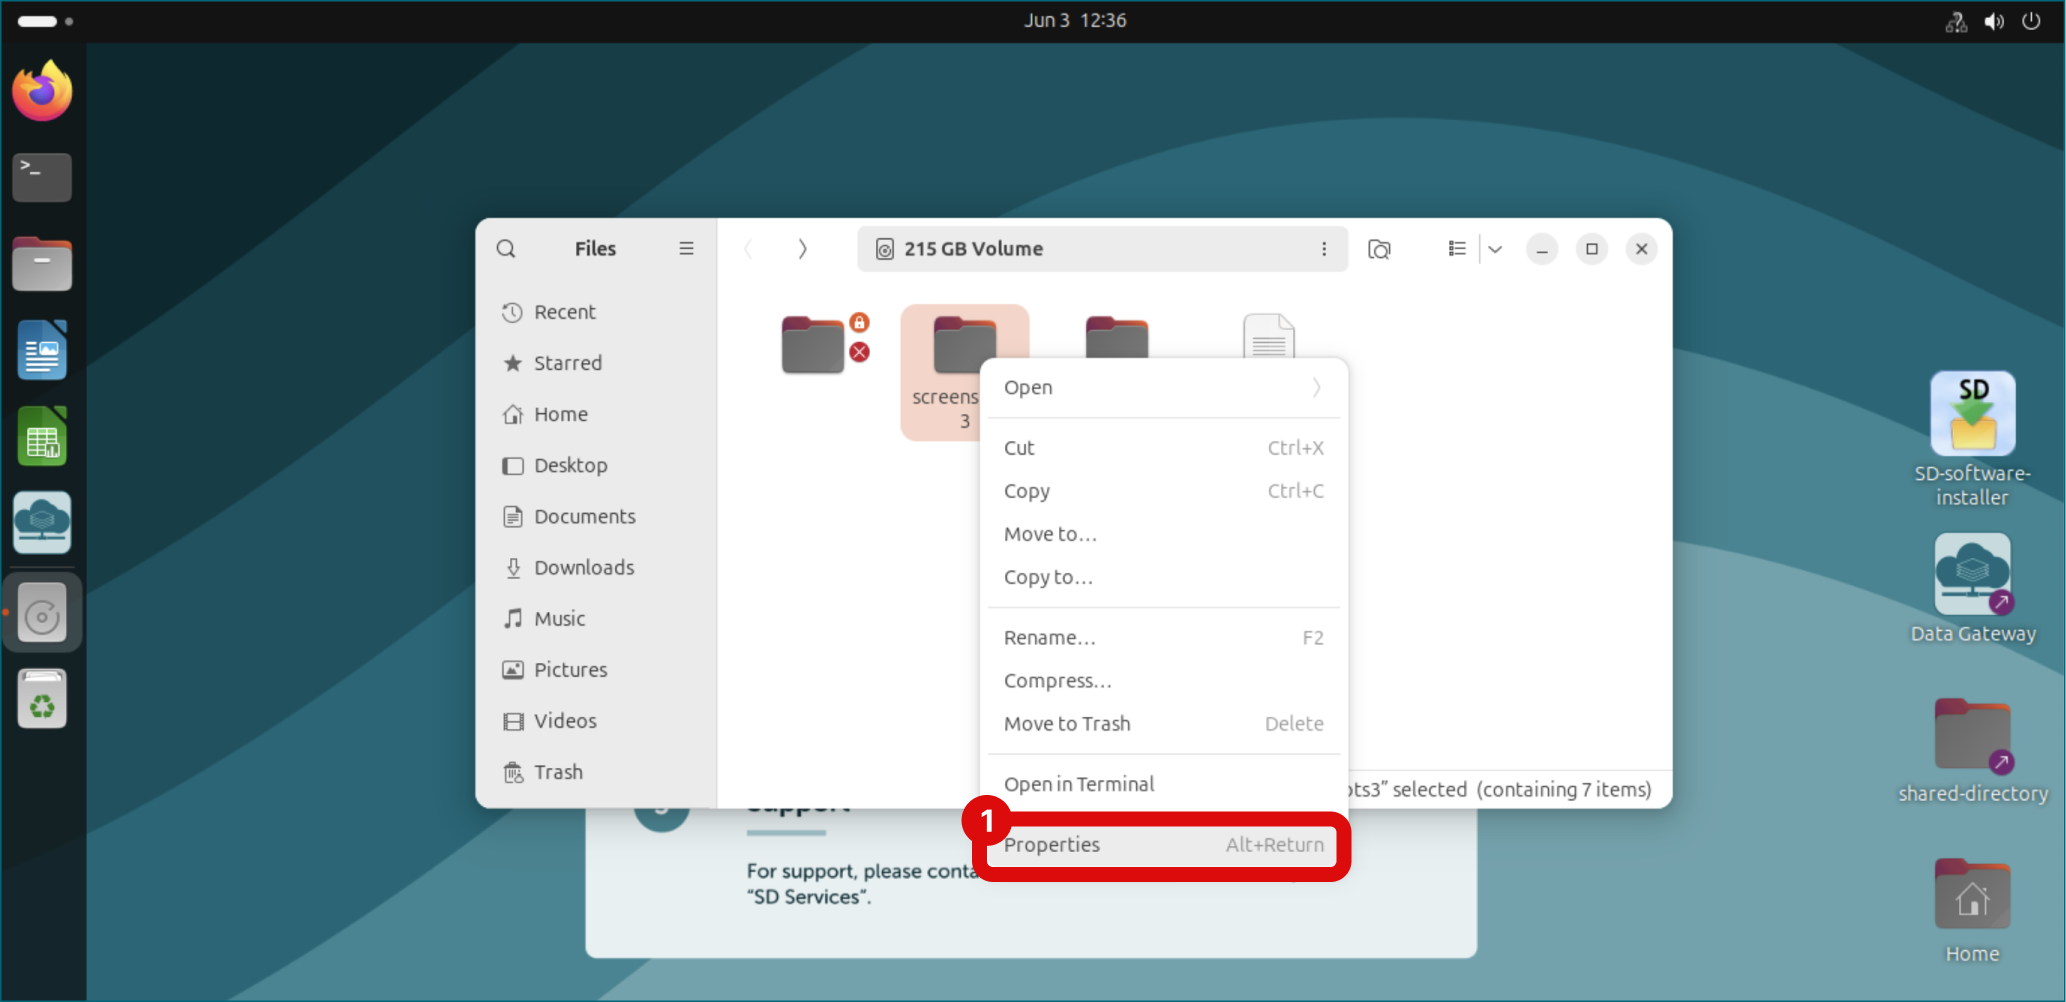
By default, permissions are limited to your access only (orange lock icon).
-
Right-click the folder and select Properties.
-
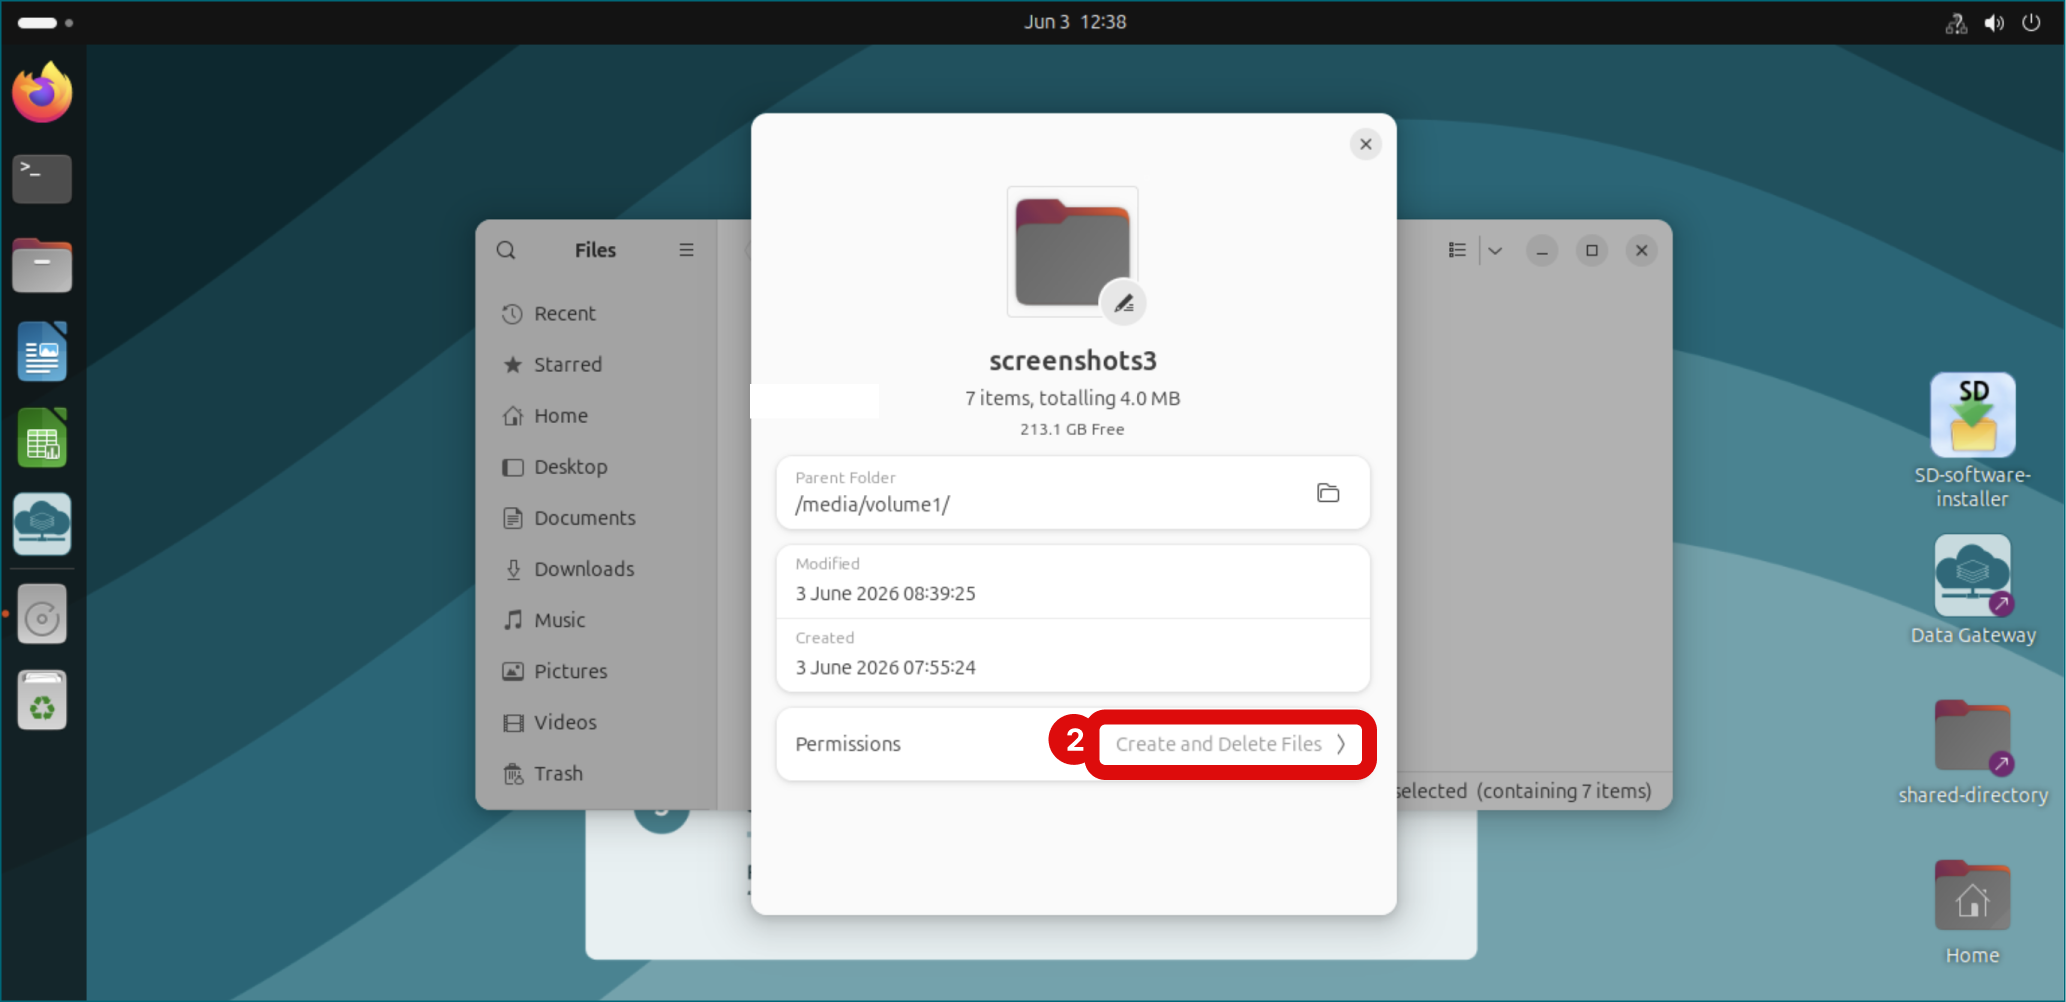
Open the Permissions tab.
-
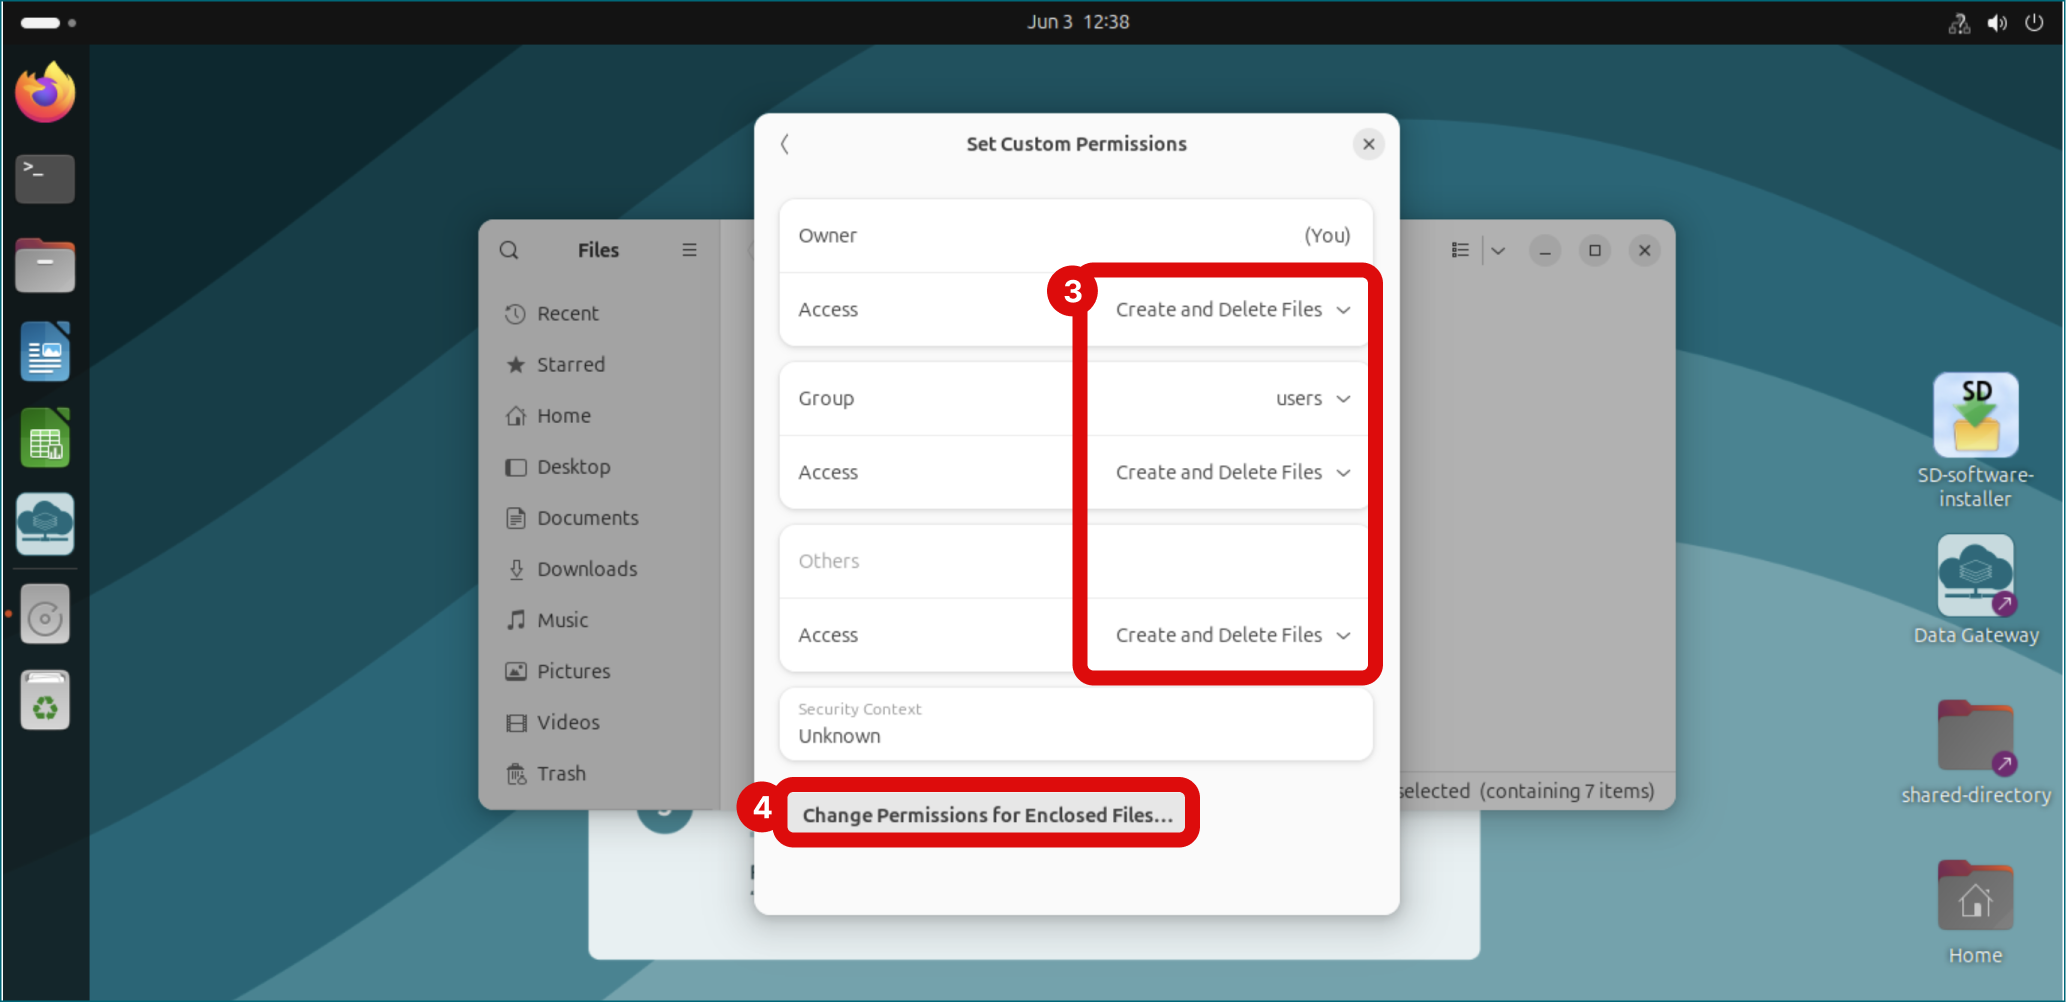
Set permissions to Create and Delete Files:
- Owner -> Access -> Select “Create and delete files”.
- Group -> Access -> Select “Create and delete files”.
- Others -> Access -> Select “Create and delete files”.
-
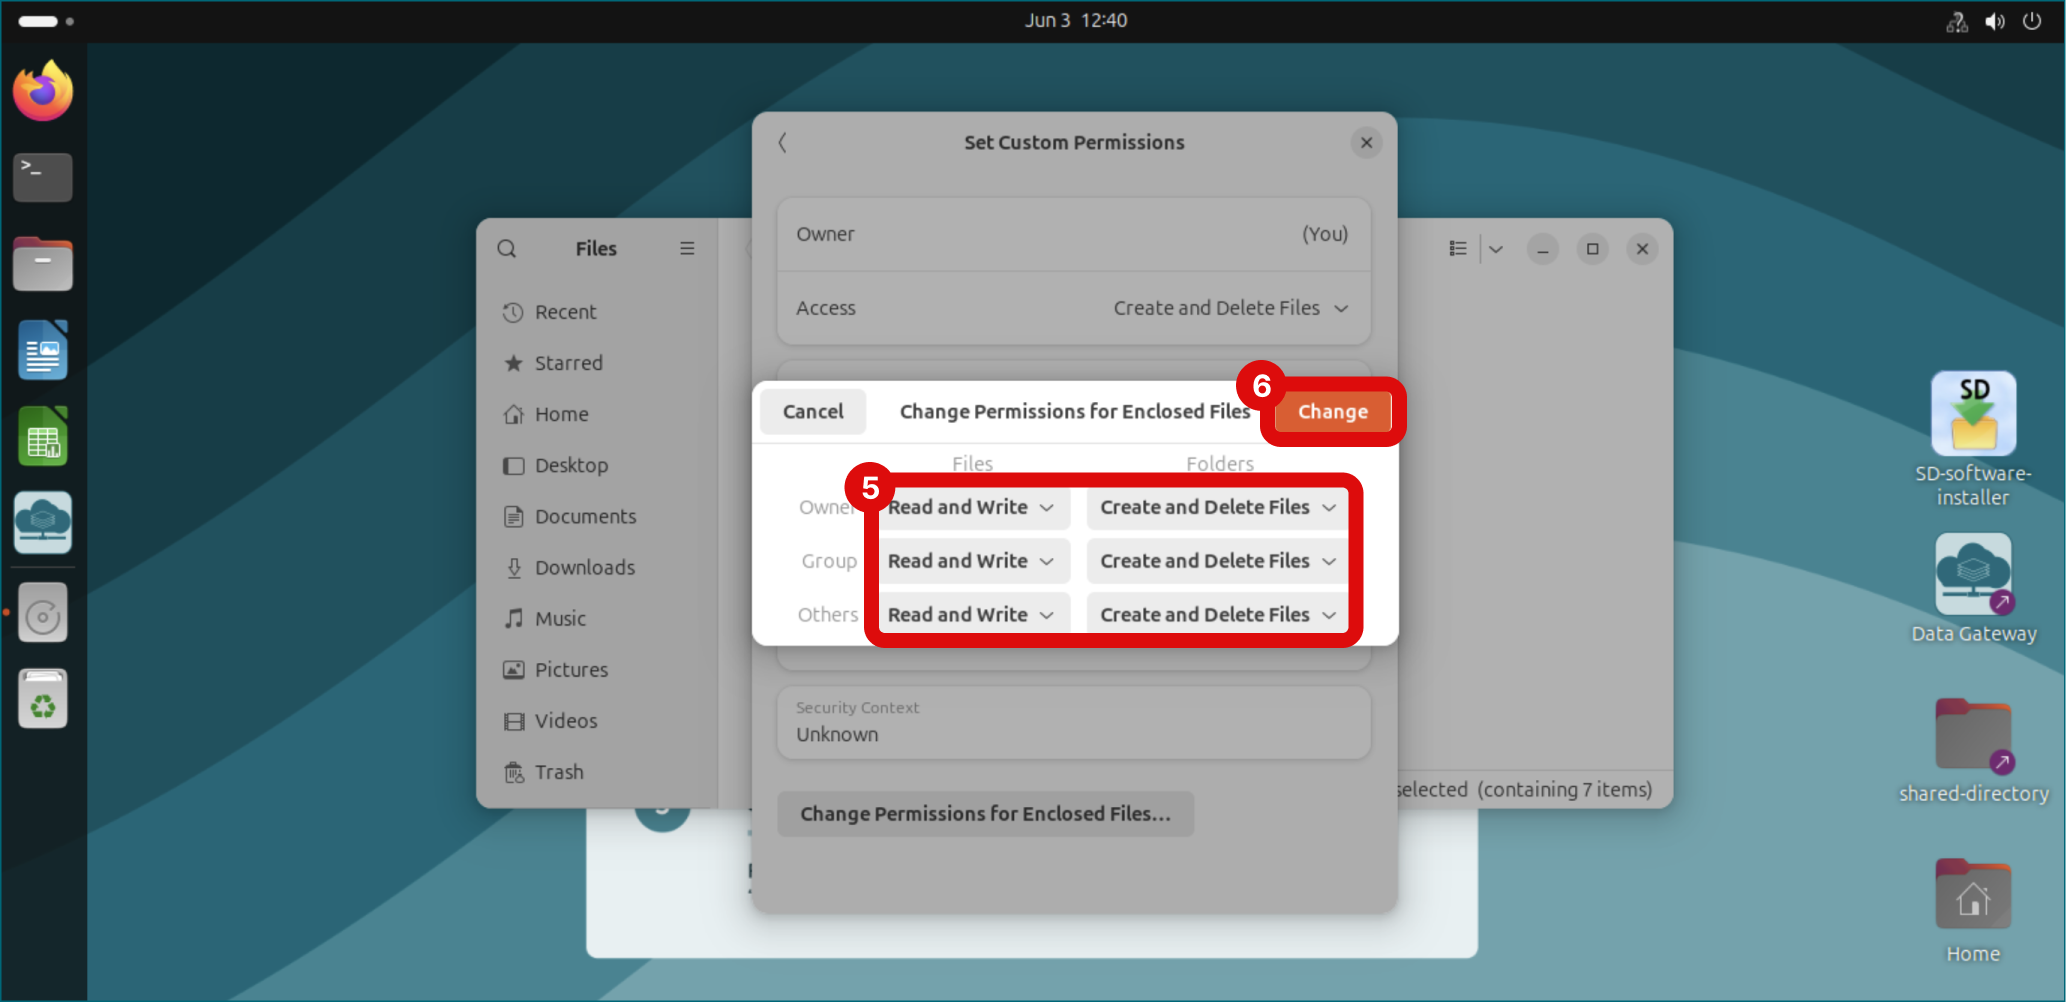
Next select Change Permissions for Enclosed Files button to adjust file permisssions inside the folder.
-
Set permissions to Create and Delete files:
- Owner -> Files -> Select “Read and write”. Folders -> Select “Create and delete files”.
- Group -> Files -> Select “Read and write”. Folders -> Select “Create and delete files”.
- Others -> Files -> Select “Read and write”. Folders -> Select “Create and delete files”.
-
Click Change.
- Close the permission tab (top right corner).
The orange lock icon will no longer be visible next to folders and files and they can now be edited by all project members.
Note: If you open the enclosed file permission settings again, it looks like the settings haven't changed even though the permissions have been set correctly.
Step 2: Detach a volume from a virtual desktop
-
Log in to SD Desktop. On the SD Desktop homepage, click Access desktop on the right side of the correct desktop.
-
Save and close all the files on the volume to prevent data corruption and log out from the virtual desktop.
-
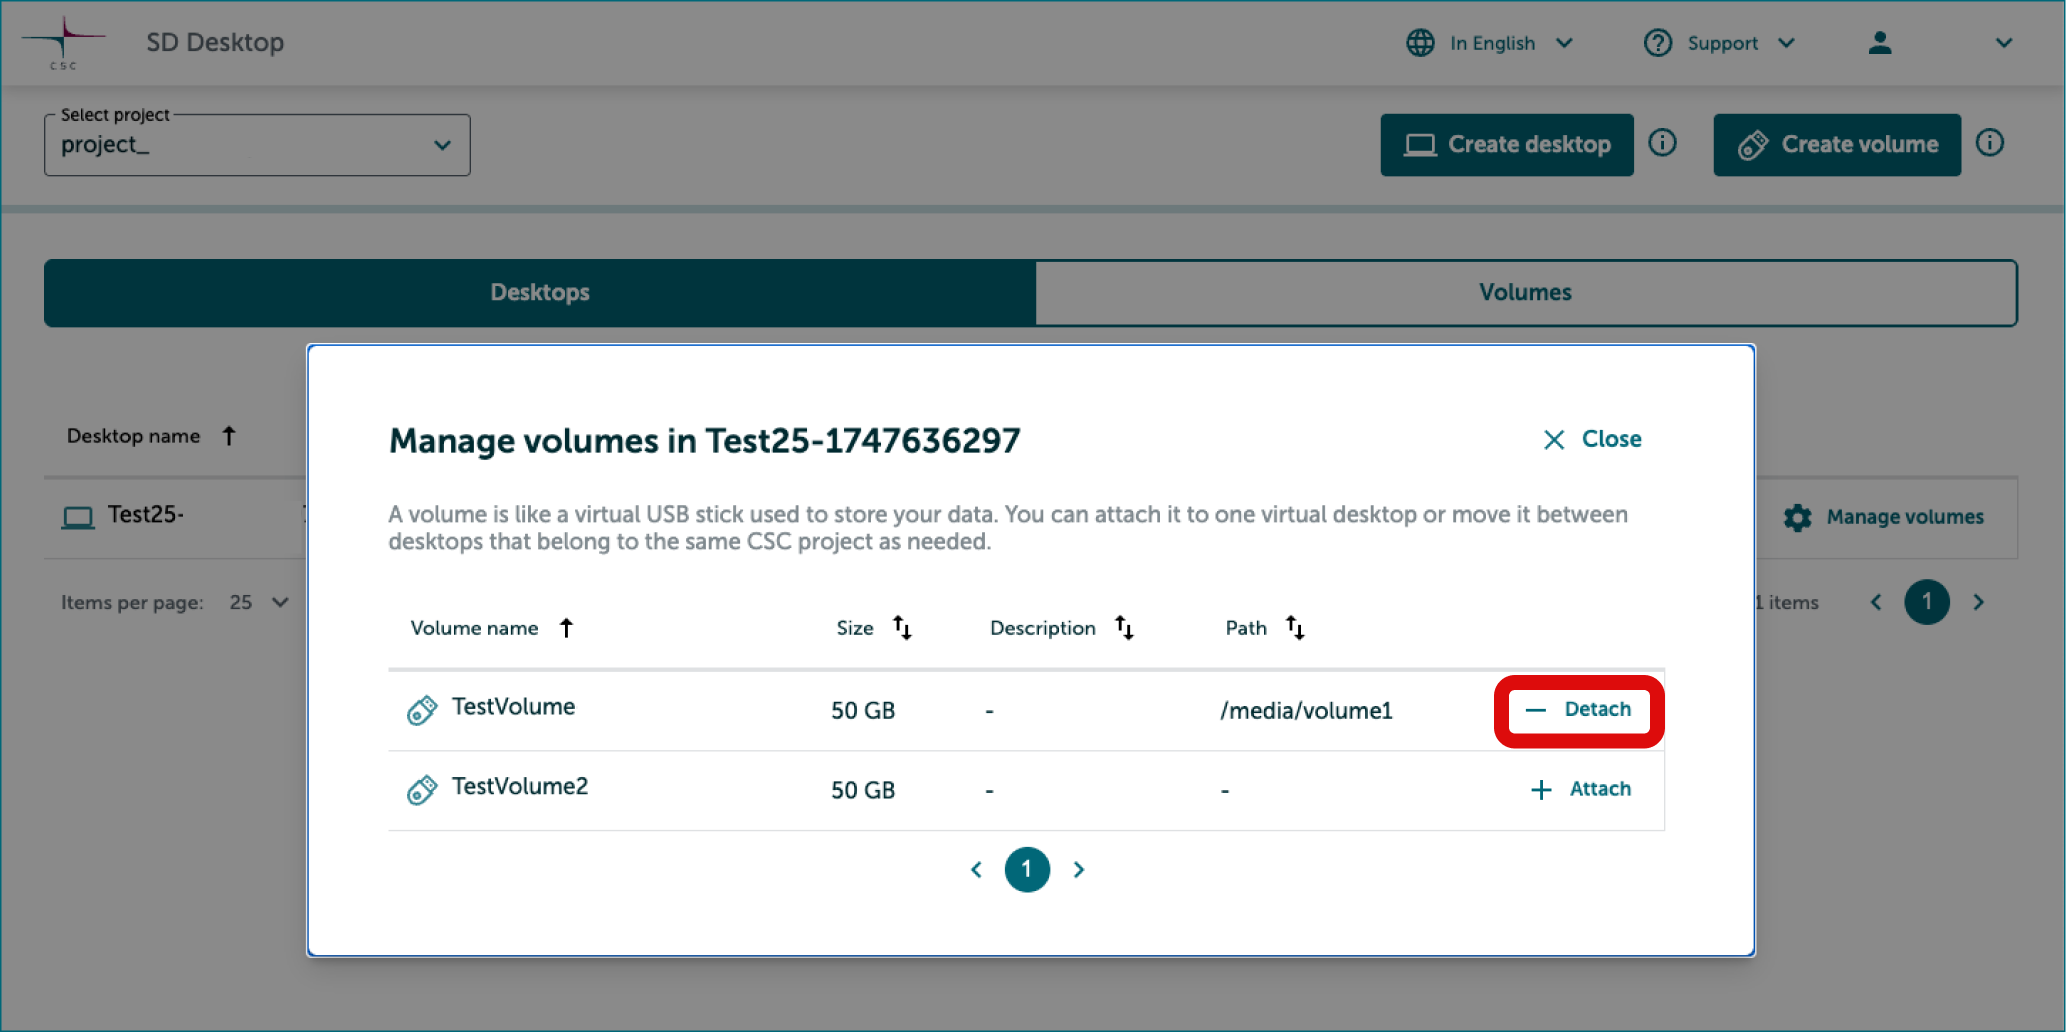
On the SD Desktop homepage, click Manage volumes on the right side of the correct desktop.
In Manage volumes window
- You will see a list of volumes that are available to be attached and/or are attached to the desktop. Click Detach on the right side of the volume you want to detach from the desktop.
- Close the window when you are ready.
Pausing or unpausing a virtual desktop
Desktops consume Cloud Billing Units from your CSC project while they are running. To avoid unnecessary usage, ensure you pause or delete desktops when not in use. Desktops that remain inactive trigger email notifications after 14 days of inactivity.
Volumes consume Cloud Billing Units starting from the moment they are created - whether or not they’re attached to a virtual desktop and whether or not the desktop a volume is attached to is paused.
-
Pausing is not intended as a long‑term method for storing data
CSC cannot guarantee the functionality of desktops paused for extended periods or not updated after service upgrades, including situations where required actions have not been performed.
Pausing a virtual desktop
-
Log in to SD Desktop. Access the correct virtual desktop from the homepage.
-
Close all the programs, save or close all the files, and log out from the virtual desktop to prevent data corruption.
-
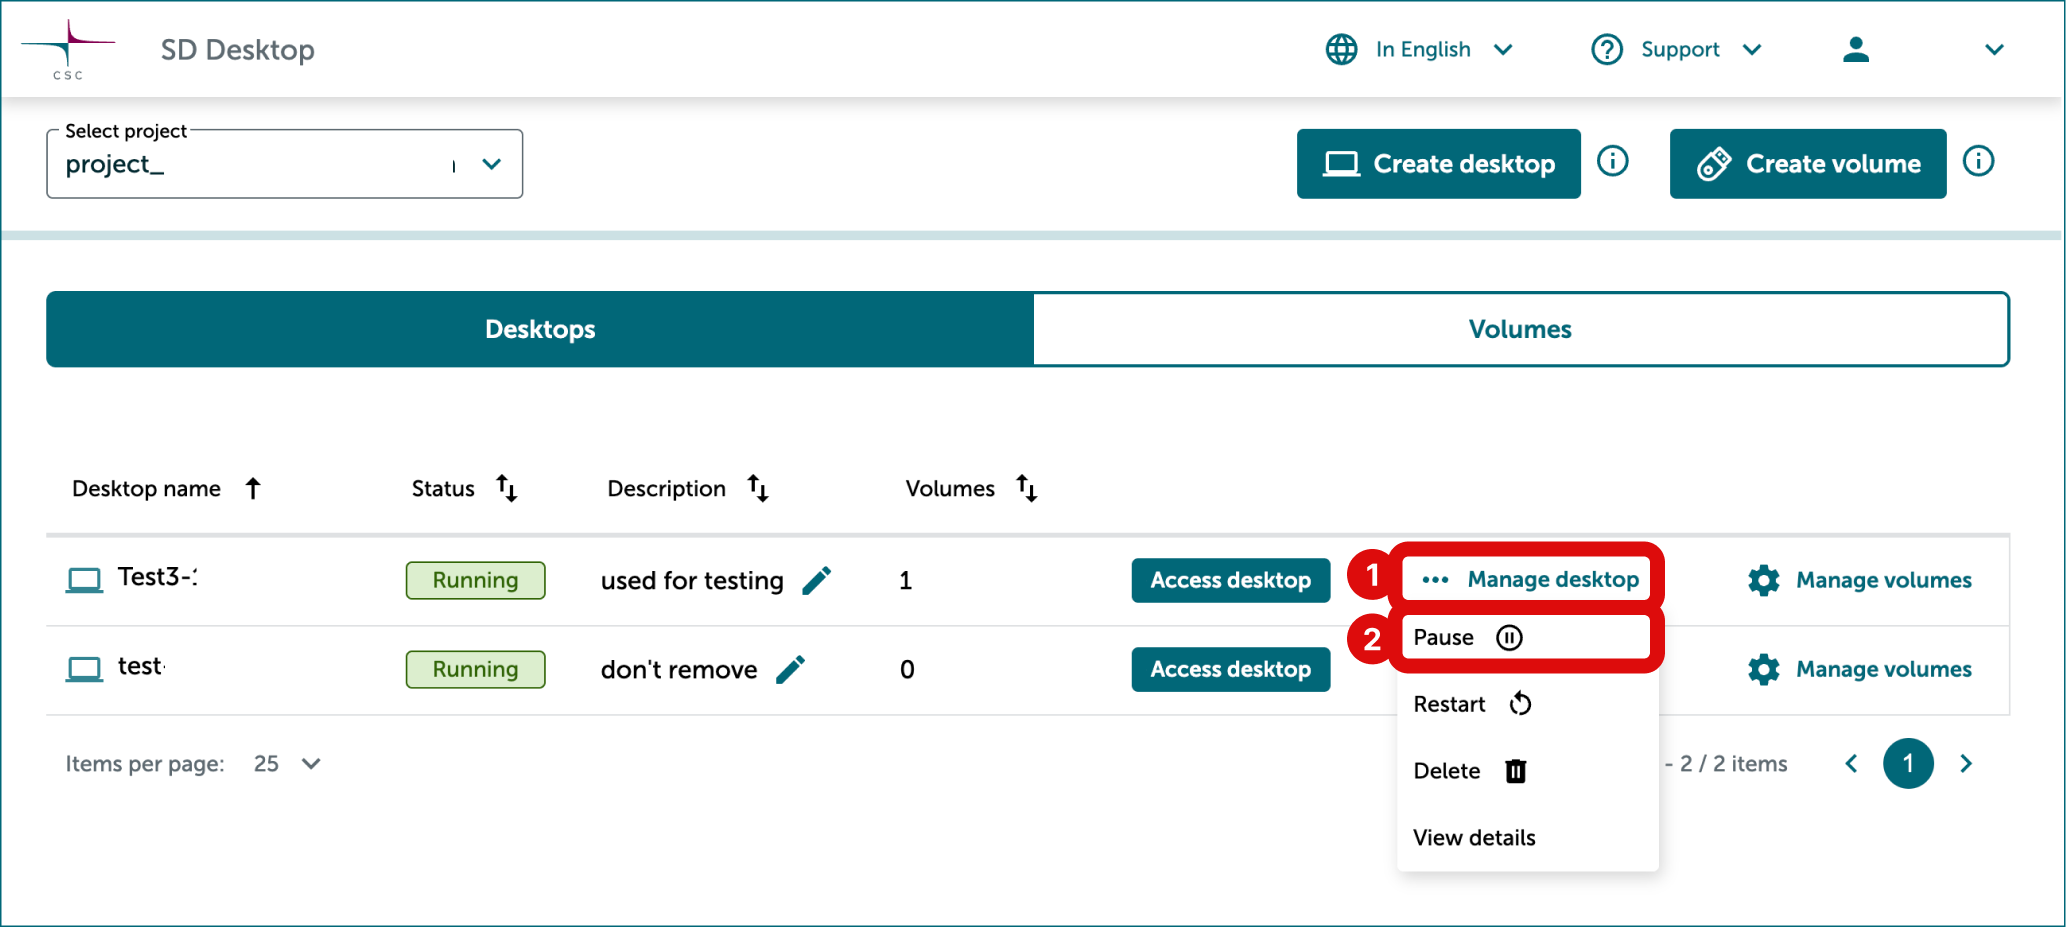
On the SD Desktop homepage, click Manage desktop.
-
Click Pause.
-
Confirm the operation via the notification. Pausing a desktop may take up to 30 minutes.
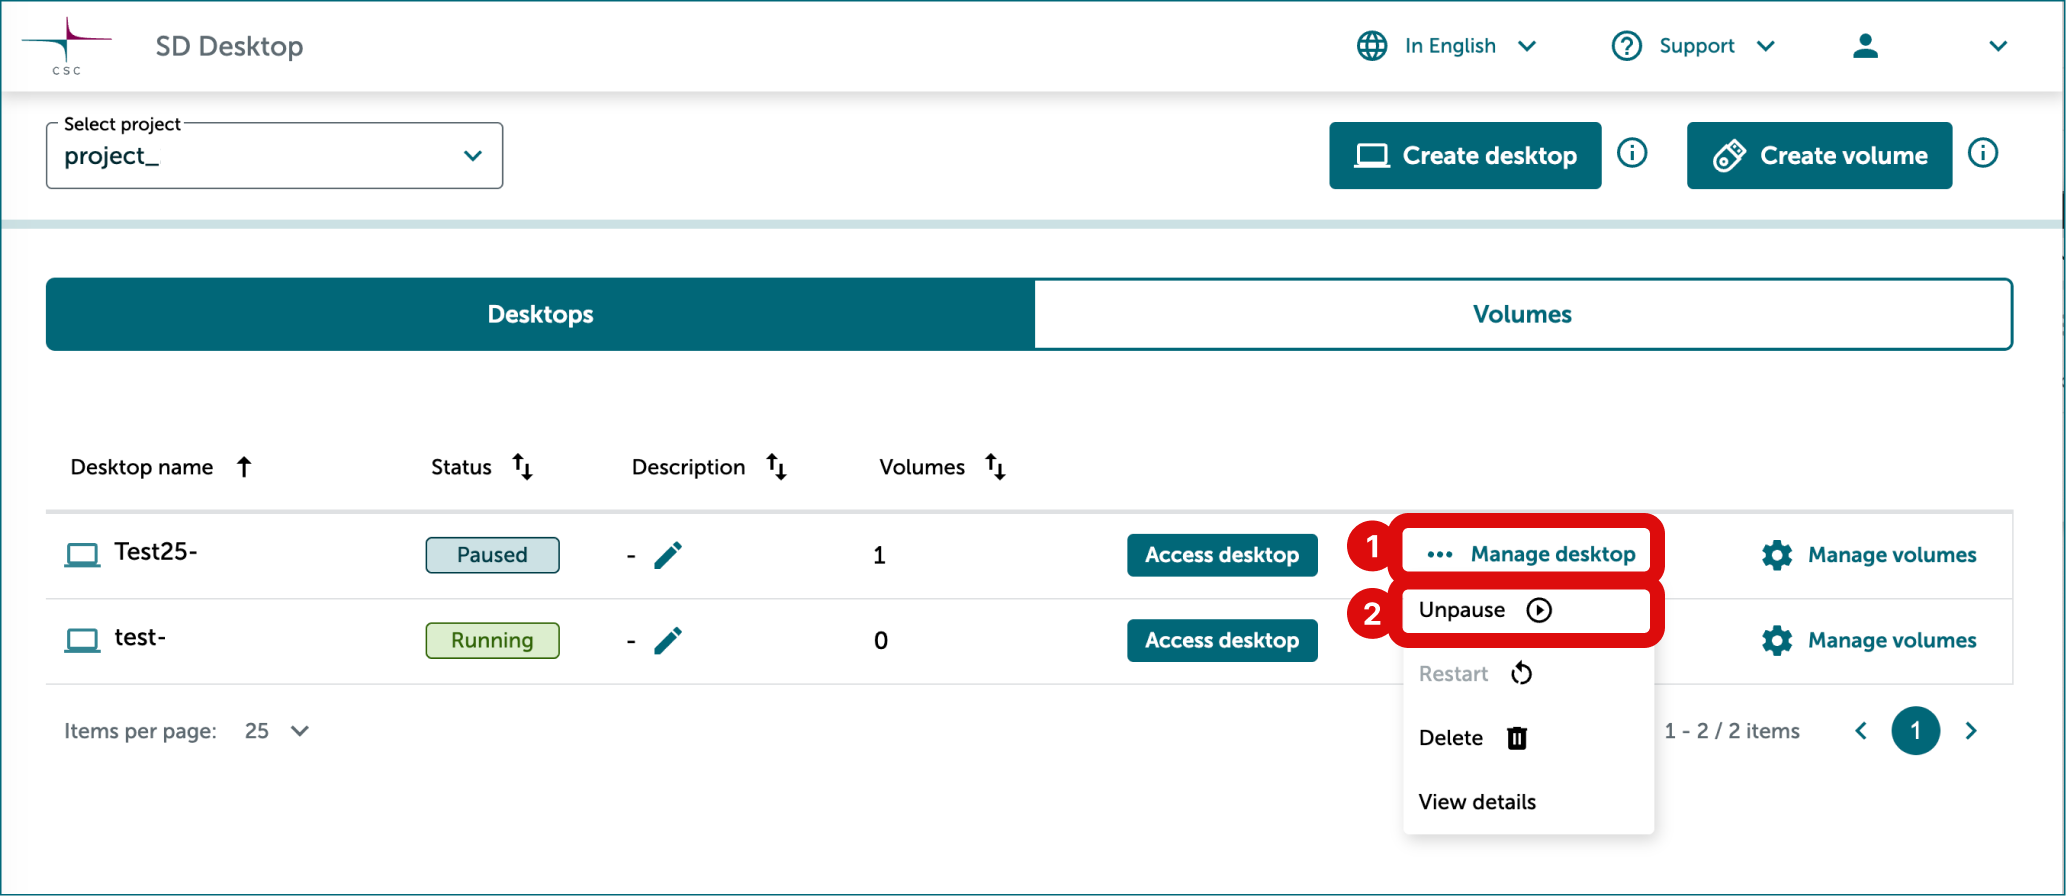
Unpausing a virtual desktop
You can unpause a virtual desktop if the CSC project is active and Cloud Billing Units balance is positive.
-
Log in to SD Desktop.
-
On the SD Desktop homepage, click Manage desktop on the right side of the correct desktop.
-
Click Unpause.
-
Confirm the operation via the notification.
Restarting a virtual desktop
If your virtual desktop or software becomes unresponsive, you can restart it. All files and software saved on the virtual desktop will remain accessible.
-
Info
If the Data Gateway application becomes unresponsive due to old sessions running in the background, there's no need to restart your desktop. Instead, you can utilize the terminal to identify and halt the process. For assistance, please contact CSC Service Desk, subject "Sensitive data."
-
Log in to SD Desktop. Access the correct virtual desktop from the homepage.
-
Close all the programs, save or close all the files, and log out from the virtual desktop to prevent data corruption.
-
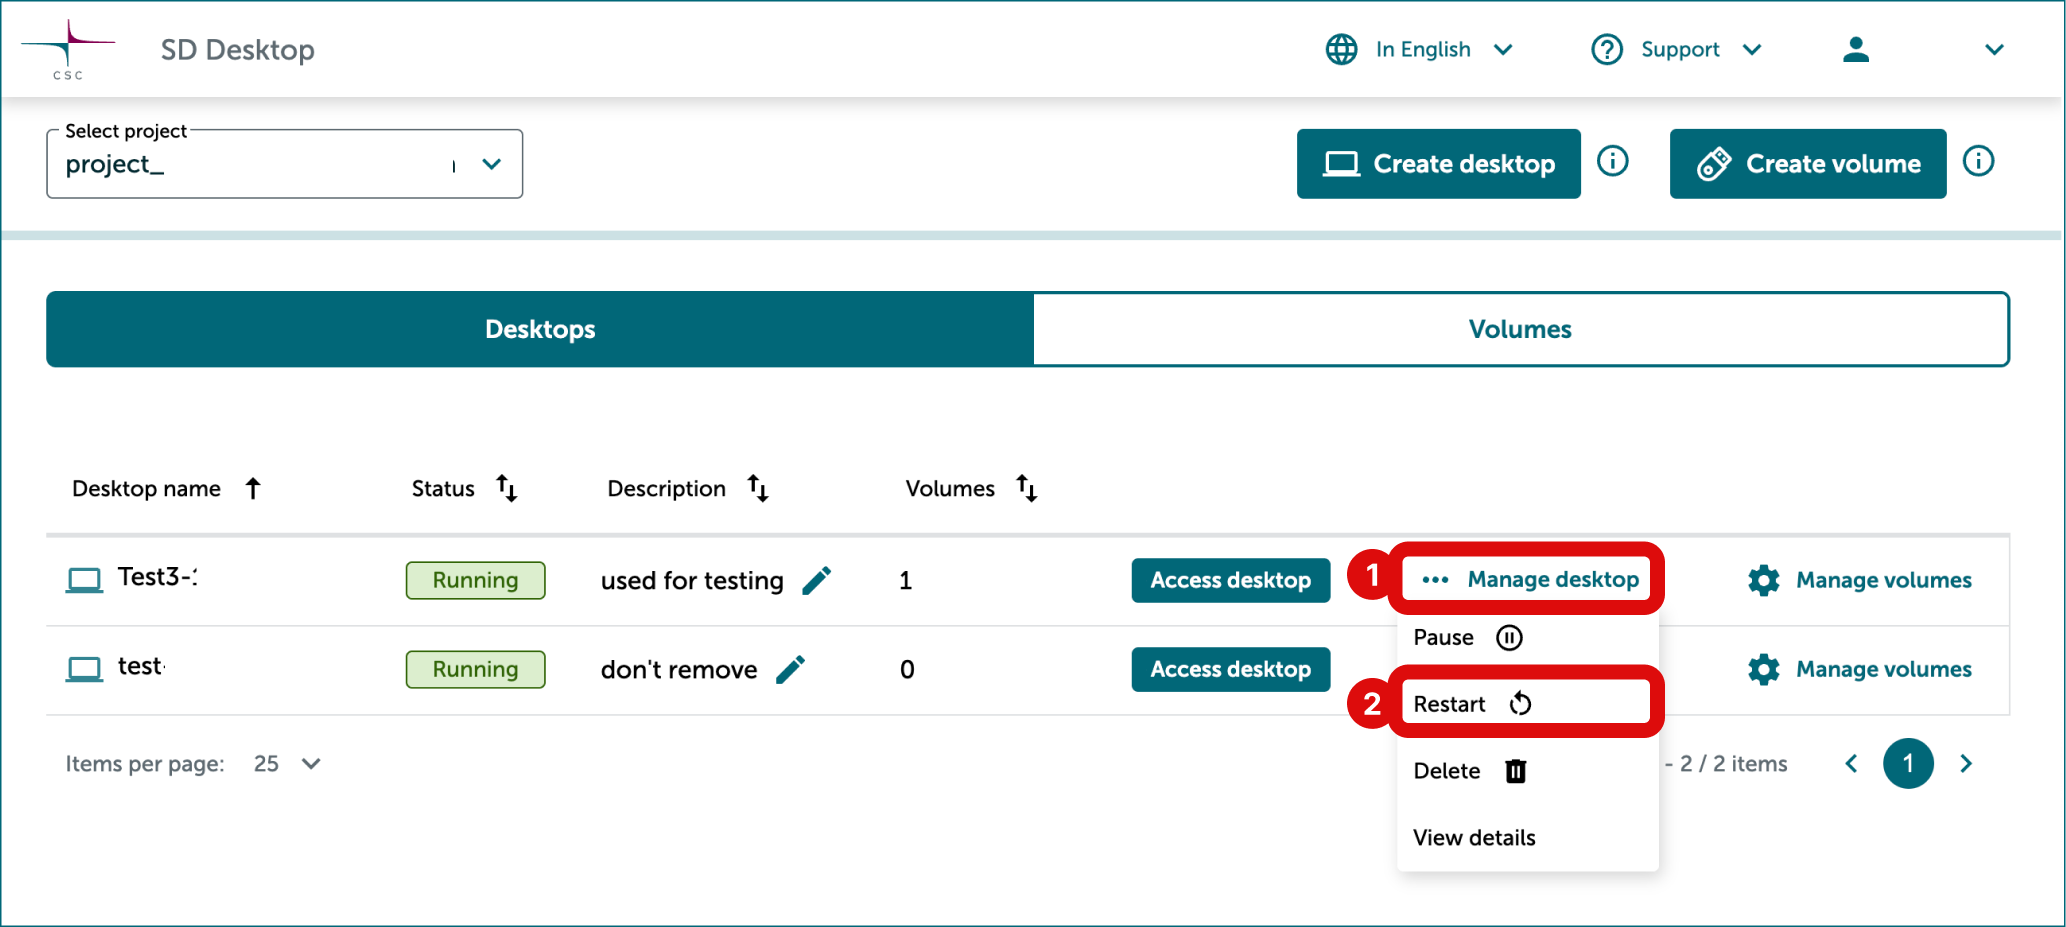
On the SD Desktop homepage, click Manage desktop on the right side of the correct desktop.
-
Click Restart.
-
Confirm the operation via the notification. Restarting a desktop may take up to 30 minutes.
Deleting a virtual desktop
At the end of your analysis, you can delete entire virtual desktop, and all files saved to it by you or other project members.
-
Warning
You cannot undo this action. Please contact all the project members before deleting a virtual desktop.
-
Log in to SD Desktop.
-
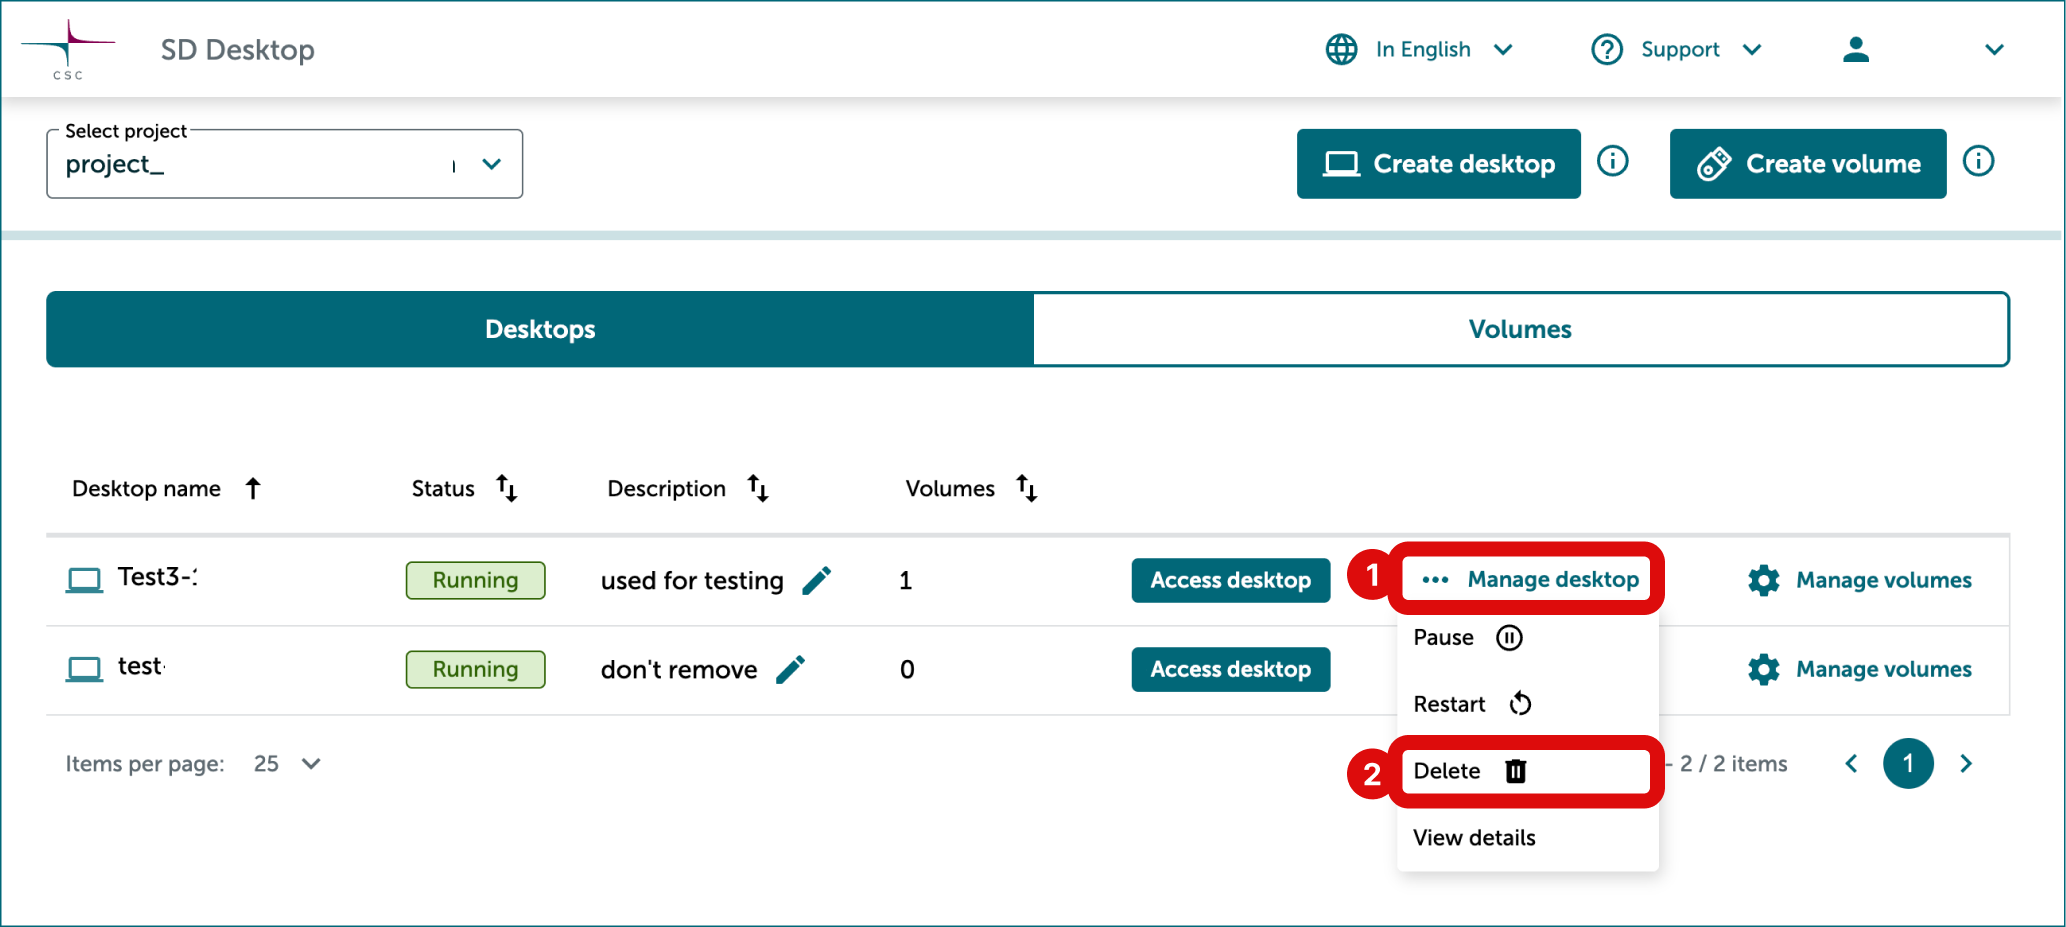
On the SD Desktop homepage, click Manage desktop on the right side of the correct desktop.
-
Click Delete.
-
Confirm the operation via the notification.
Deleting a volume
At the end of your analysis, you can delete a volume, and all files saved to it by you or other project members.
-
Warning
You cannot undo this action. Please contact all the project members before deleting a volume.
- If the volume is attached to a desktop detach it first.
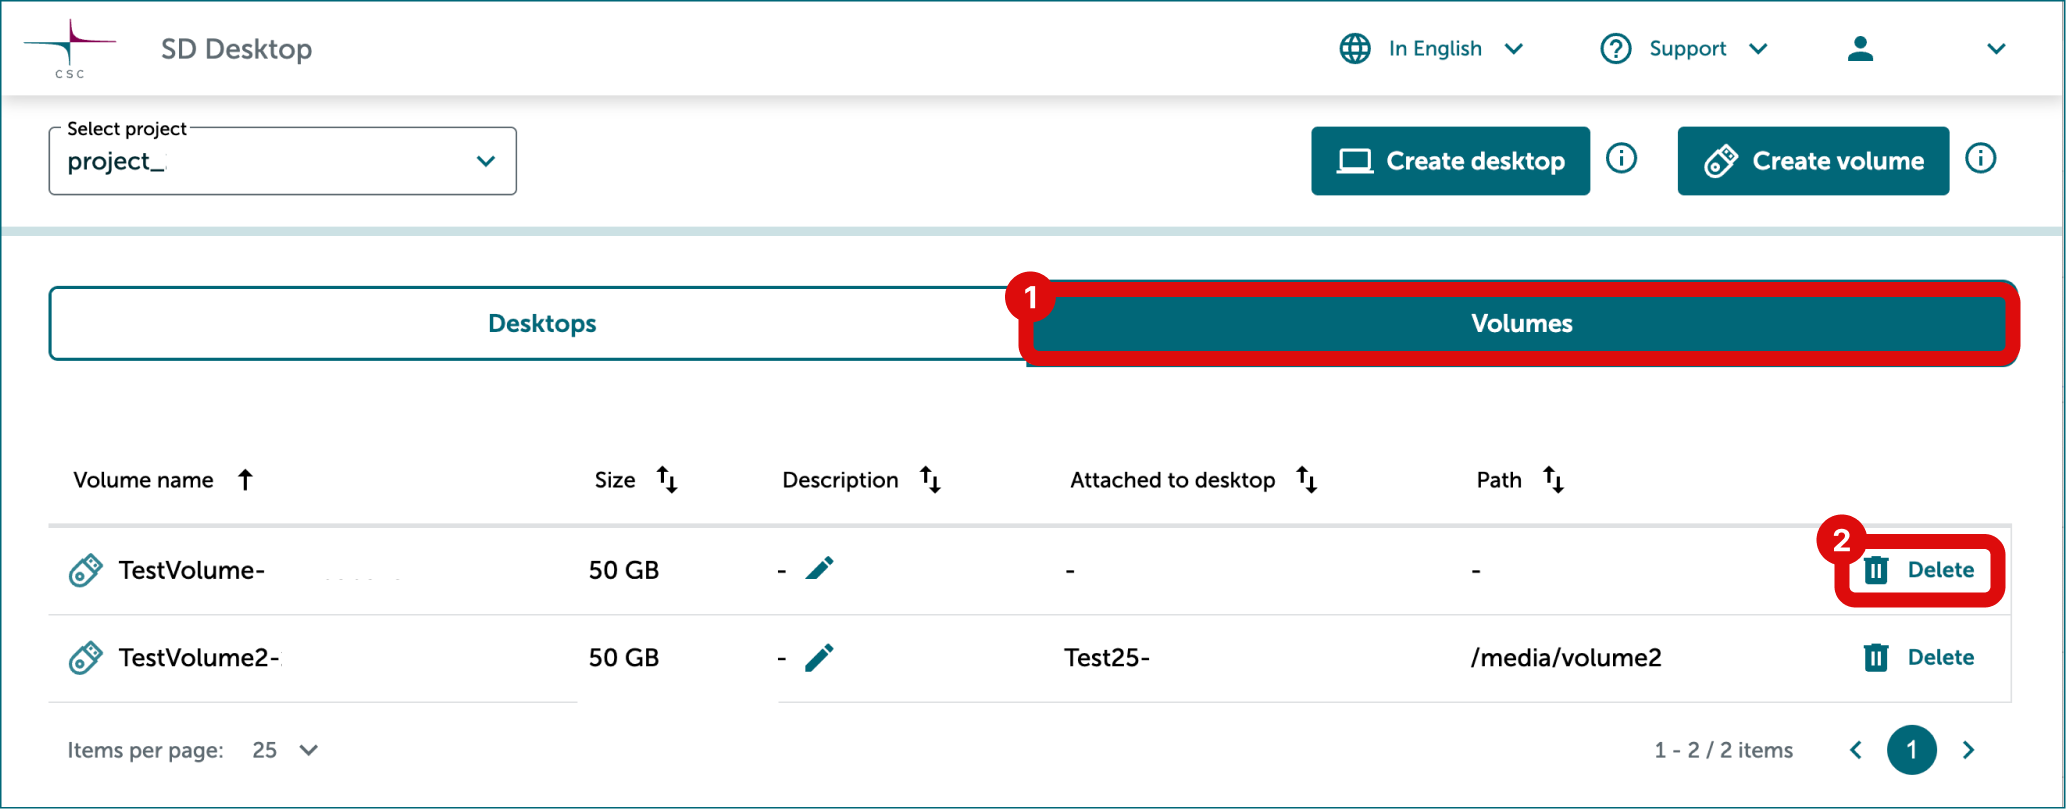
- On the SD Desktop homepage, click Volumes tab.
- Click Delete on the right side of the correct volume.
- Confirm deleting the volume via notification.