Table of contents of user guide
Importing data in your virtual desktop
Prerequisites
Once a virtual desktop is created, each CSC project member can access it through their browser. The virtual desktop is isolated from the internet, so data access must be done through the Data Gateway application. This application allows you to import data from SD Connect or SD Apply. Imported data is saved on the virtual desktop’s external volume for secure analysis.
Additional information
- What is an external volume? Your virtual desktop’s local storage is limited, so it’s recommended to save large data files and collaborative work on the external volume. This volume acts like a USB stick that can be detached and reattached to different desktops, allowing project members to share and edit files stored there.
- Adding the external volume: the external volume can only be added when creating a new virtual desktop
- Additional volume space: if you need additional volume space (more than 200 GB), you can request it by writing to CSC Service Desk, (subject: SD Desktop), please be aware that volume extensions are only possible before any data has been added to the volume.
Step by step
1. Access data via the Data Gateway application
- Access your virtual desktop.
-
Launch Data Gateway by clicking icon on the left side of desktop.
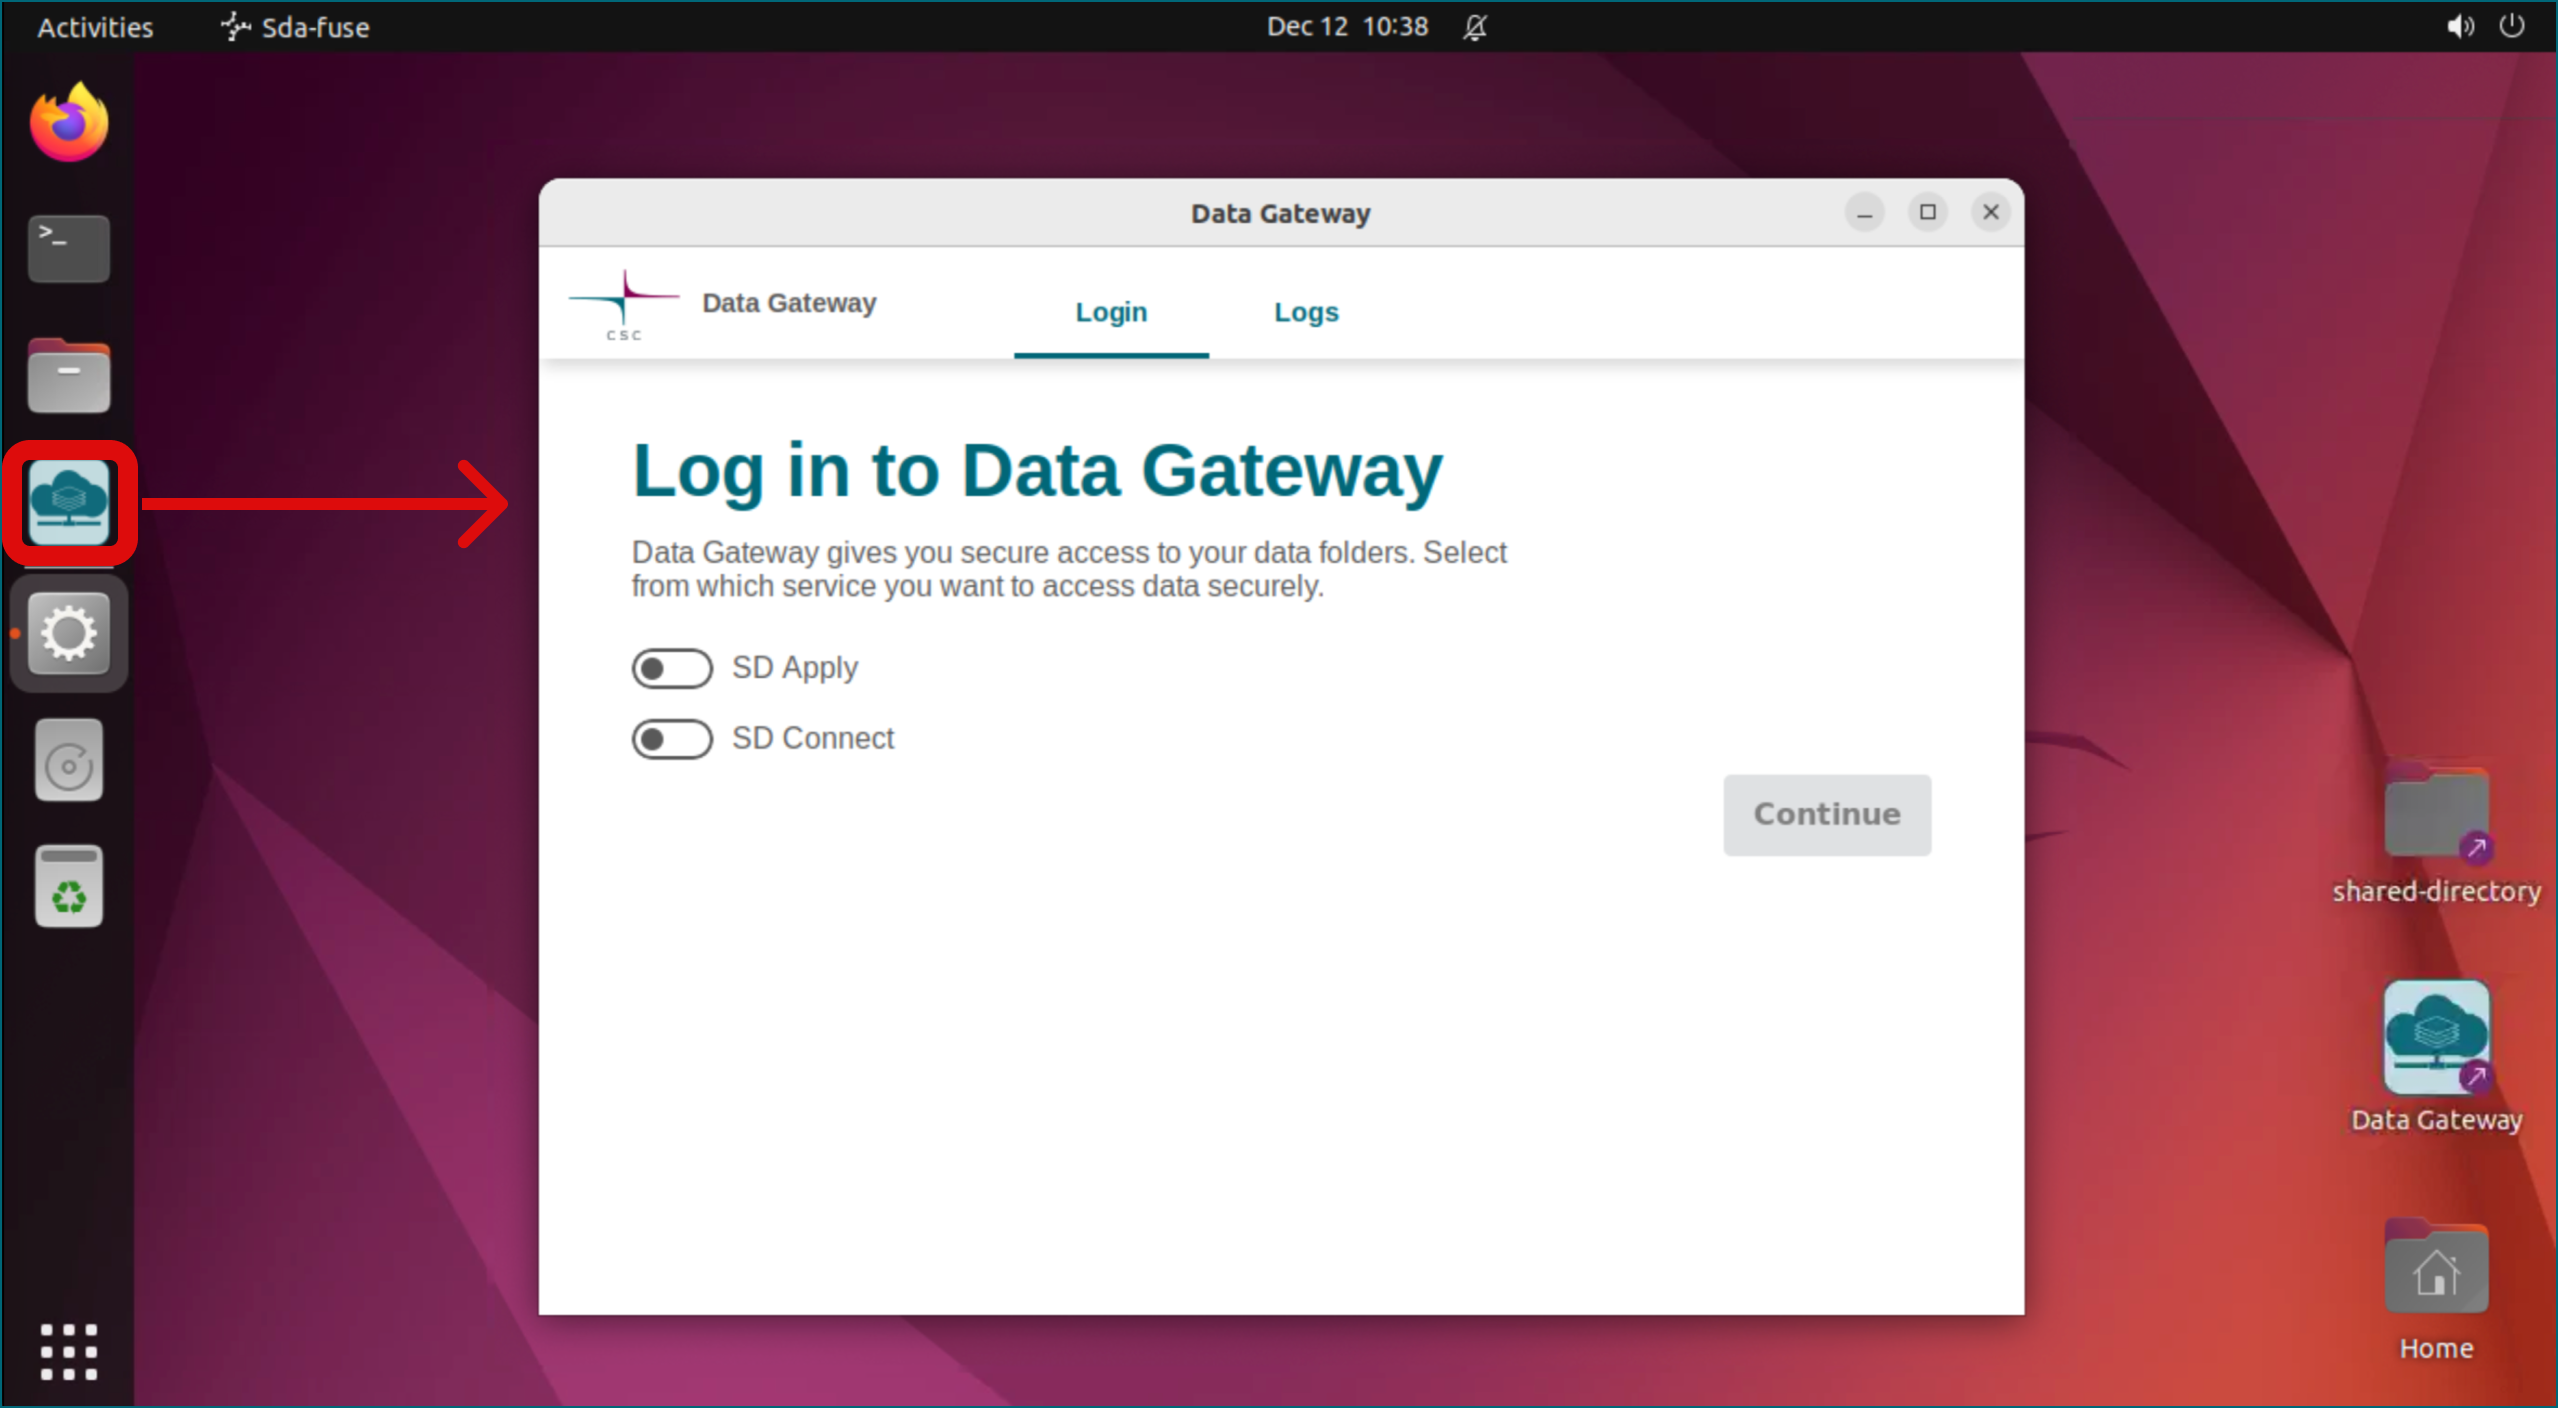
-
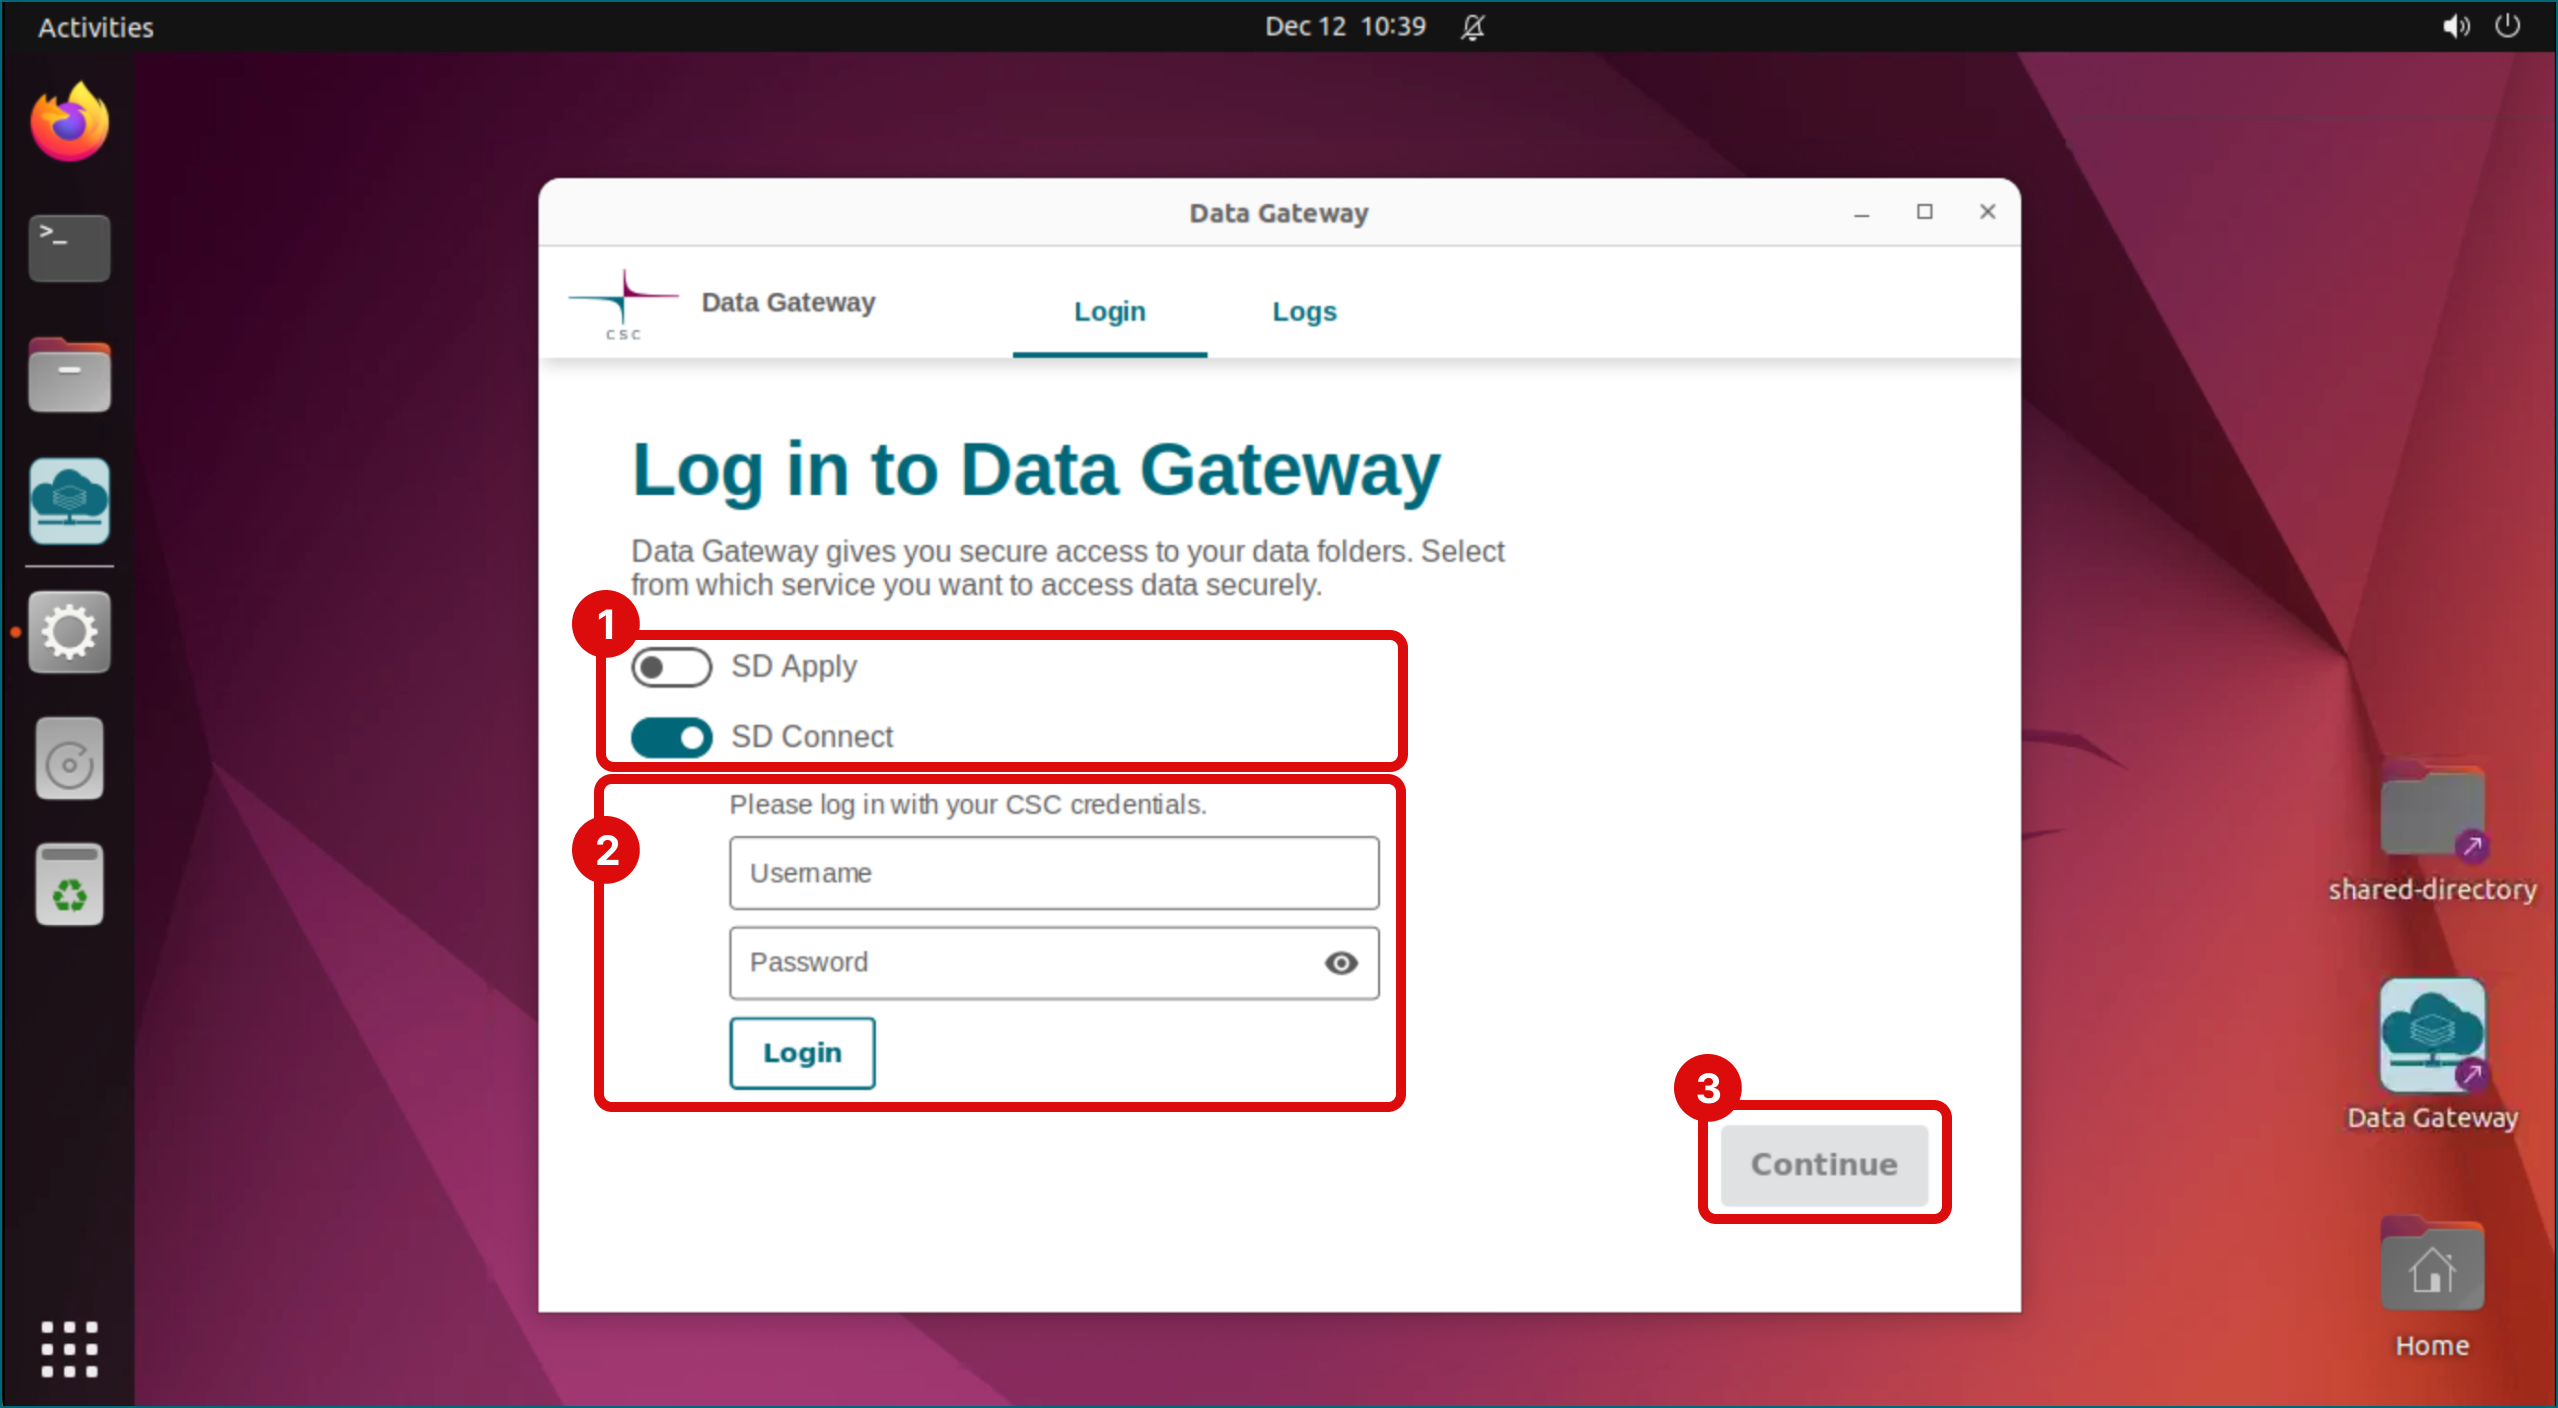
Select:
- SD Connect: This option is for accessing data you’ve uploaded directly to SD Connect. Enter your CSC username and password (note that copy-paste is disabled for security, so you need to type credentials manually).
- SD Apply: This option is accessible only if the data controller has granted you permission.
- Click Login and then Continue.
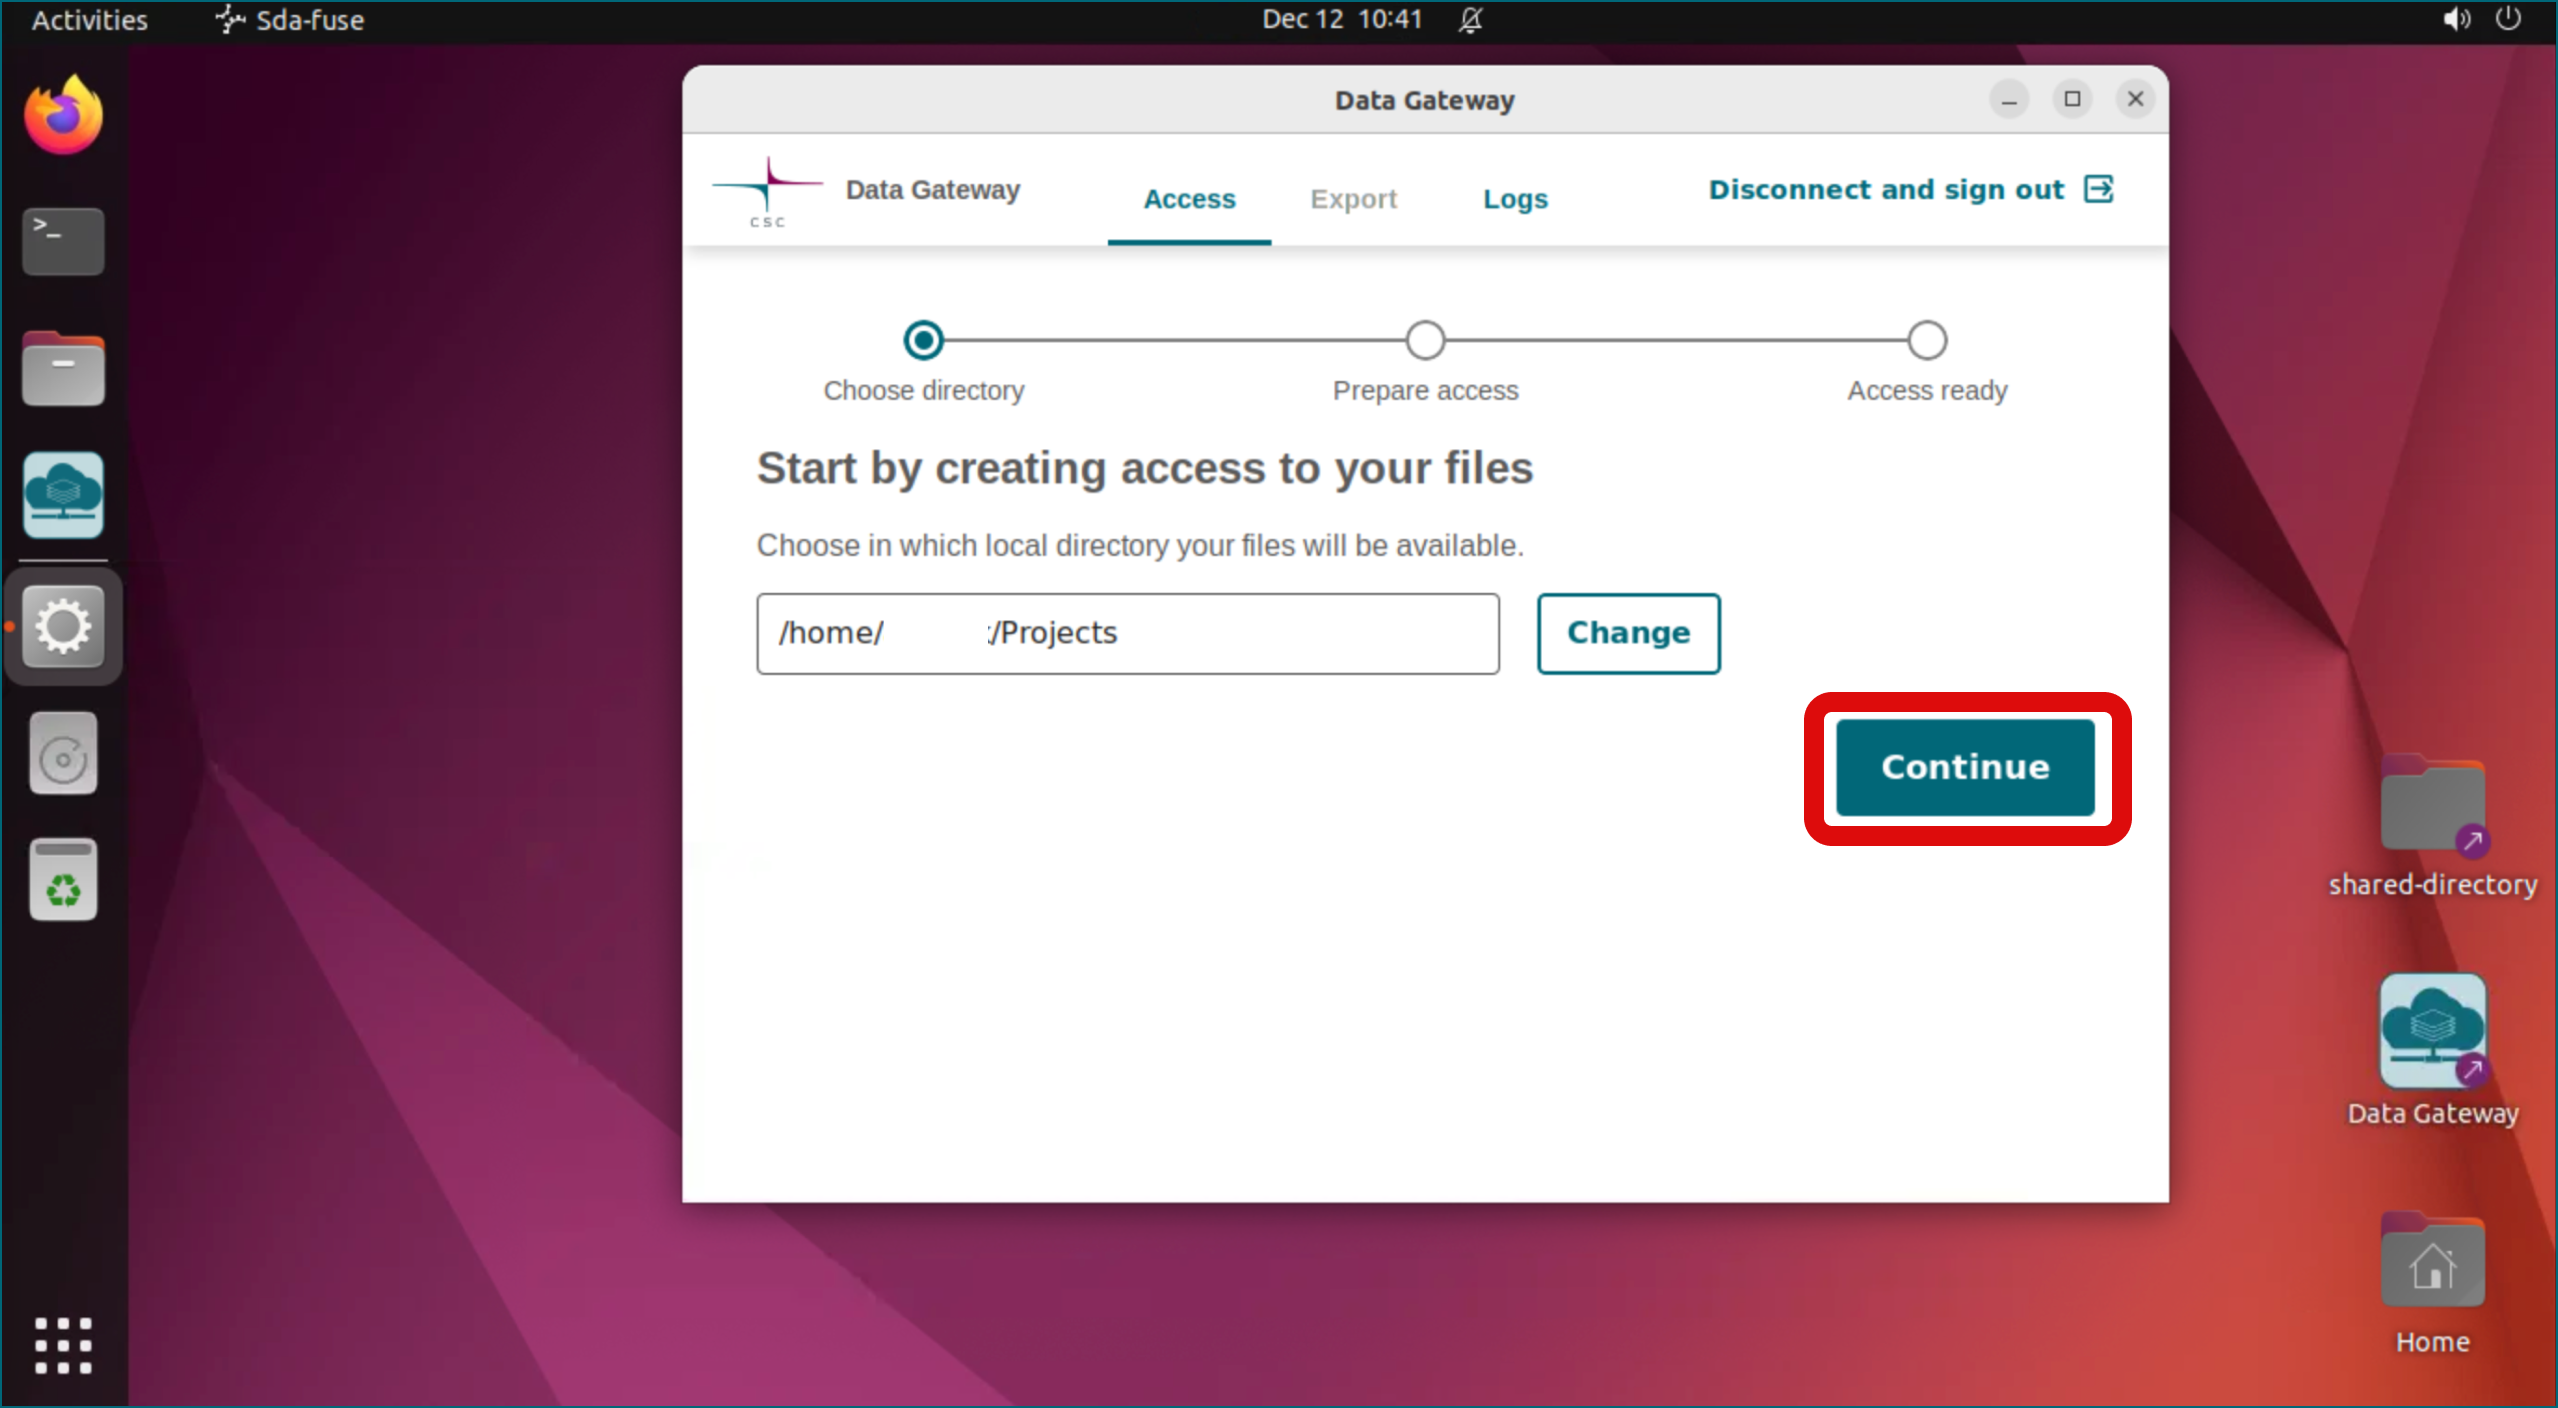
- In the next window click Continue. Data Gateway establishes a secure connection between your virtual desktop and your data, and creates Projects folder on your virtual desktop (and accessible from the terminal).
- In the next window click Open folder to view all files stored in SD Connect or SD Apply. Files are available in read-only mode for secure access. To view them, right-click the file and select the desired application to open it.
Note
In SD Desktop, you can access only encrypted files. Accessing unencrypted data or files encrypted only with your public encryption key will result in an error.
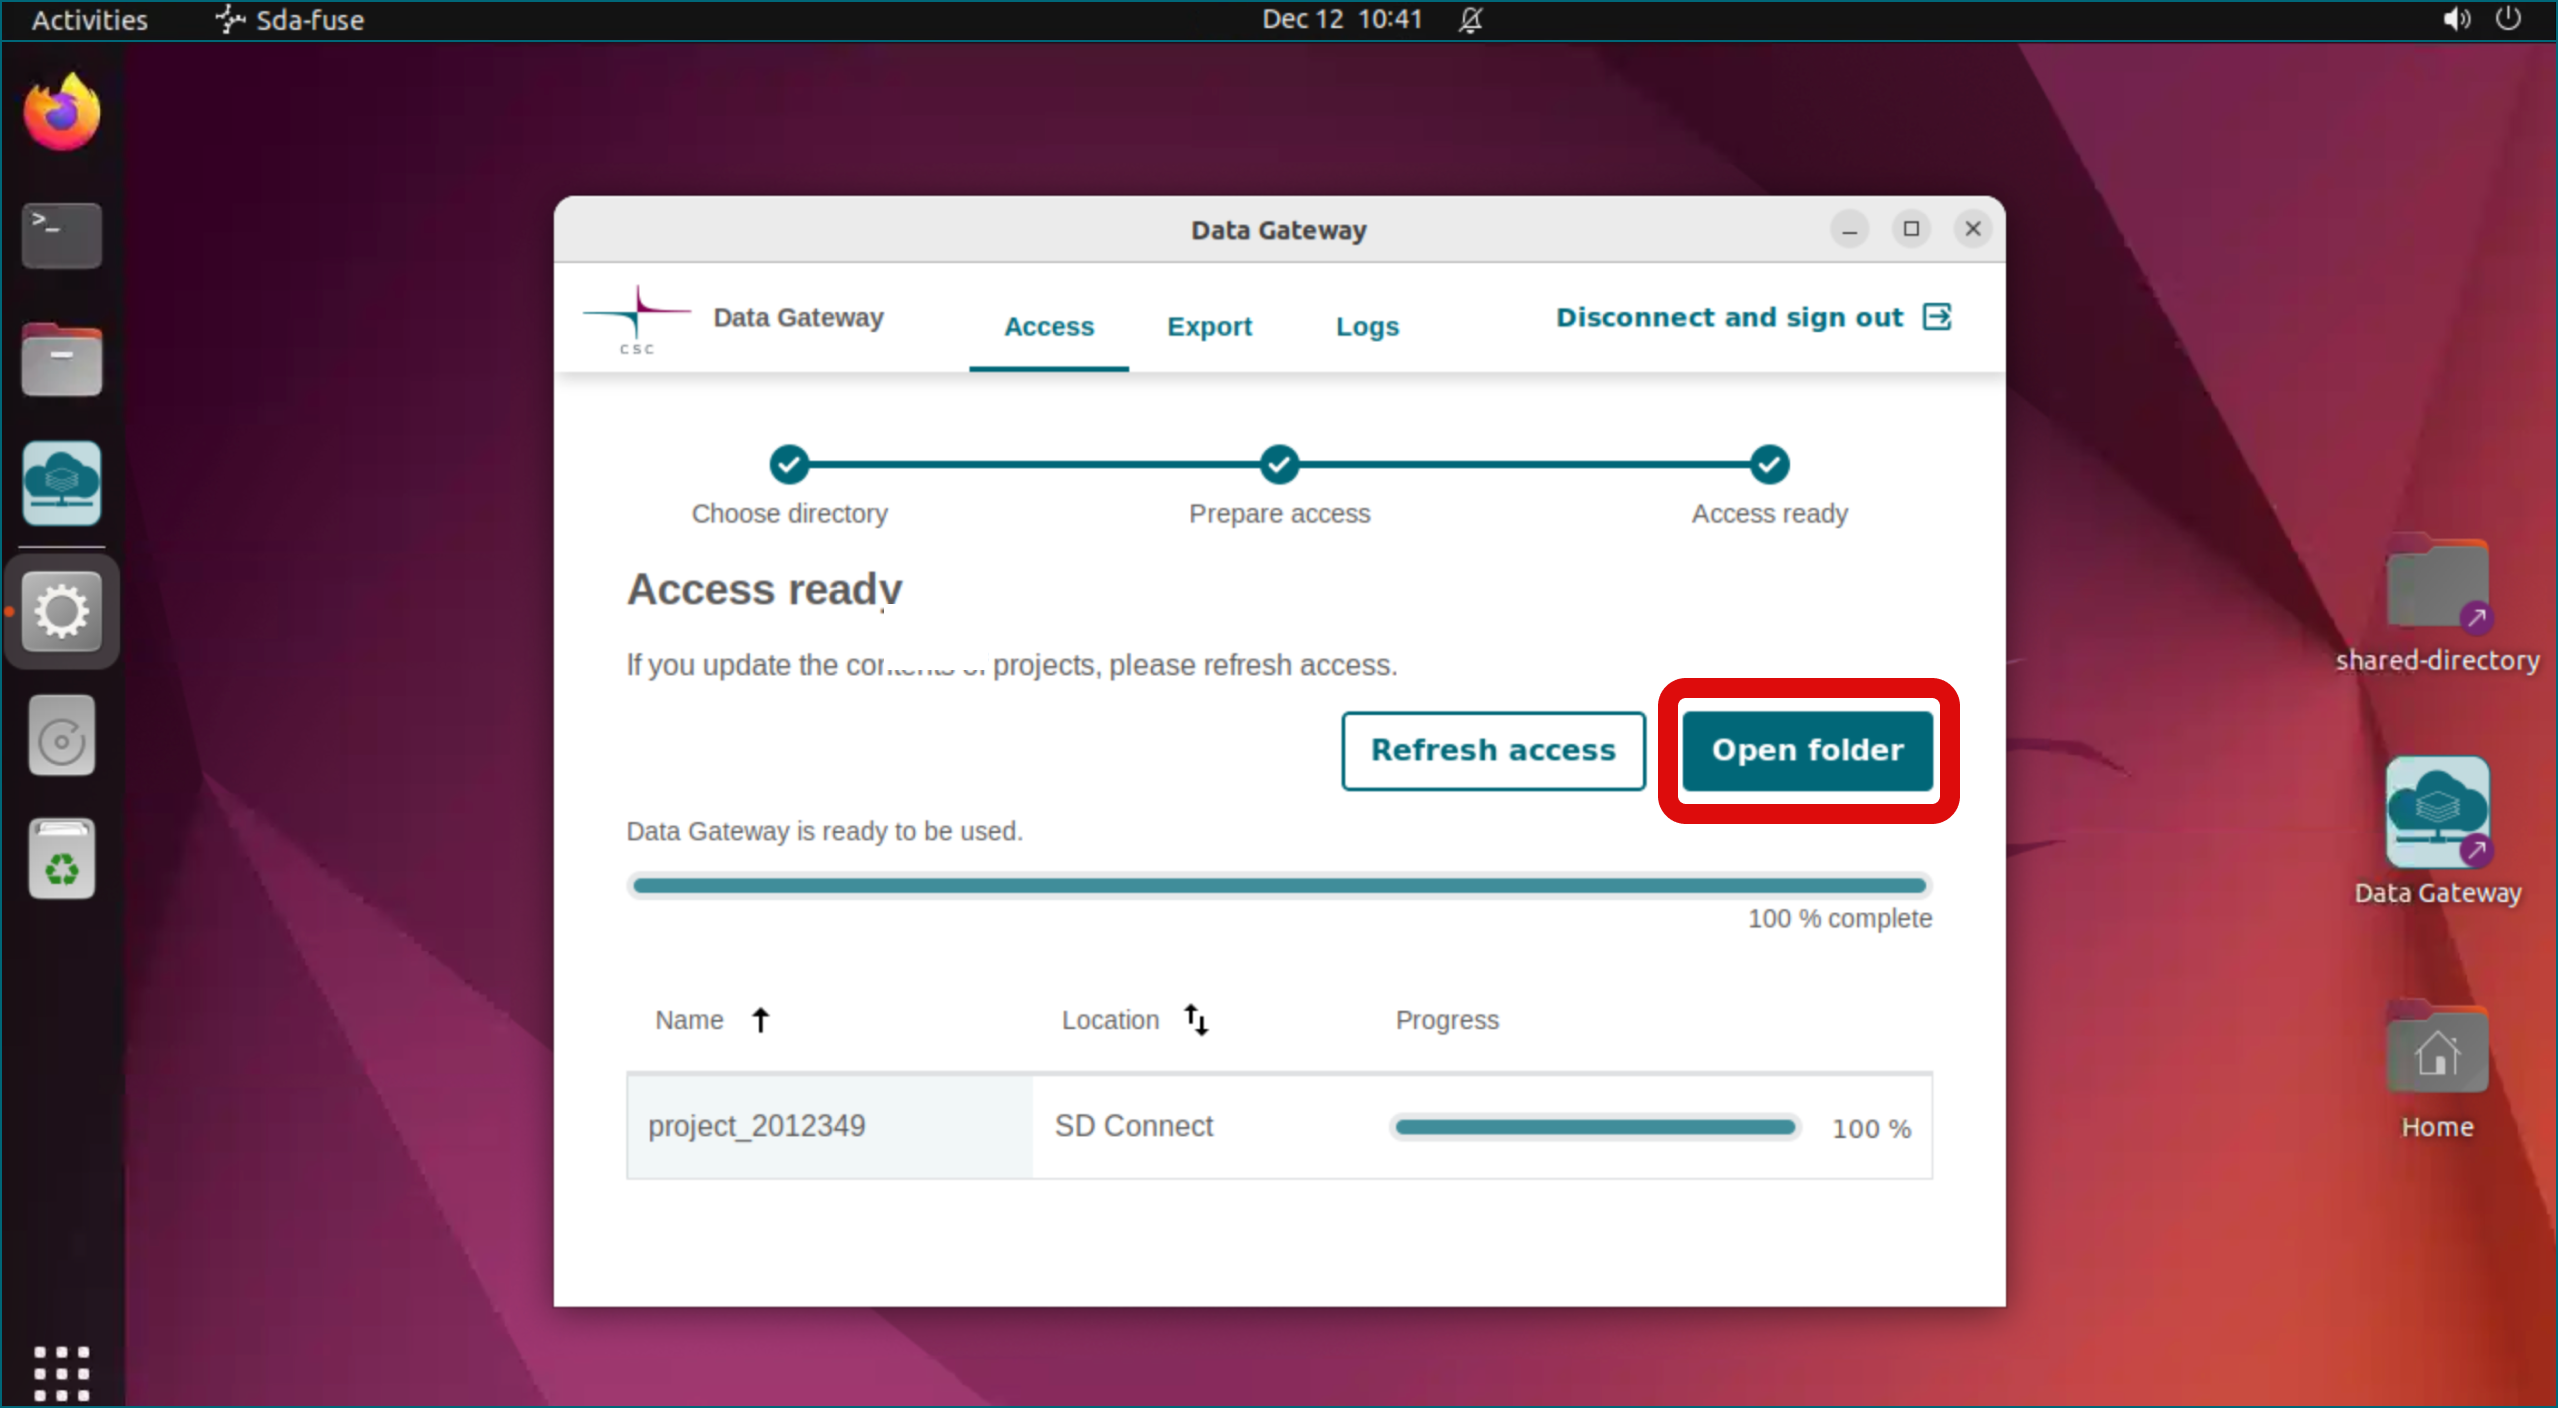
2. Import a copy of the files to your virtual desktop's volume
Keep Data Gateway open and click Open folder.
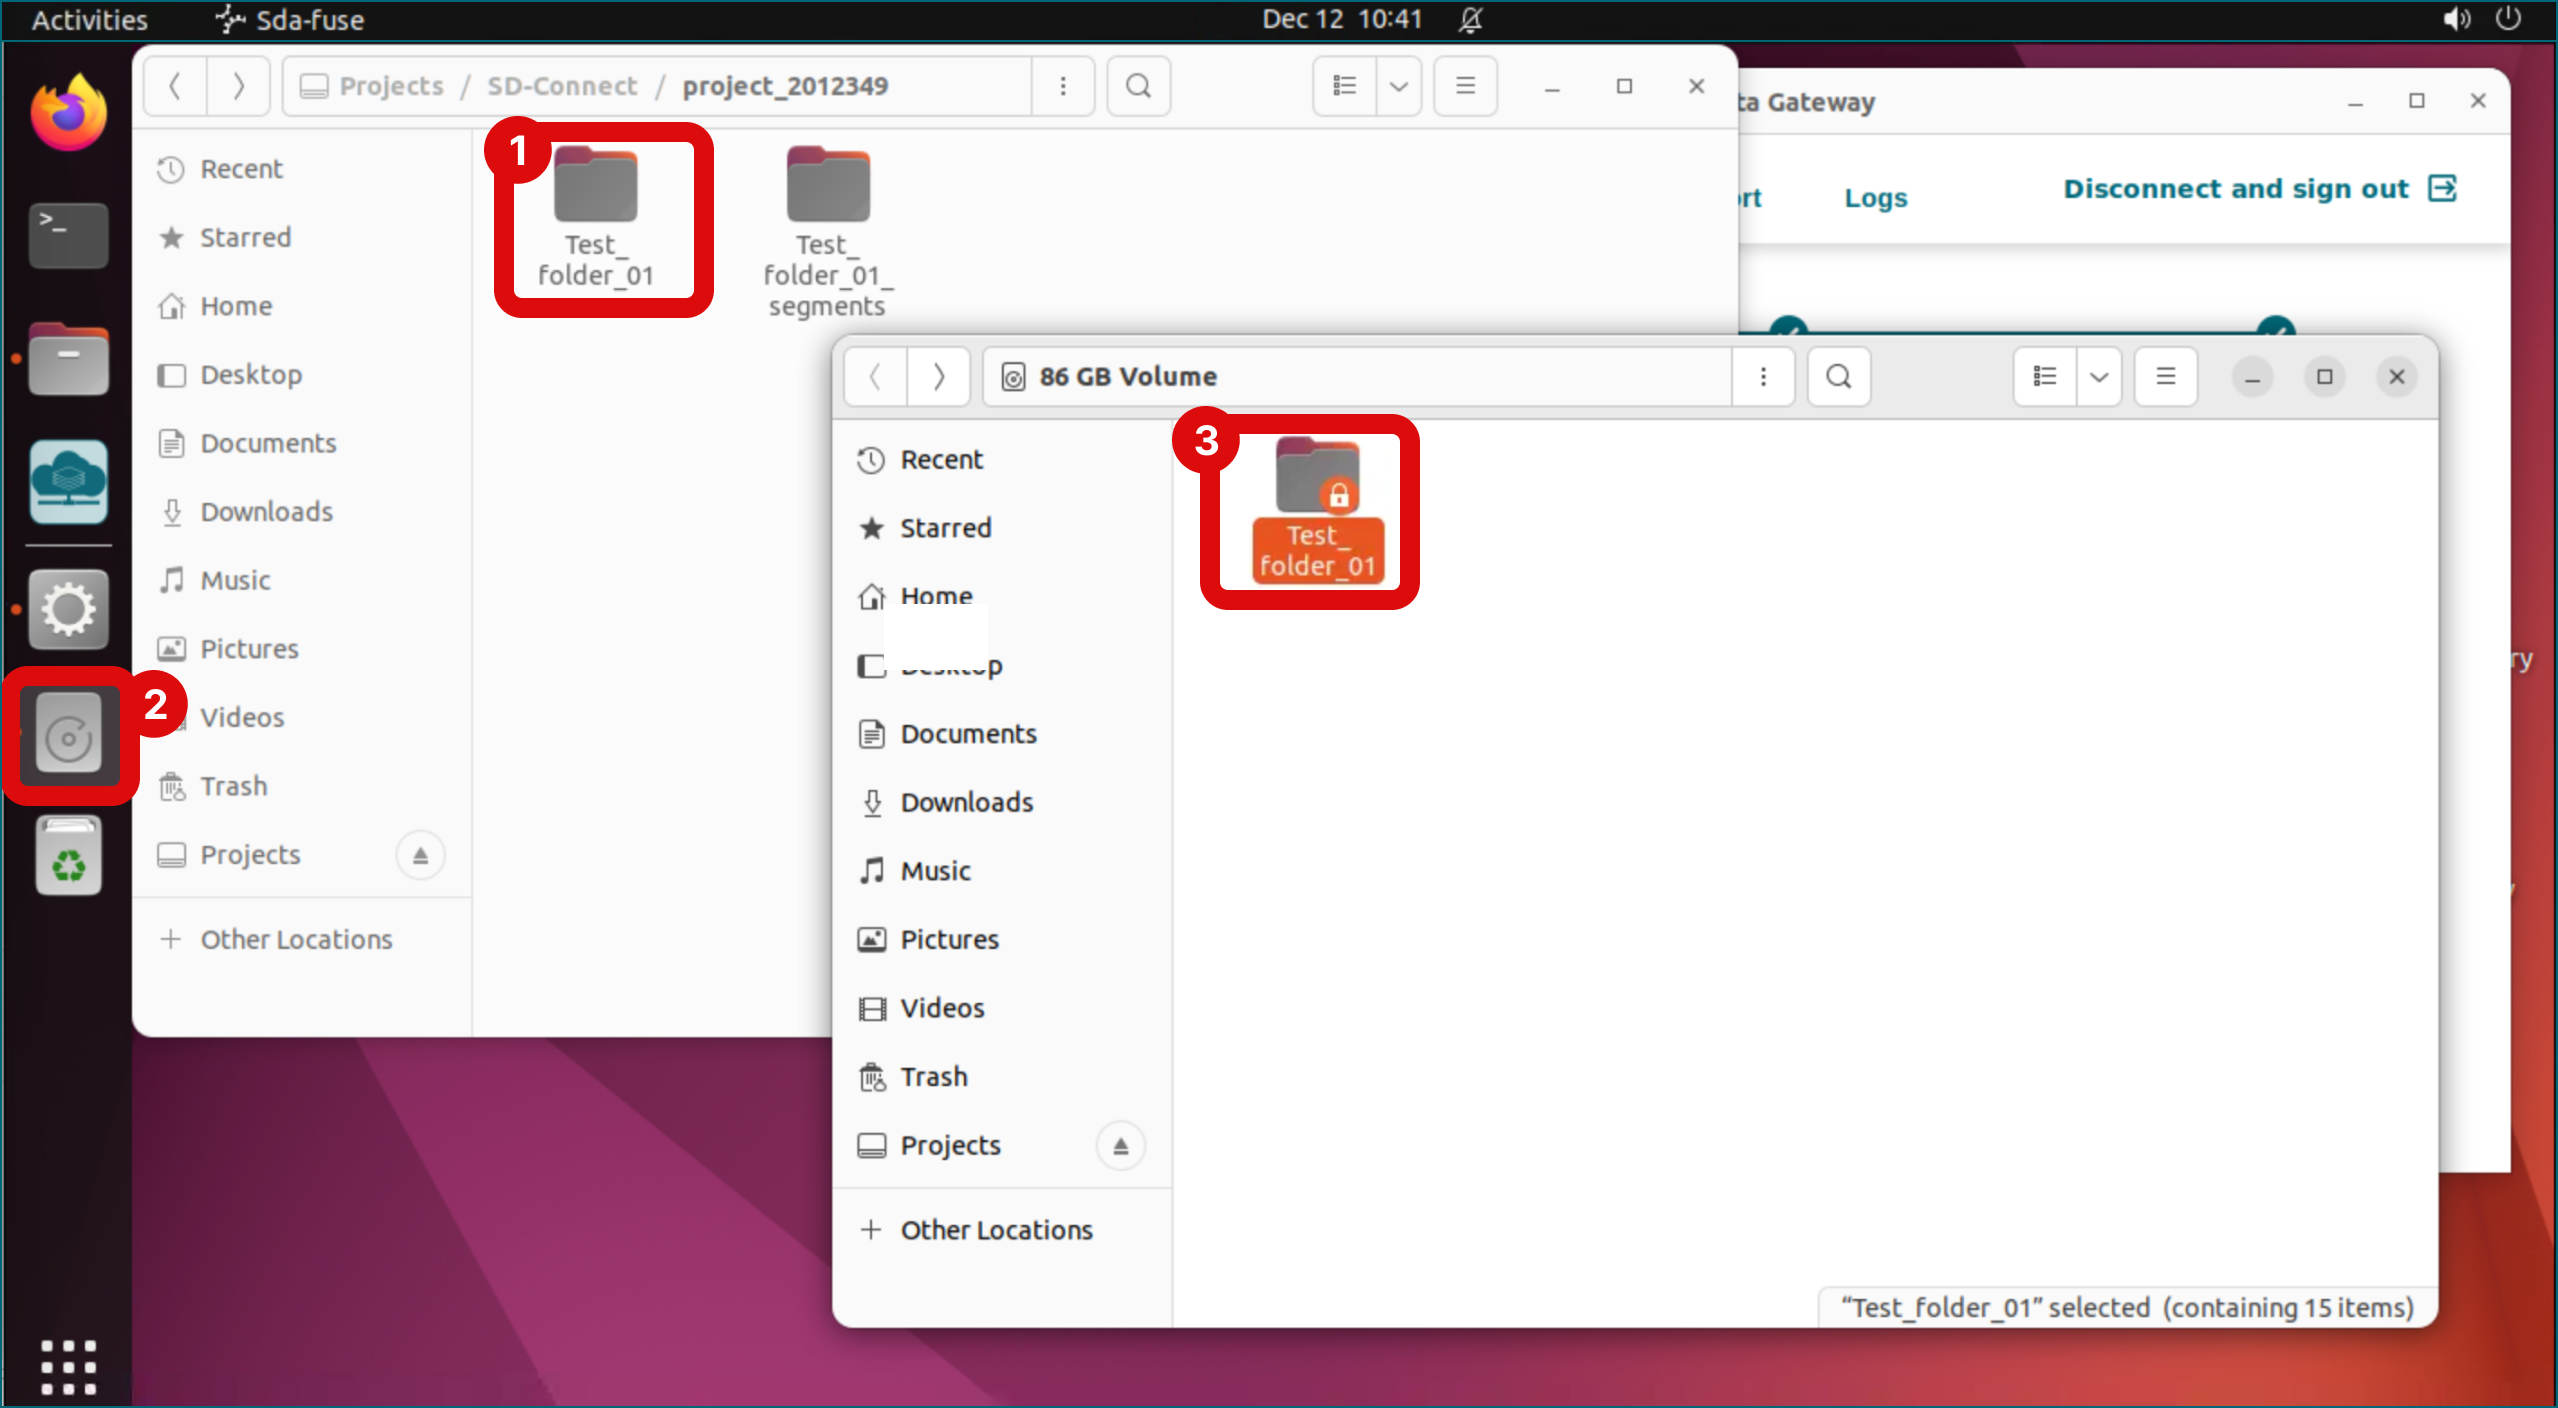
- Select and copy the files or folders from the Projects folder.
- Open Volume by clicking icon on the left side of desktop.
- Paste files or folders into Volume. Files or folders will automatically decrypt during the copy process and become available for analysis.
3. Set permissions for shared access
After copying files to volume, adjust permissions for folders and files to enable access for other project members. By default, permissions are limited to your access only (orange lock icon).
With the steps below, you ensure that all project members have read and write access to all files and folders. This prevents possible access issues when the volume is used on different virtual desktop, where file ownership information may be handled differently.
Method 1: Use CSC Tools to set access permissions
- If you haven't SD Tools installer already installed on your virtual desktop, follow these instructions (Steps 1-2).
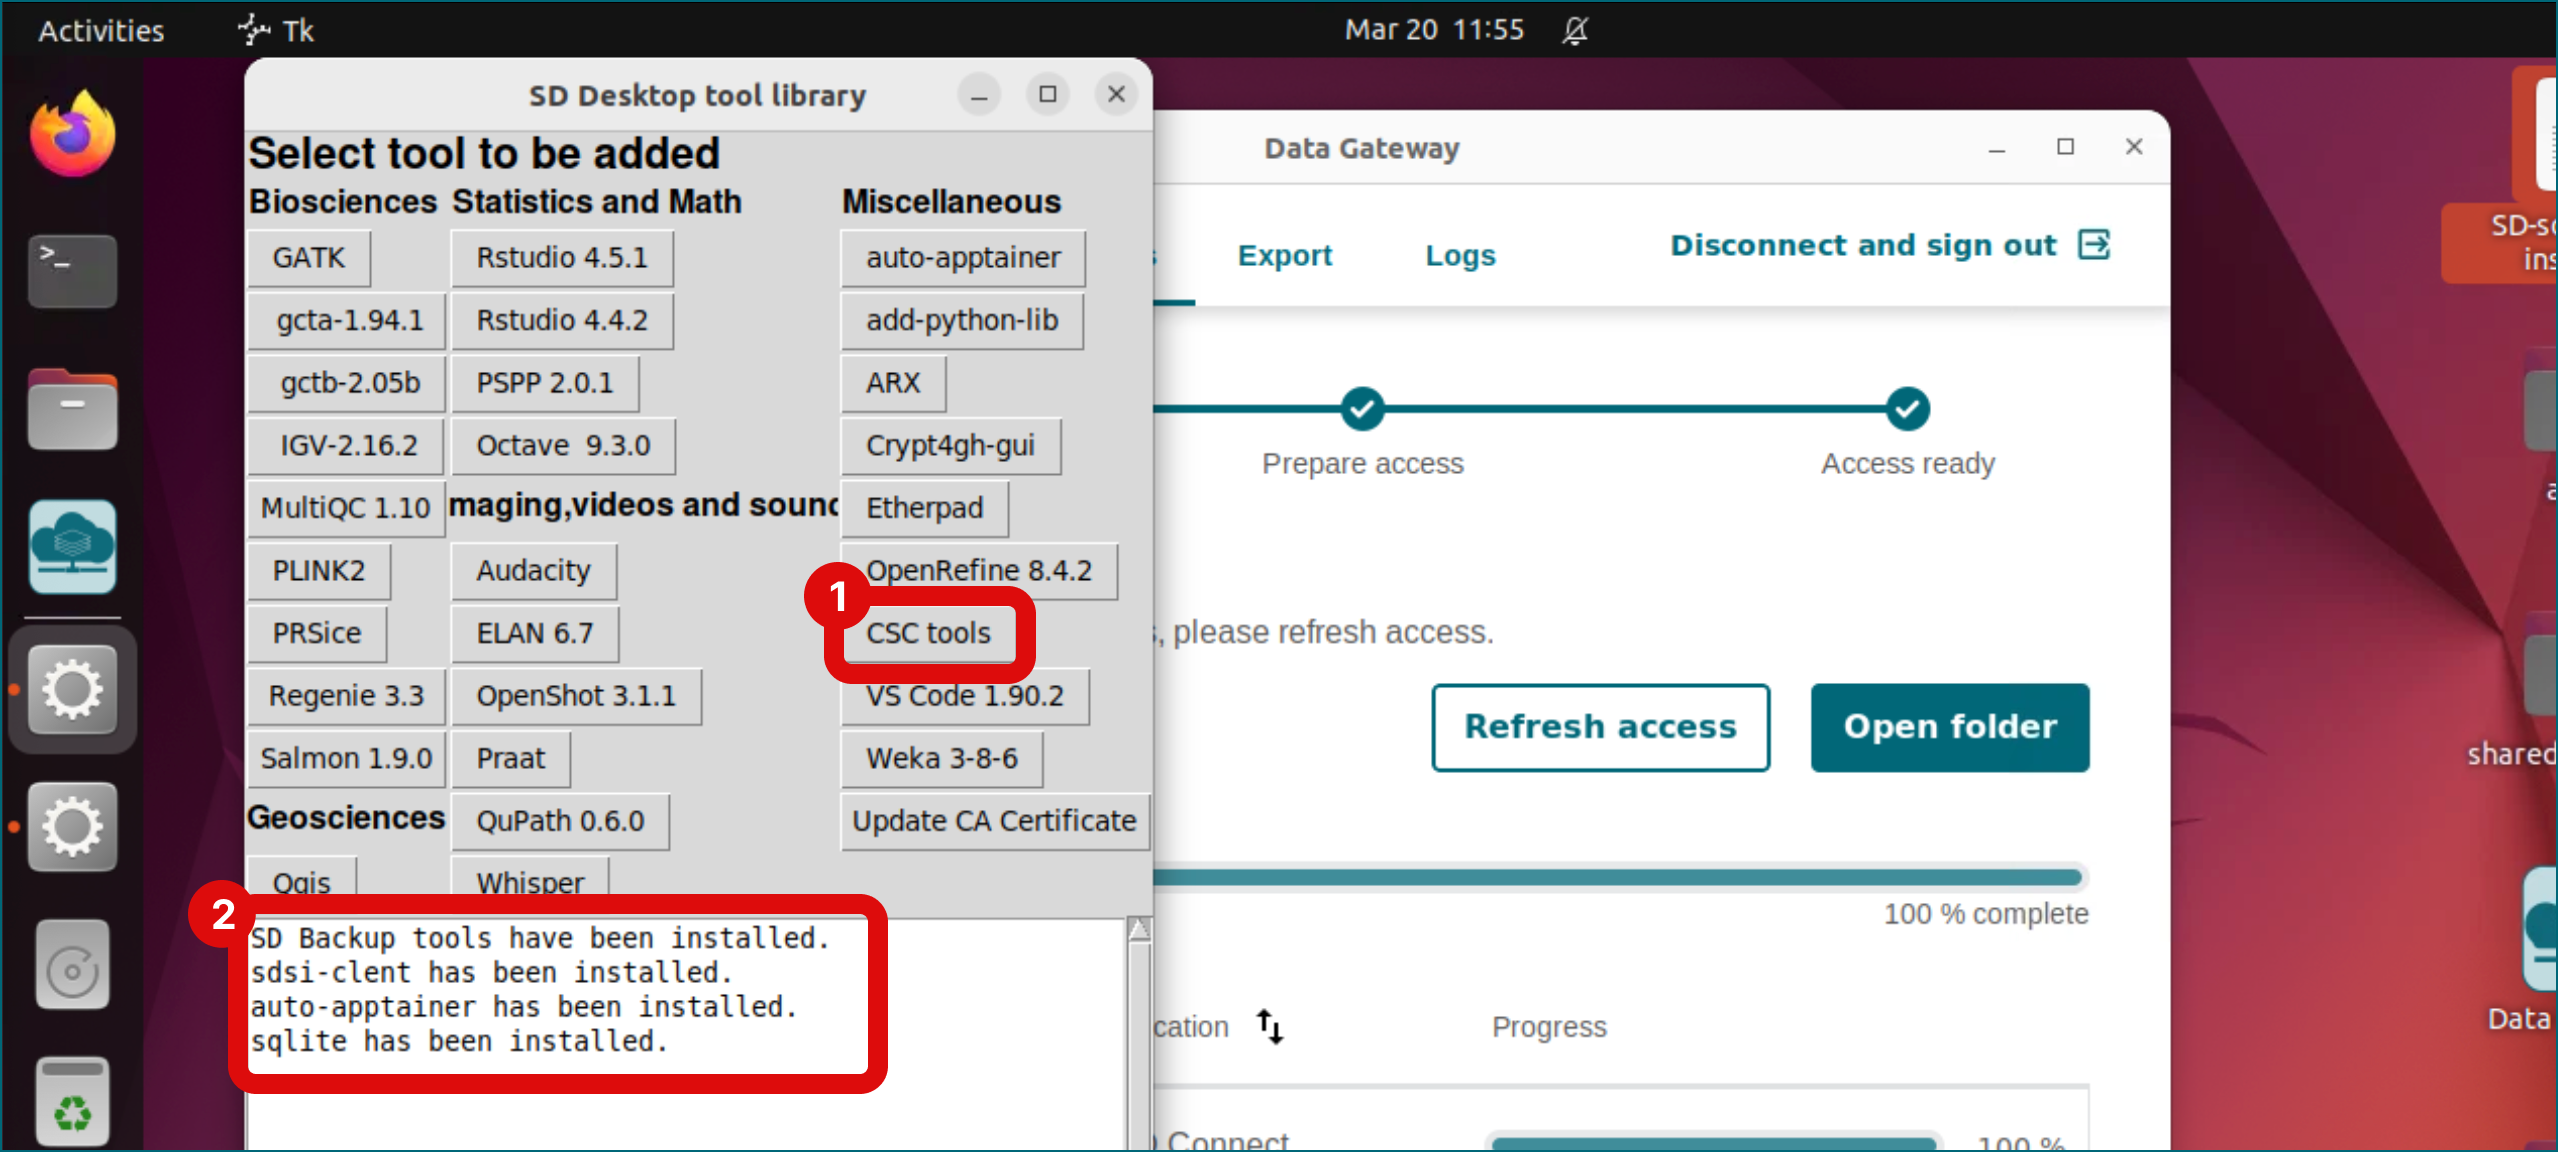
- Launch SD Tools installer. Remember that you've to have Data Gateway application open for it to work.
-
Install CSC Tools by clicking corresponding button. Wait for confirmation.
-
Open terminal from to left side of the desktop. Type in
pre-volume-detach. This command fixes the access permissions.
- Next, the command tells if there are other project members who should run this command as well. You should inform them if this happens.
- You are then asked whether you want to make a backup copy of your home directory to the volume, allowing you to import its contents to the new virtual machine. Type y or n (Yes/No).
- Next, the command asks whether you want to make a backup copy of your shared directory, which contains software installations. Type y or n (Yes/No).
Method 2: Set access permissions manually
By default, permissions are limited to your access only (orange lock icon).
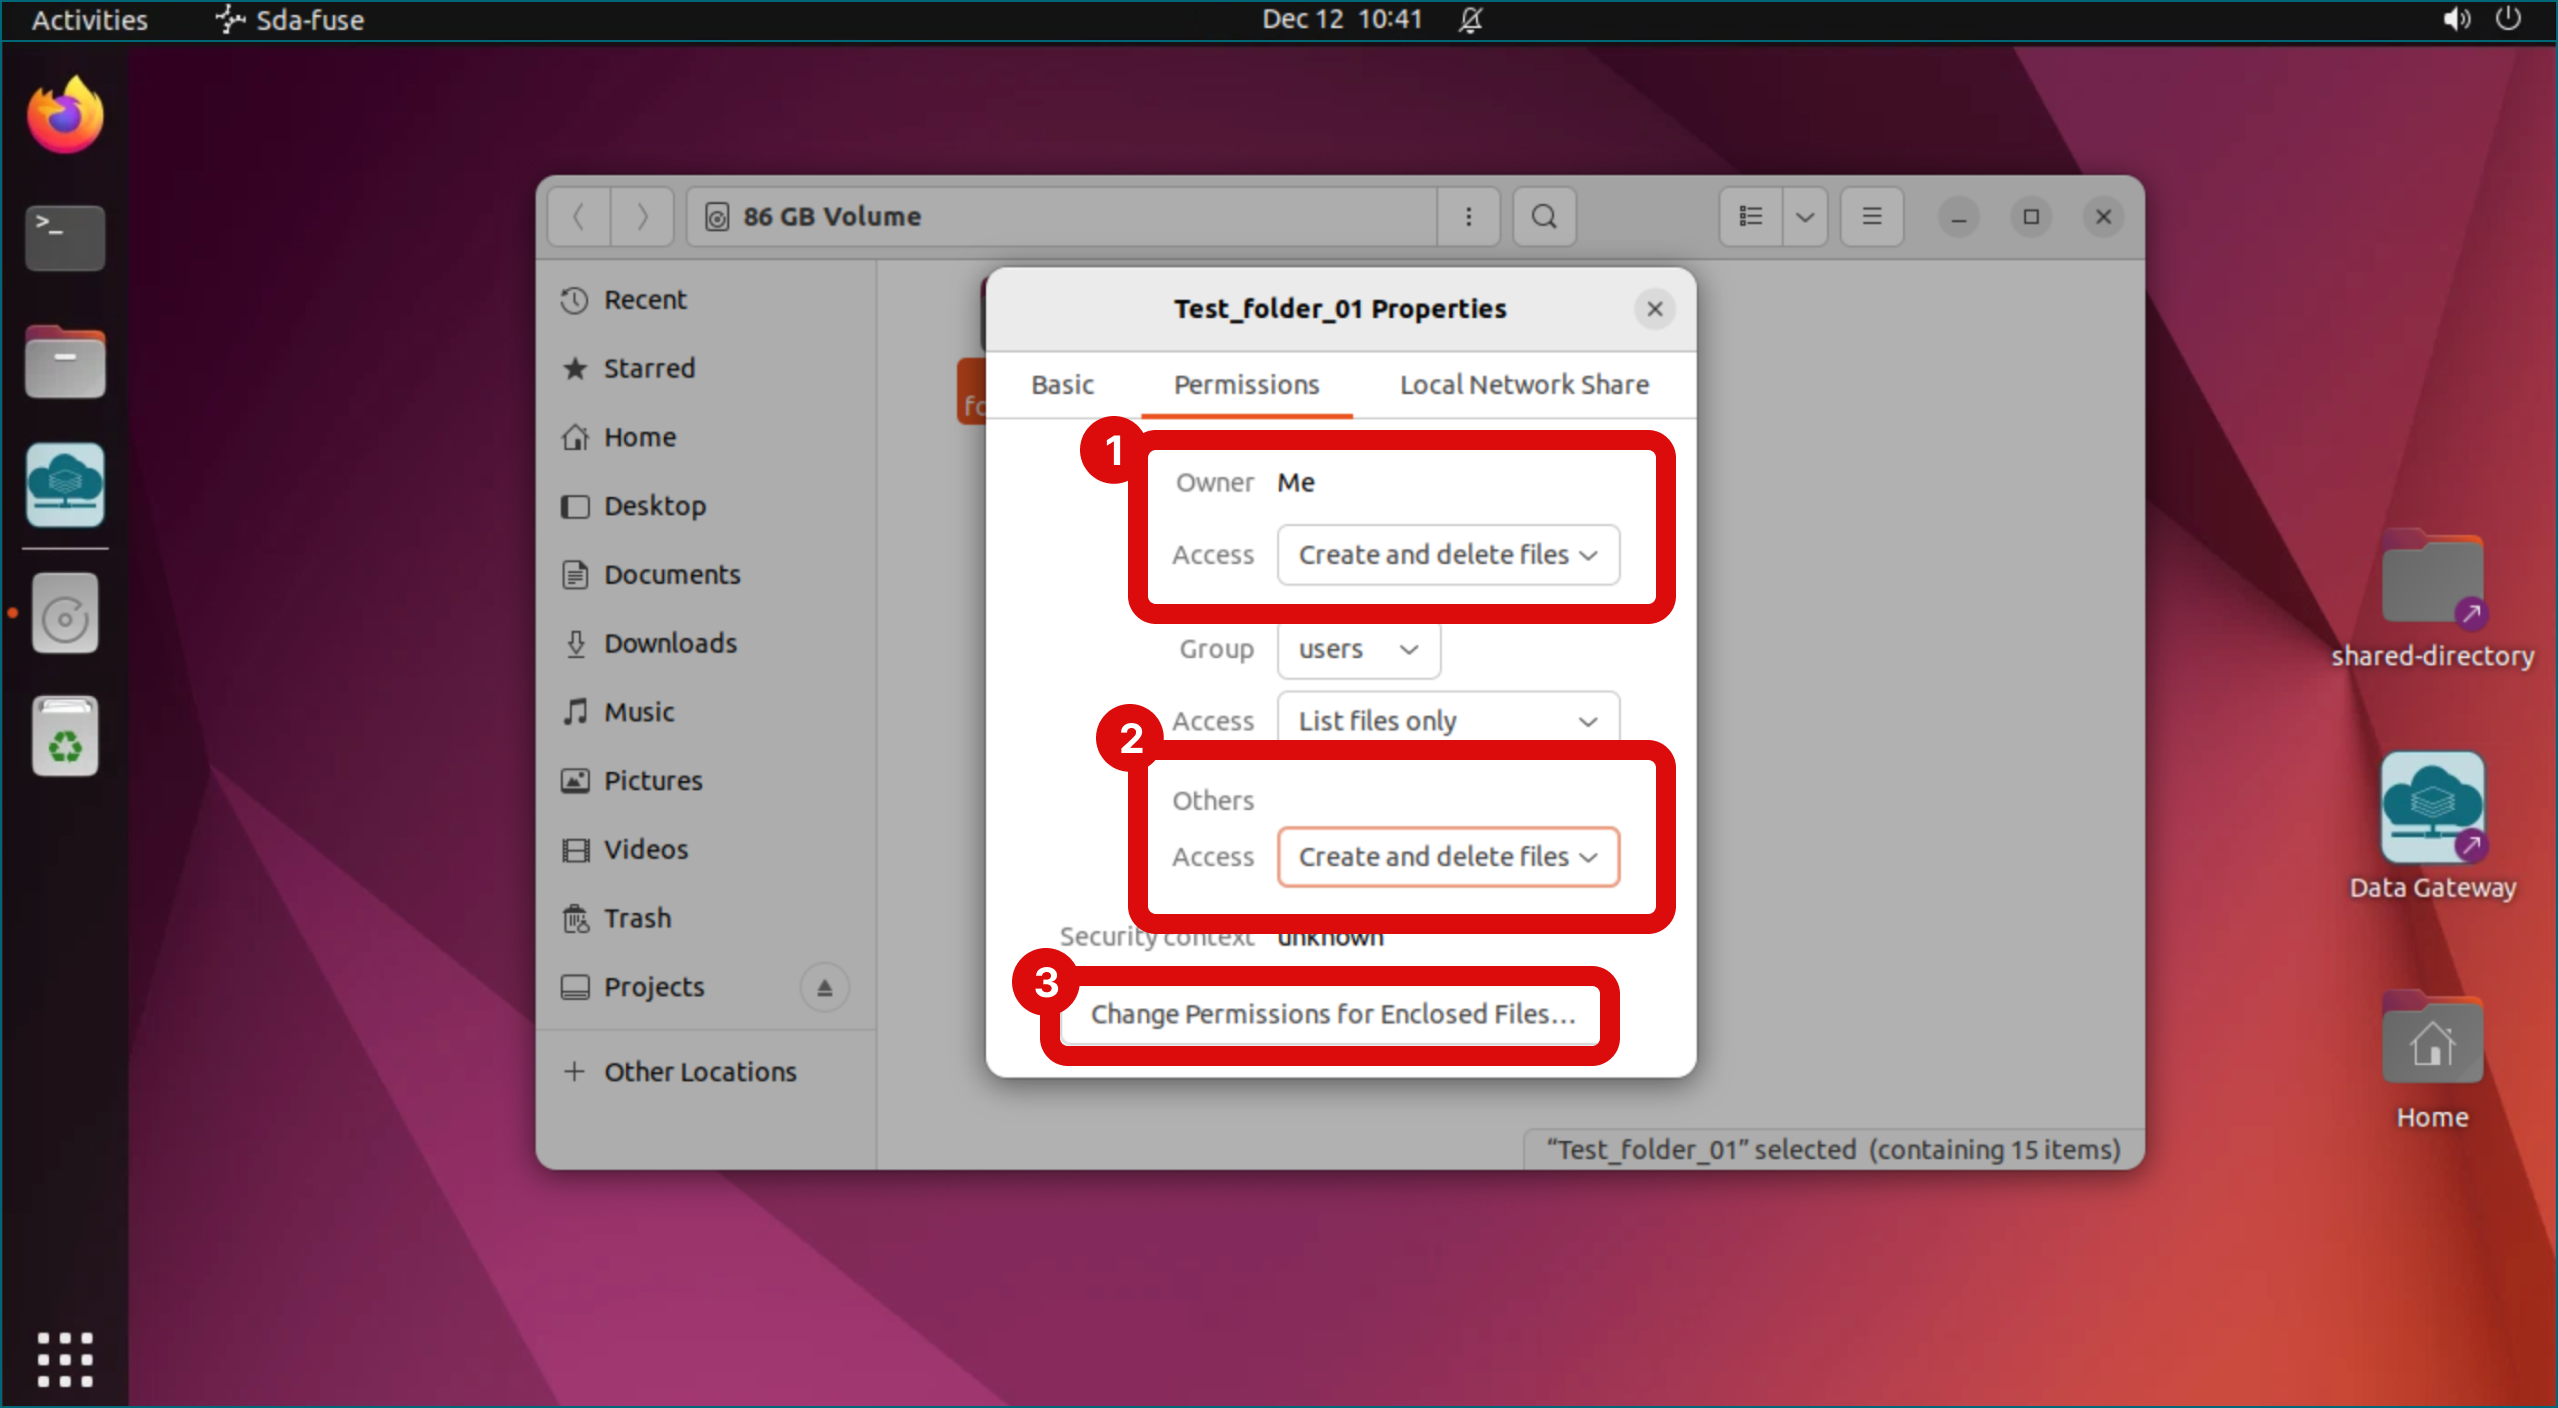
- Right-click the folder and select Properties.
- Open the Permissions tab.
-
Set permissions to Create and Delete Files:
- Owner -> Access -> Select “Create and delete files”.
- Group -> Access -> Select “Create and delete files”.
- Others -> Access -> Select “Create and delete files”.
-
Next select Change Permissions for Enclosed Files button to adjust file permissions inside the folder.
-
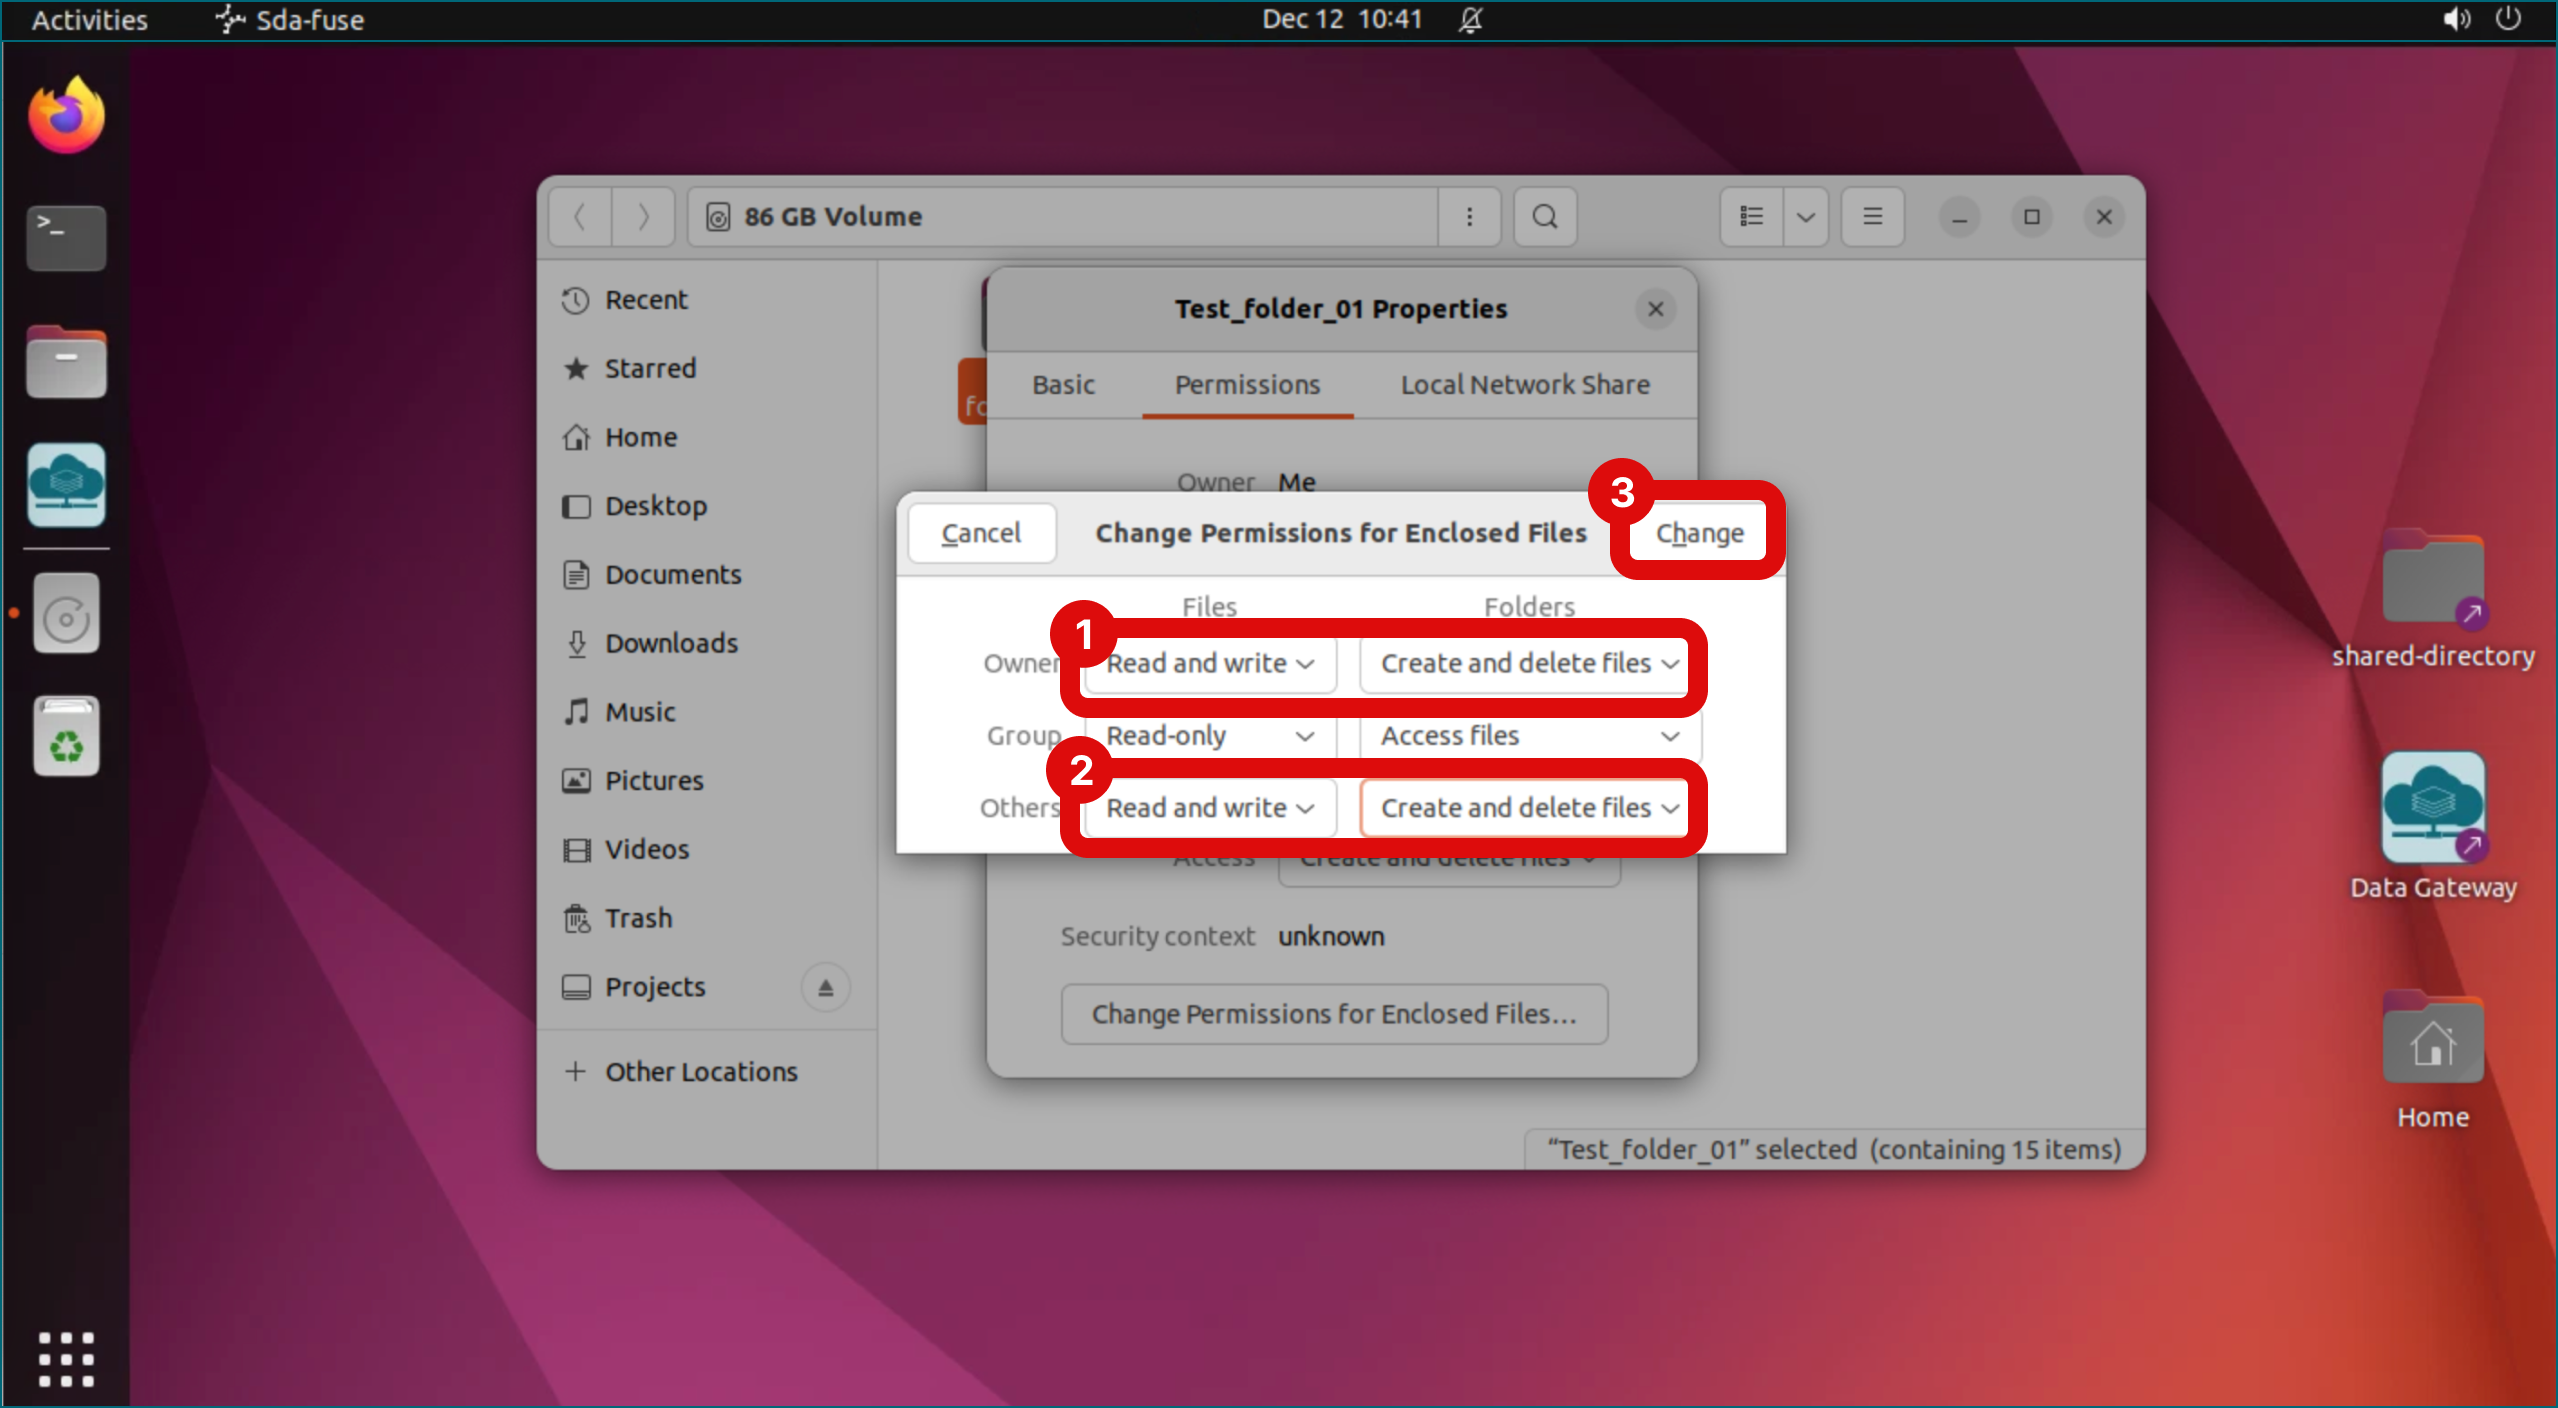
Set permissions to Create and Delete files:
- Owner -> Files -> Select “Read and write”. Folders -> Select “Create and delete files”.
- Group -> Files -> Select “Read and write”. Folders -> Select “Create and delete files”.
- Others -> Files -> Select “Read and write”. Folders -> Select “Create and delete files”.
- Click Change.
-
Close the permission tab (top right corner).
The orange lock icon will no longer be visible next to folders and files and they can now be edited by all project members.
Note: If you open the enclosed file permission settings again, it looks like the settings haven't changed even though the permissions have been set correctly.
Note
If you open the enclosed file permission settings again, it looks like the settings haven't changed even though the permissions have been set correctly.
4. Close Data Gateway
You can now disconnect the Data Gateway by clicking Disconnect and sign out if you no longer need to access to the data or import new data.
Note
If more than 10 Data Gateway connection are left open, Data Gateway will stop working. In this case, contact CSC Service Desk (subject: SD Desktop).
5. Log out
Log out from virtual desktop.