Developing scripts remotely
Here be dragons!
While developing scripts remotely can be useful, it is quite prone to connection issues and other hard-to-debug problems. If you encounter issues while developing scripts remotely, we unfortunately cannot guarantee being able to resolve them for you. Especially, running actual computations on HPC systems via remote VS Code is not supported.
We recommend using the VSCode, Jupyter and RStudio apps available in our supercomputer web interfaces for scripting or code development on HPC.
It can be convenient to use an IDE like Visual Studio Code to modify and develop the scripts you are running in Puhti, Mahti or cPouta virtual machine.
- No need to use command line text editors like vi, vim or nano.
- No need to transfer files back and forth between your local computer and Puhti/Mahti/cPouta.
This tutorial contains some installation and usage instructions for VS Code.
Visual Studio Code with Remote SSH plugin
Visual Studio Code is a widely used open source code editor that can be used remotely with the Remote SSH extension. It is great for Python and bash scripts, but can be used with any programming language. VS Code has many extensions available. However, for running Jupyter notebooks, we recommend primarily using the Jupyter app available in our HPC web interfaces.
Installation
You can install VS Code to your computer from the VS Code webpage and the Remote SSH Plugin from the Extension tab on the program.

Note
Windows users also need an SSH client installed as PuTTy is not supported.
If you have access to admin privileges, you can enable the OpenSSH on Windows 10.
If you don't have access to admin privileges, you can install
Git for Windows from here and configure VS
Code to use the SSH client included in Git (File -> Preferences ->
Settings -> search for "Remote SSH Path" and add path to your
ssh.exe, e.g
C:\Users\<YOUR_USER>\AppData\Local\Programs\Git\usr\bin\ssh.exe). You
might also need to disable the setting "useLocalServer" if you encounter
problems with VS Code using your Windows username rather than CSC username.
Usage
Note
To connect to CSC supercomputers using an SSH client you must set up SSH keys and add your public key to the MyCSC portal. Read the instructions here.
Once you've set up SSH keys, added the public key to MyCSC, and installed the Remote SSH extension, go to the Remote Explorer tab in VS Code and add new remote machine from the + symbol. When VS Code asks for the SSH command, type
Also, you need to choose a config file where it will save that connection to.

See also the Remember hosts and advanced settings section of the VS Code documentation for further details.
After that you can connect to the new host.

You are now in Puhti and can open a folder and edit files remotely. Notice that you can also transfer files to Puhti/Mahti by dragging and dropping them to VS Code.
Note
Latest versions of VS Code may give out-of-memory error when trying to connect to CSC supercomputers. See this FAQ for workarounds.
Configuring CSC software environments in VS Code Remote SSH
Due to usage of the module system and singularity containers for loading software environments, the VS Code Remote SSH extension is sometimes unable to correctly detect installed software, especially in Python environments. This means that e.g. code completion hints and many other convenient features will not work. Some additional configuration is required in order for VS Code to enable these.
This typically requires running an SSH remote command upon connection and varies depending on your exact use case - details on the exact commands that need to be run are listed below for a few examples. However, in all cases you need to
-
Enable remote commands in the Visual Studio Code Remote-SSH extension:
Open the settings screen (Ctrl ,) and type "enable remote command" in the search field. TheEnable Remote Commandsetting should appear as the first search result. Make sure it is enabled (shows the tick mark).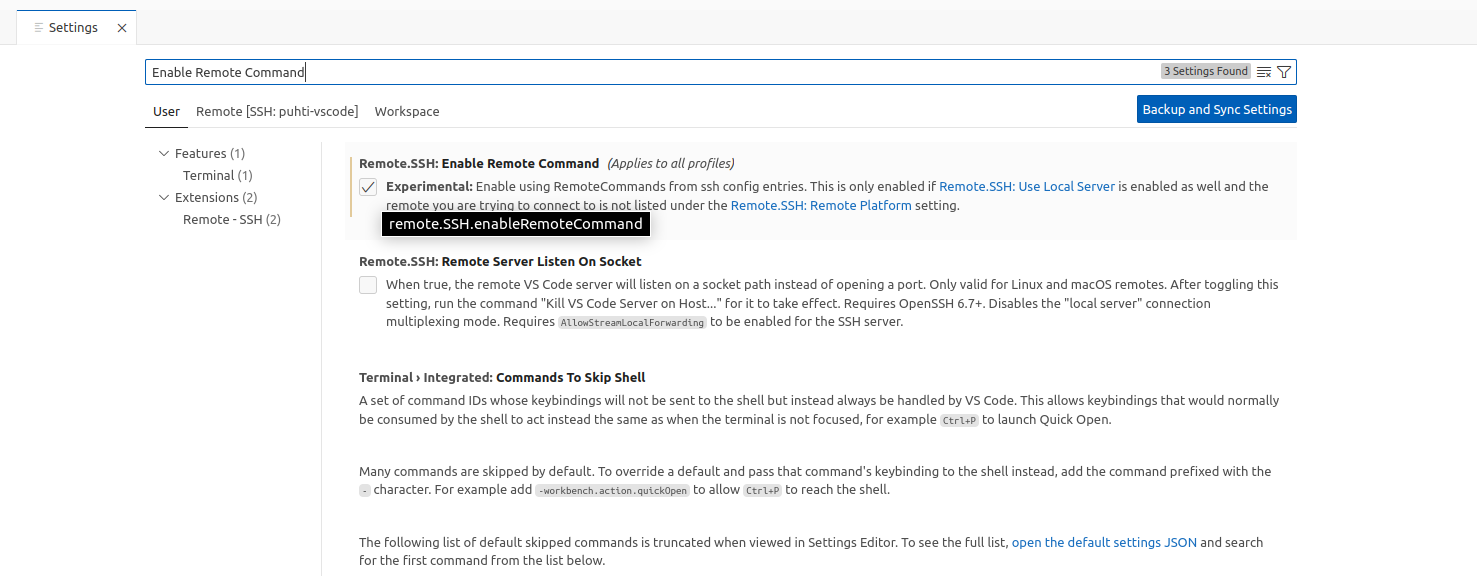
-
Configure a connection with remote command in your SSH configuration file:
Open the SSH configuration file (Ctrl Shift porF1) and typessh configuration, thenRemote-SSH: Open SSH Configuration Fileshould appear as the first result. Click it. -
In the now opened file, add a new block like the following and save the file:
Adjust the HostName to the system you want to connect to. You can freely
choose the label after Host (puhti-software-environment) and this is how
it will appear in the remote host selection of the VS Code Remote SSH
extension when you make a connection. We recommend giving each combination
of system and software environment you work with a recognizable name (e.g.,
puhti-pytorch). If you have saved your SSH key in a non-default location,
add IdentityFile <path_to_your_keyfile> to the host configuration block
shown above.
Loading CSC modules
You can load a module into the VS Code remote connection using the following
remote_command:
On LUMI, you will instead need to use
<your_module> is the module (or modules) you want to load, e.g. pytorch.
Note
The singularity_wrapper shell part of the above remote_command assumes
that the module is built using a singularity container, which is true in
the majority of cases. However, if this does not work, try to replace it
with bash.
Loading CSC modules with additional packages (Python)
If your environment is based on a CSC module but you have installed some
additional packages on top either via venv or using pip install --user (see
also our
Python usage guide)
you will need to use the following remote_command (on Puhti/Mahti):
-
pipinstallation to customPYTHONUSERBASE:
Insertexport PYTHONUSERBASE=<your_pip_user_base_dir>;beforesingularity_wrapper shell, i.e. on Puhti/Mahti theremote_commandbecomes: -
venv:
Insertexport APPTAINERENV_PREPEND_PATH='<your_venv_dir>/bin/'beforesingularity_wrapper shell– you may also have to select the Python interpreter used by VS Code as the one provided by the venv.
Note
Unfortunately the support for venv is currently limited to environments that are set-up from within the singularity container. To set up the venv, do the following in the system terminal:
- Load the respective (base) module:
module load <your_module> - Enter the container environment:
singularity_wrapper shell - Create the virtual environment:
python -m venv --system-site-packages <path_where_to_create_the_venv_directory>
Step 2 is crucial - if you create the venv from outside the container, it will not work from within and therefore not with the VS Code remote setup described above.
Loading tykky containers (Python)
To connect to a custom Python environment container created with our
Tykky container wrapper, use the
following remote_command:
where <tykky_installation_dir> is the path in which the Tykky environment
installation was made.
Once you are connected to the remote environment in VS Code, the integrated terminal should show as prompt line
indicating that you have a shell inside the Tykky container.
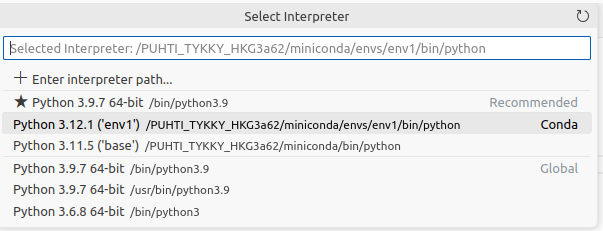
Finally, you need to
select the Python interpreter used by VS Code
as /<SYSTEM>_TYKKY_*/miniconda/envs/env1/bin/python, where <SYSTEM> is a
placeholder for PUHTI, MAHTI, LUMI, and * for some string of random
characters.
Note
You will not be able to modify the contents of the container using this VS Code remote connection, including installing new packages via pip or conda. Please modify the container using the instructions for tykky outside the configured VS Code remote connection.
Running the code
Please do not run any computations on HPC via the VS Code Terminal tab or using VS Code's debuggers. This would run the code on a login node by default, which is not meant for demanding computations. The setup is also fragile in general.
VSCode Remote Tunnels
VSCode also offers a Remote Tunnel feature as an alternative to SSH. The VSCode dev tunnels feature has been intentionally disabled on Puhti and Mahti due to security concerns, as it would give a third party the ability to control access into CSC's supercomputers. We recommend using the Remote SSH feature instead (documented above).