Option 3: Virtual desktop has no volume
Desktops have 80 GB of storage by default. If you save more than 80 GB of data to your desktop, it becomes unresponsive and you may lose your data. To avoid this we recommend that you export your data to SD Connect, create to a new virtual desktop and a volume and then import your data to the volume.
Before you begin, make sure you read the instructions carefully and agree on the approach with your colleagues.
Step-by-step
- Step 1: Access desktop
- Step 2: Update Data Gateway application
- Step 3: Export all needed files to SD Connect
- Step 4: Create a new virtual desktop
- Step 5: Create a volume
- Step 6: Attach a volume to a virtual desktop
- Step 7: Import data to your volume via the Data Gateway application
- Step 8: Delete old virtual desktop to save resources
- Step 9: Customising virtual desktop
Step 1: Access desktop
-
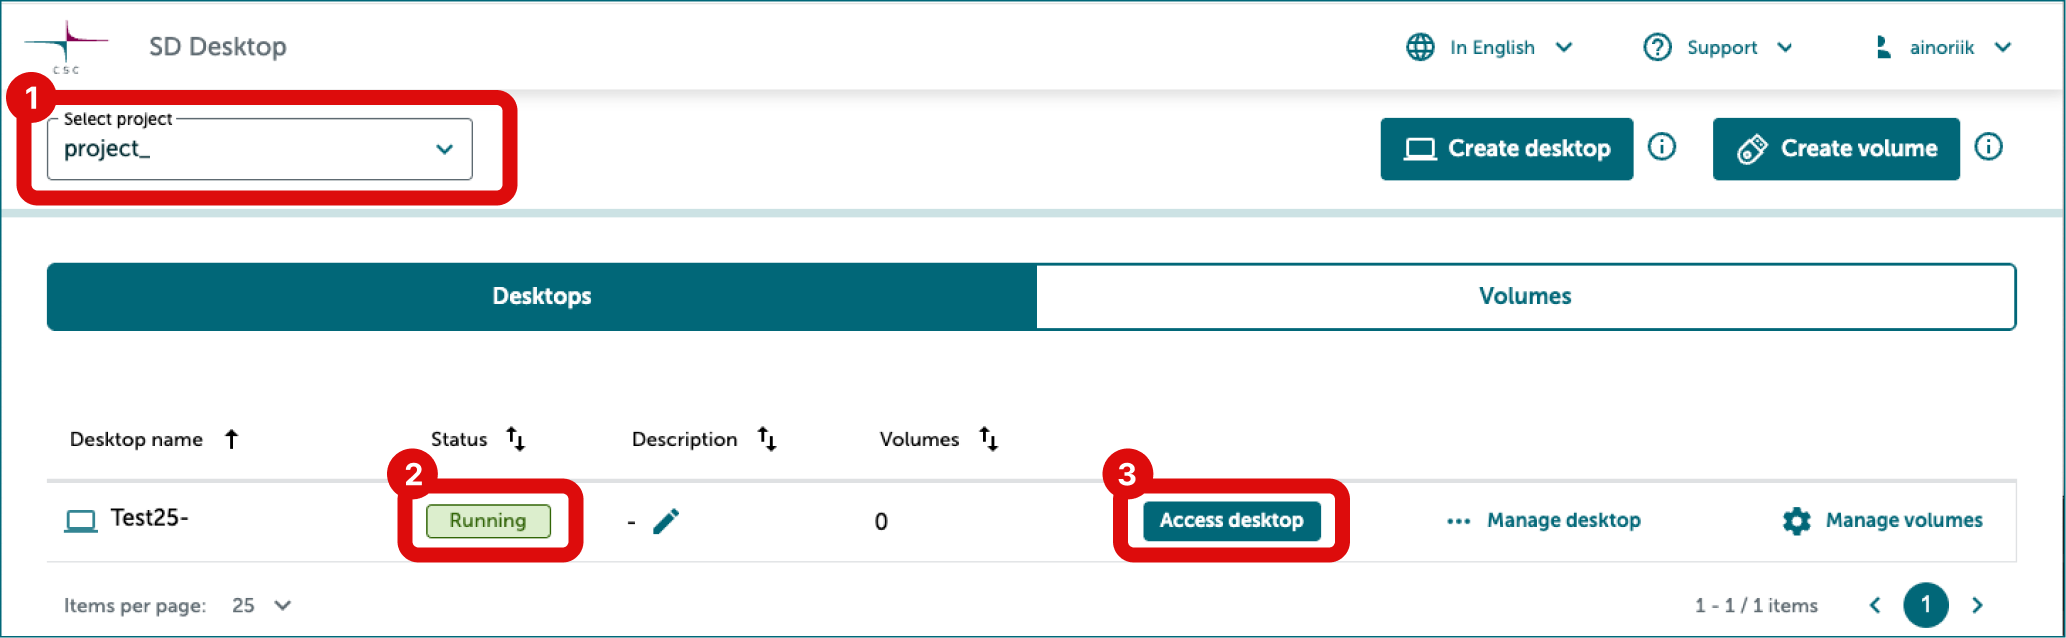
Login to SD Desktop. Select the correct CSC project in the top left corner. Now you can see all desktops in this project.
-
Make sure the virtual desktop you want to access is running. If it is paused, you need to unpause it before you can access it.
-
Access virtual desktop by clicking Access desktop on right side of the desktop name.
When you open the connection, a virtual desktop will open in your browser in a new window.
Step 2: Update Data Gateway application (project manager)
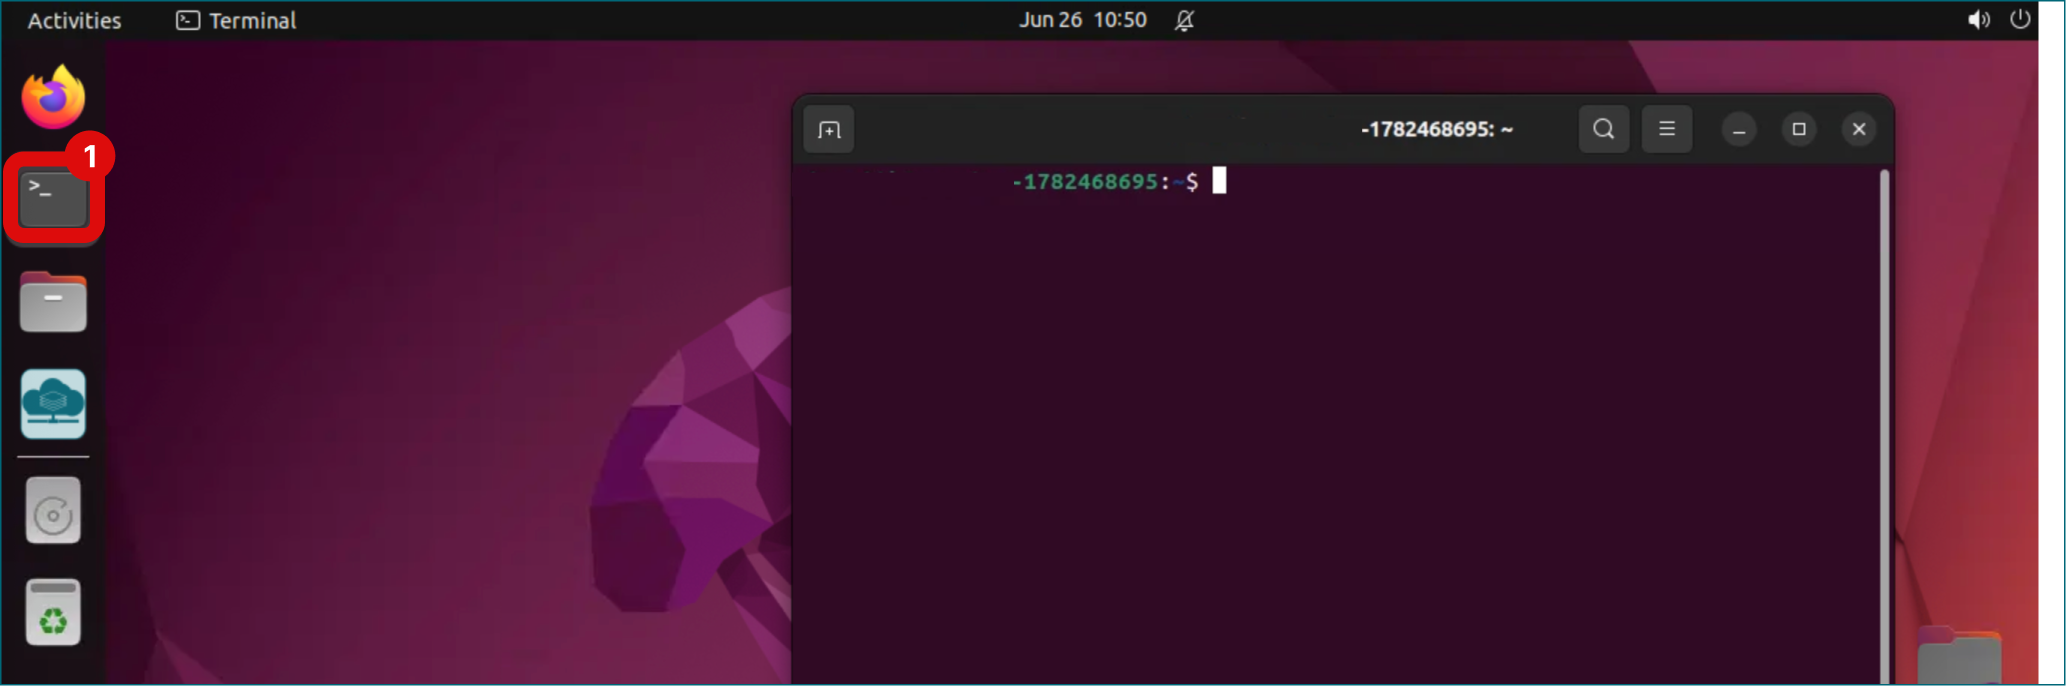
- Open terminal.
-
Copy this command:
-
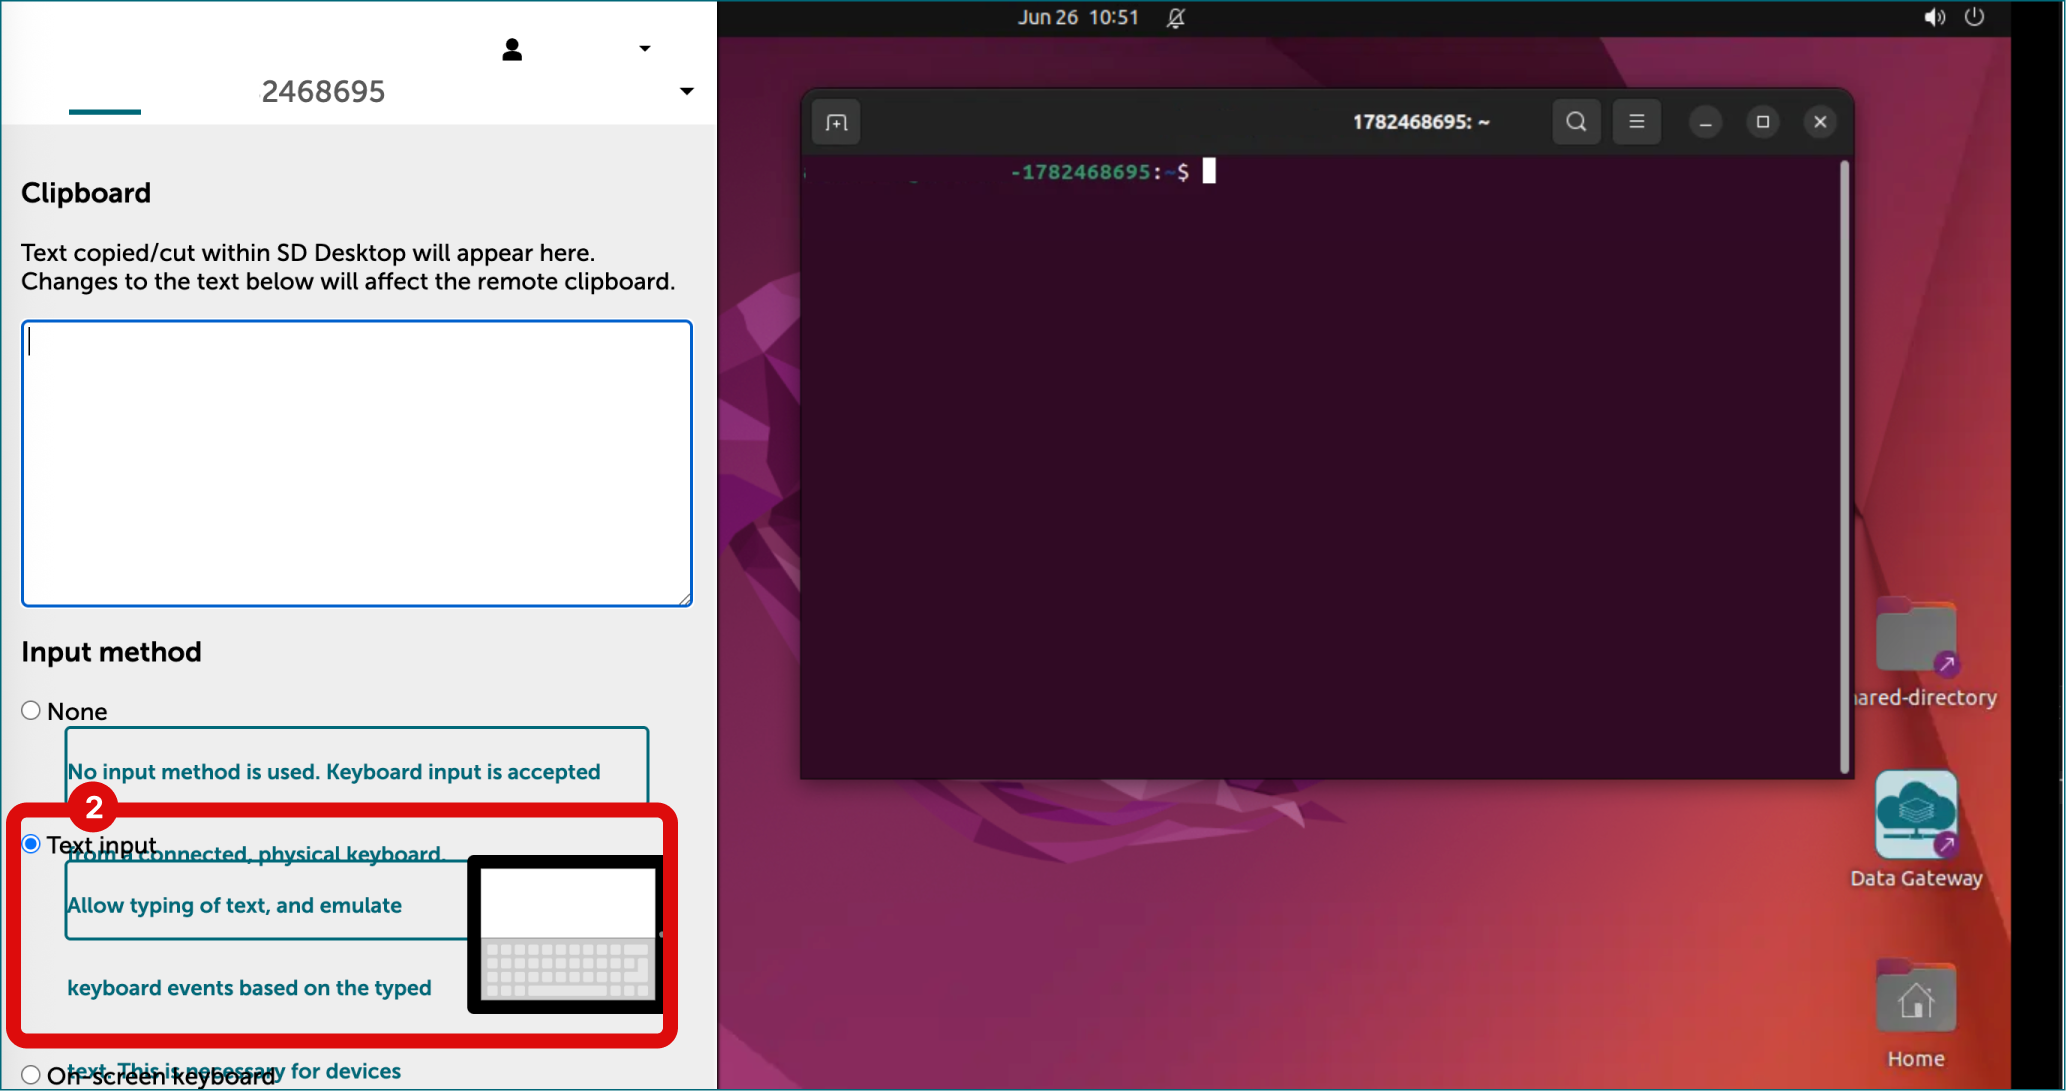
Press Ctrl + Alt + Shift to open the Clipboard panel. Select Text input to enable copy-paste. Clipboard panel will close automatically. Do not close the Clipboard panel with Ctrl + Alt + Shift, as this may disable copy-paste.
- Move your mouse over the black bar in the bottom of the screen.
- Right-click and Paste the command you copied.
- Command will appear in the terminal. Presss Enter. Update will start.
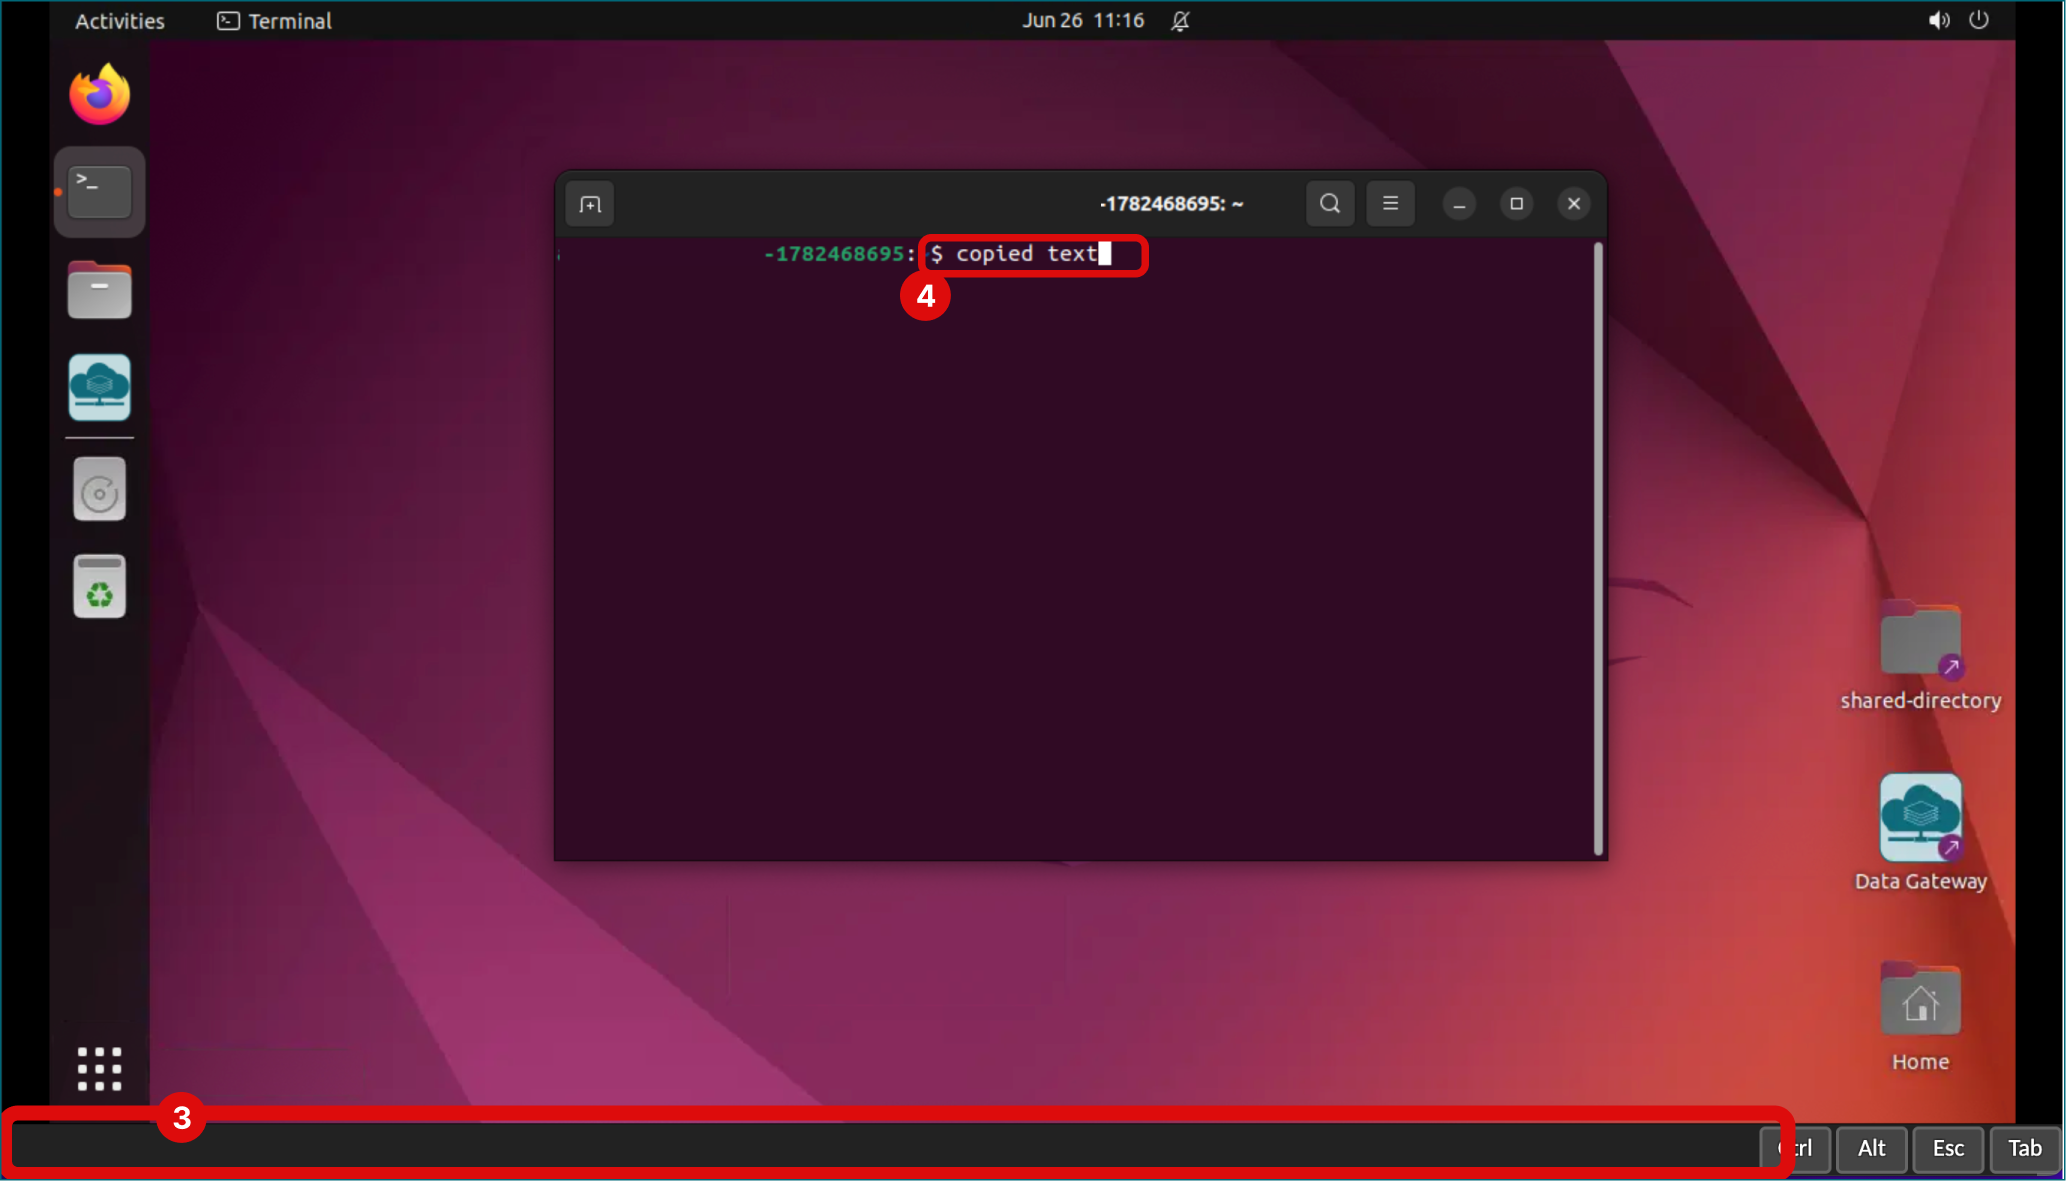
- When update is finished, an icon called New Data Gateway will appear on your desktop. Use this icon to launch Data Gateway.
Step 3: Export all needed files to SD Connect
- All project members move their data to Shared folder visible on their desktop.
-
Only project manager can export data to SD Connect.
- Launch Data Gateway by clicking icon on the left side of desktop.
- Select SD Connect and click Continue.
- In the next view you are asked to choose a folder for accessible files. Check that Projects folder is selected and click Continue.
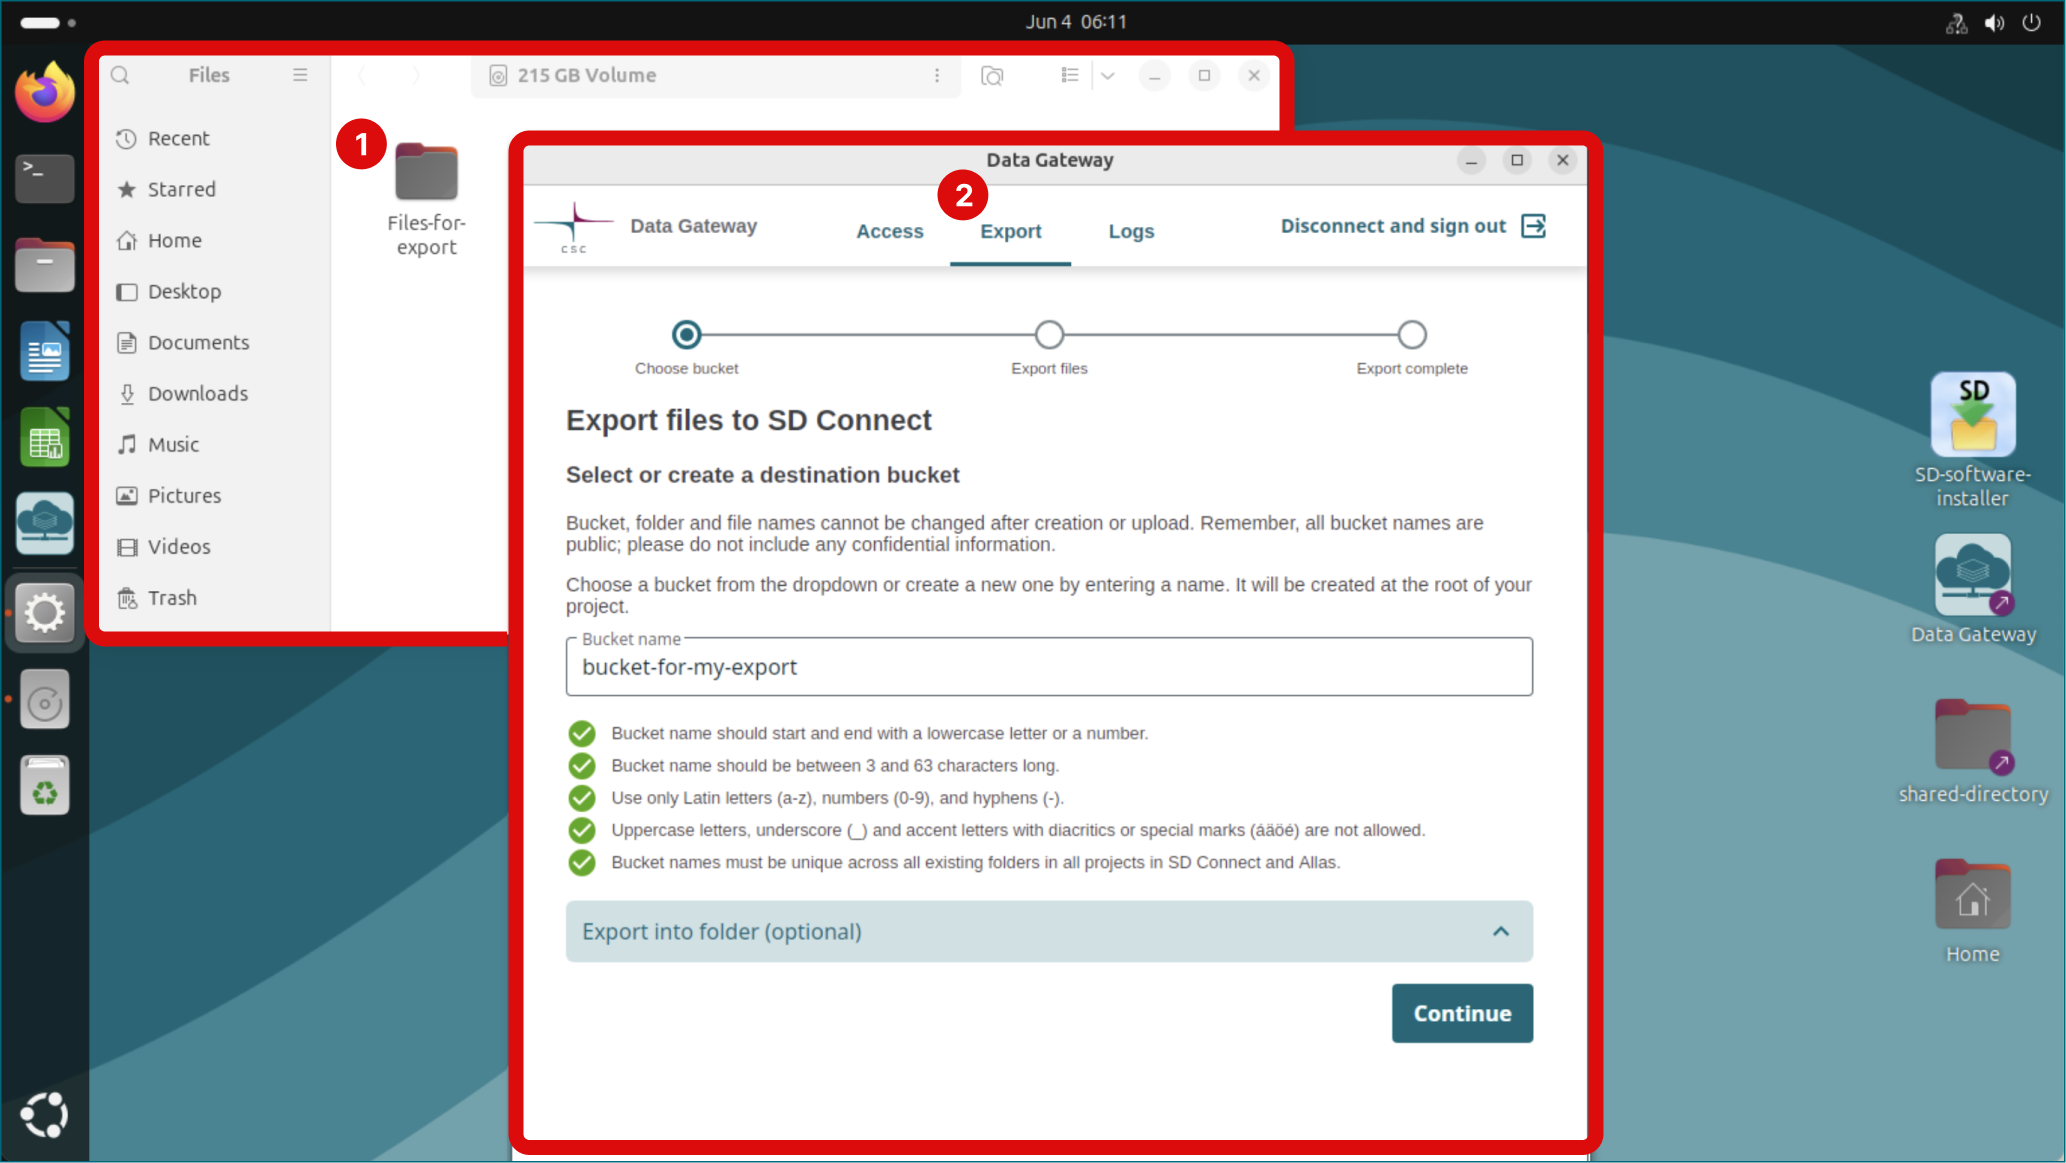
- In the next view click on Export tab. It is available only to the project manager.
-
Files will be be exported to SD Connect. Next create a new bucket or use an existing one via Bucket name field.
- Create a new bucket by writing bucket's name to the field. Follow bucket naming conventions below or via user interface.
- Use an existing bucket by clicking the field and select it from the dropdown.
Bucket naming conventions
Note
Top-level folder (bucket) name can not be modified after their creation with SD Connect. These rules apply only to top-level folders created in the service, not to subfolders or files uploaded from a local computer.
Top-level folder (buckets) names must:
- start with a lowercase letter or a number.
- be between 3 and 63 characters long.
- use Latin alphabets (a-z), numbers (0-9) and dash (-).
- be unique across all existing folders in all projects in SD Connect and Allas. If you can't create a new folder, another project may already use the name you have chosen. To avoid this situation, it is good practice to include project specific identifiers (e.g., project ID number or acronym) in the folder name.
Top-level folder (buckets) names must not contain:
- Uppercase letters, underscore (_) and accent letters with diacritics or special marks (åäöe') are not allowed.
- All folder names are public; please do not include any confidential information.
-
Click Continue.
-
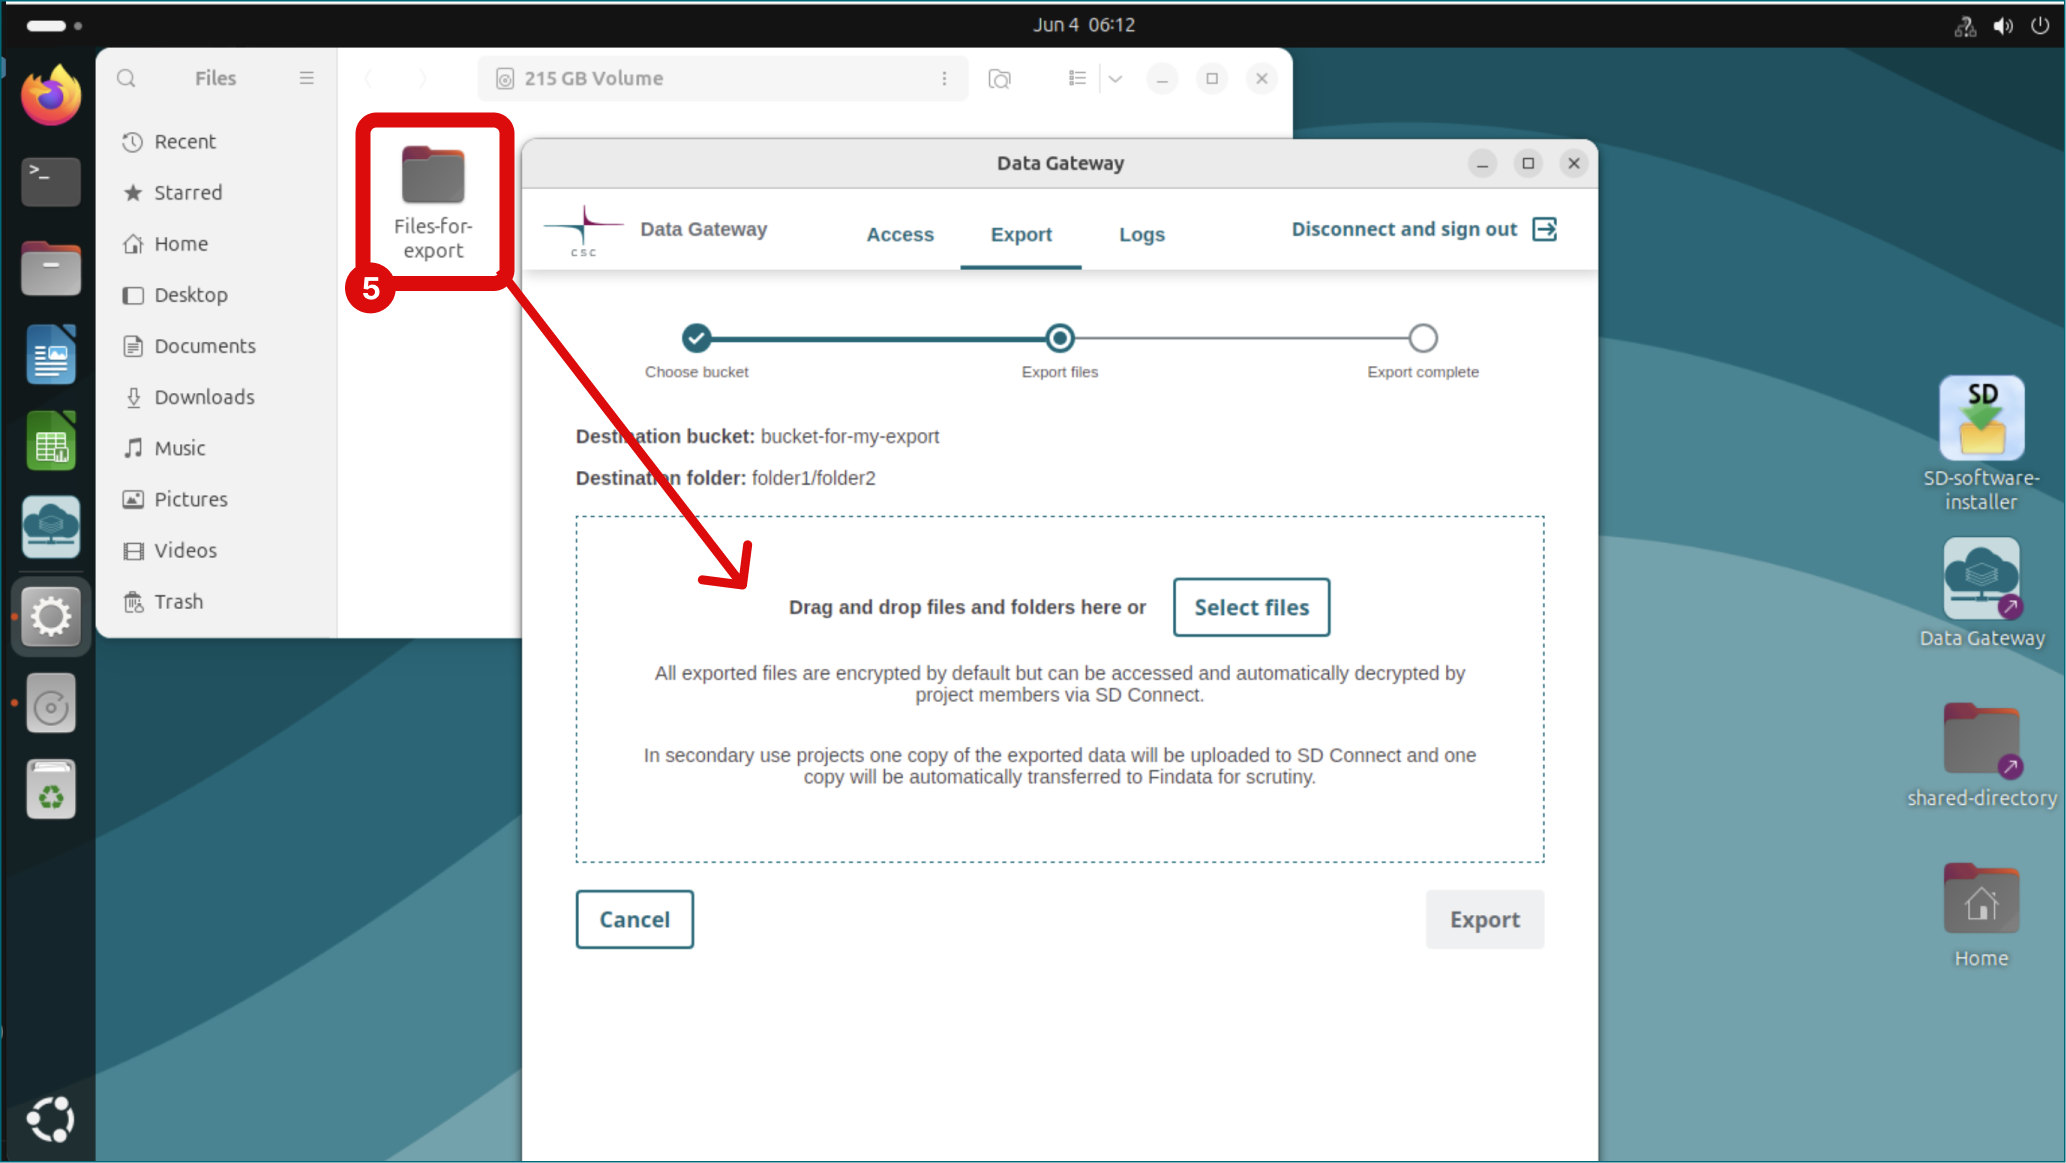
Drag and drop or select files you want to export.
-
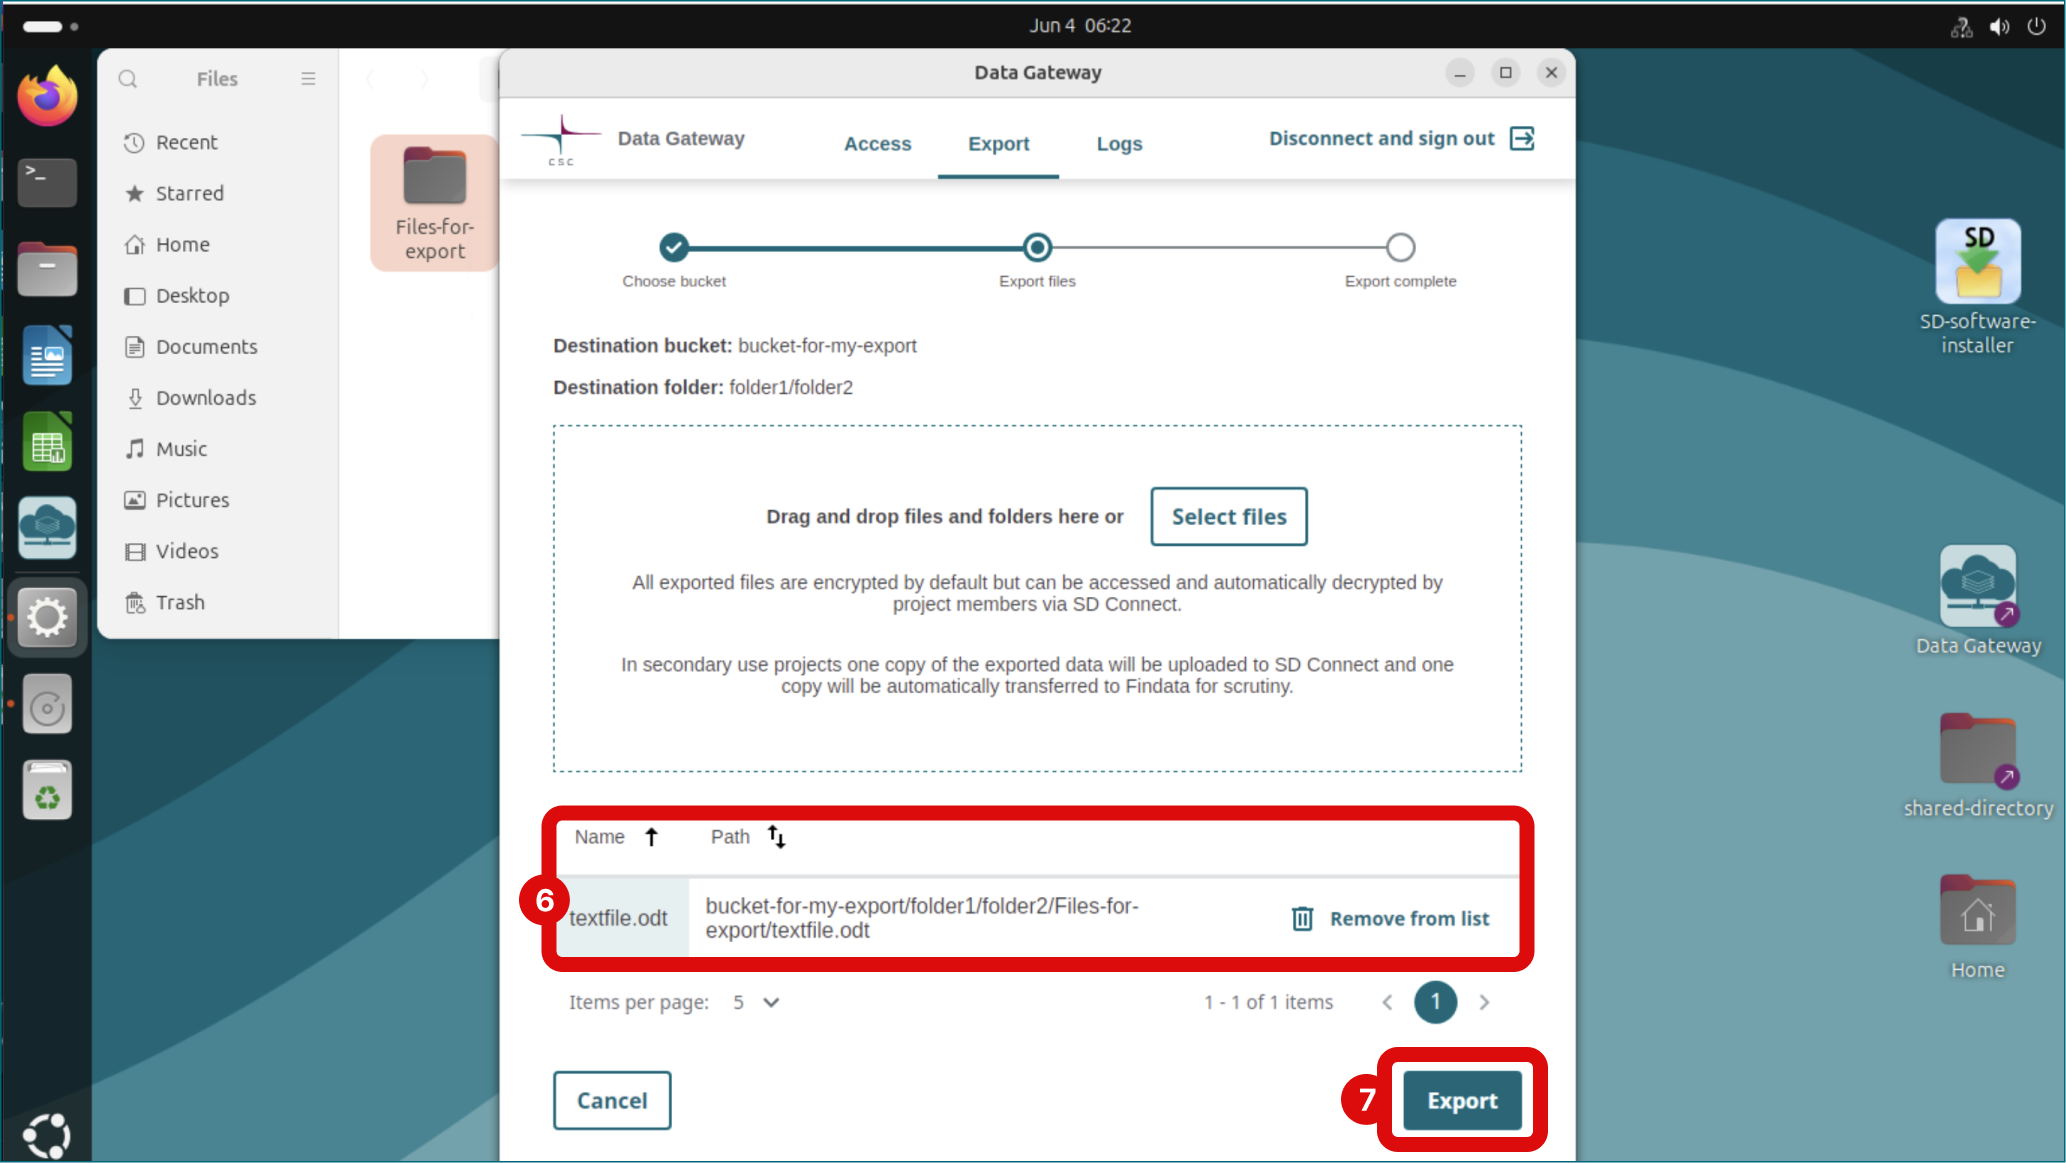
You can see files to be exported from the list and remove them if needed.
-
Finally click Export. Files will be encrypted and exported to the bucket you selected in SD Connect. Please note that files can now be downloaded by all project members via SD Connect.
Step 4: Create a new virtual desktop
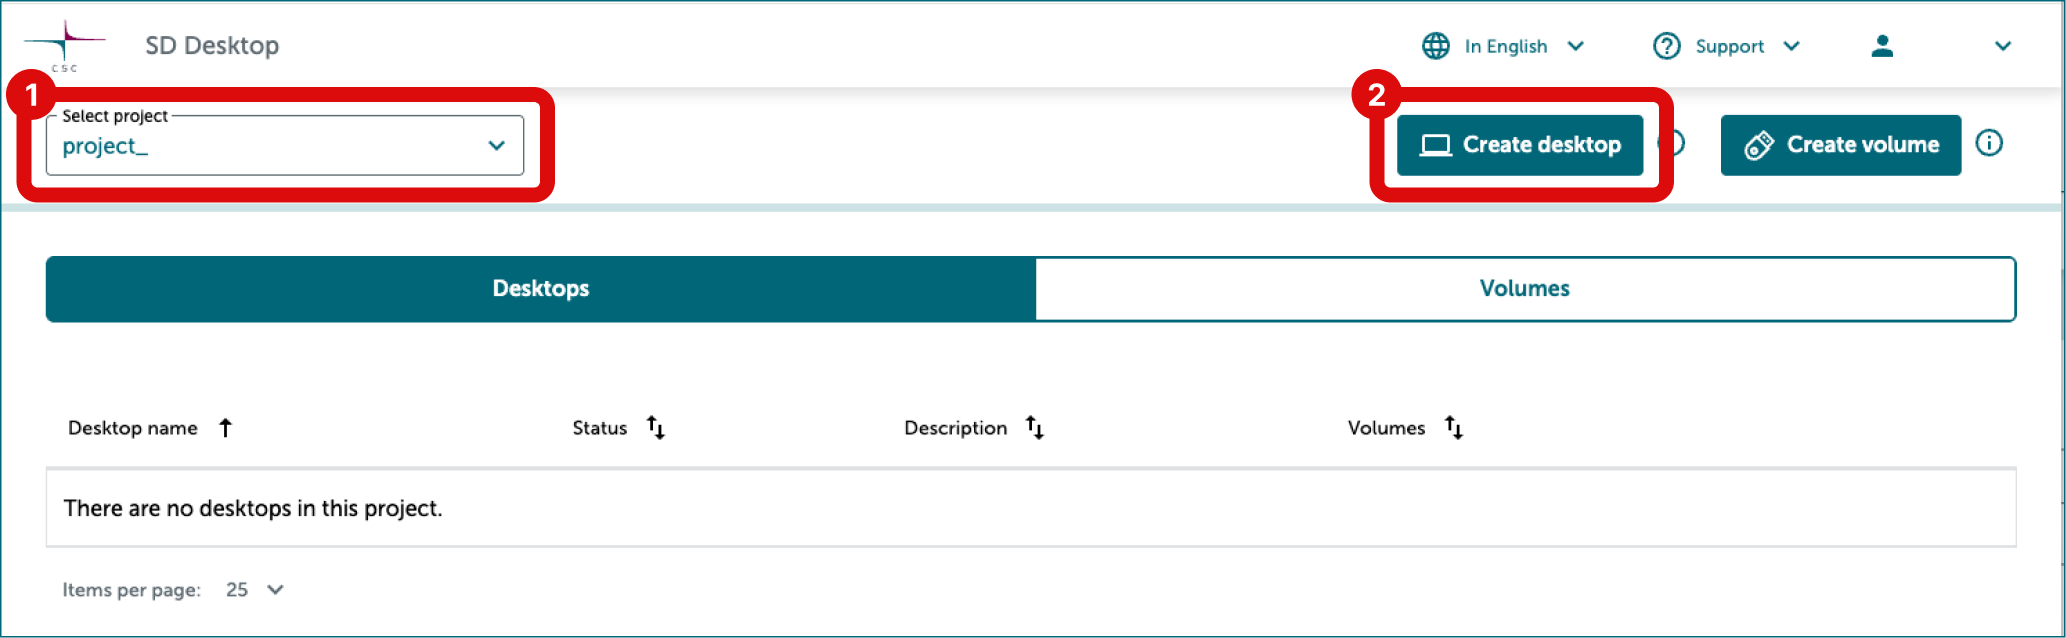
- Select correct CSC project from dropdown on the left side.
- Click Create desktop.
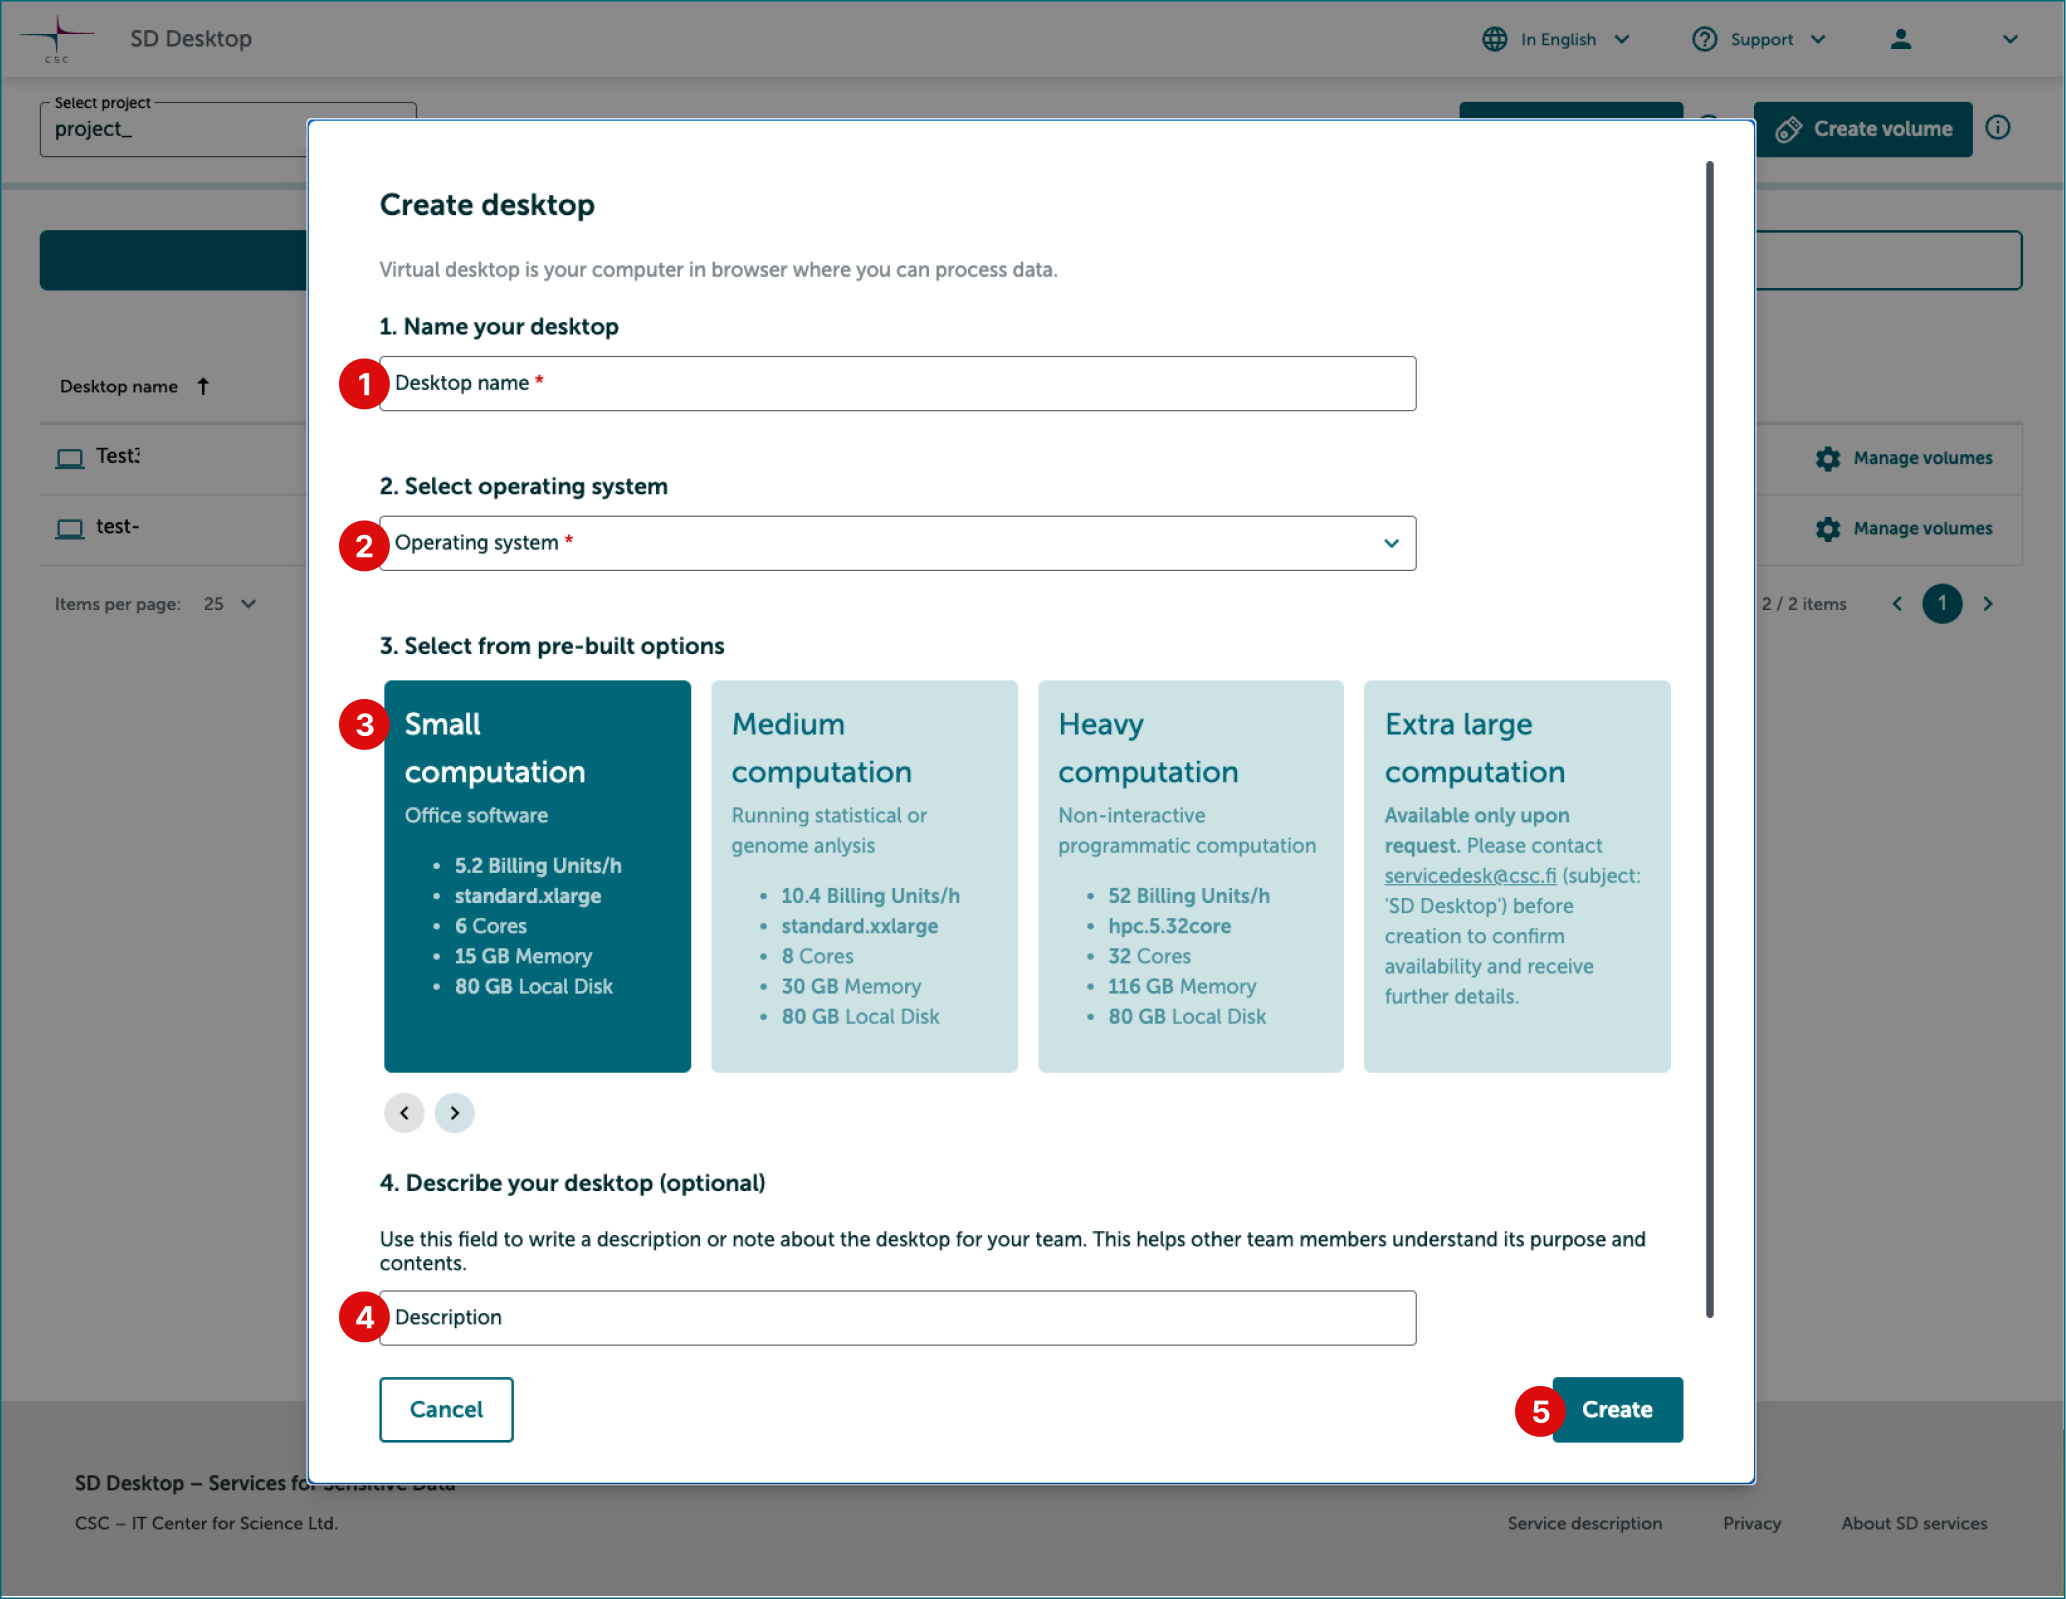
In Create desktop window
- Select a name for your desktop. Choose a clear and descriptive name - especially if you're working on multiple projects - and make sure it only contains letters or numbers, with no special characters or spaces.
- Select operating system. We recommend to choose Linux Ubuntu22. If you want to create a GPU desktop, please contact servicedesk@csc.fi (subject 'SD Desktop') before creation to confirm availability and receive further instructions.
- Select a pre-built desktop option based on your needs.
- Write optional description or note about the desktop to help your team members understand its purpose and contents.
- Click Create. The window will now close and desktop creation will start.
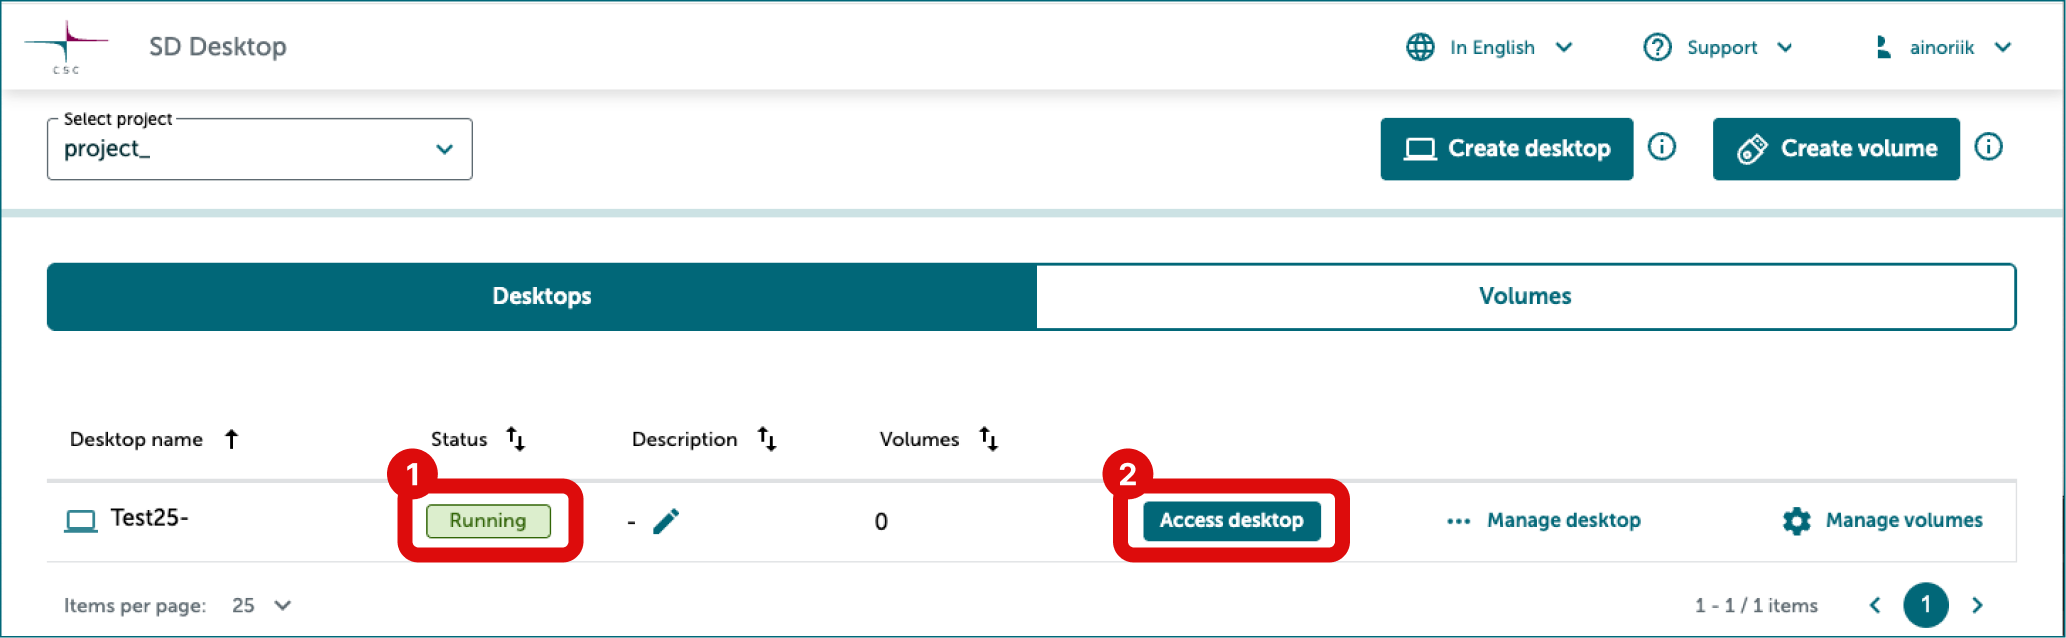
After returning to the main page, you’ll see a list of your desktops in Desktops tab. Creating a desktop can take up to 30 minutes, during which a Creating label will appear next to its name. If you try to open it too soon, you’ll get an error message. Once the status changes to Running, the desktop is ready to use.
Step 5: Create a volume
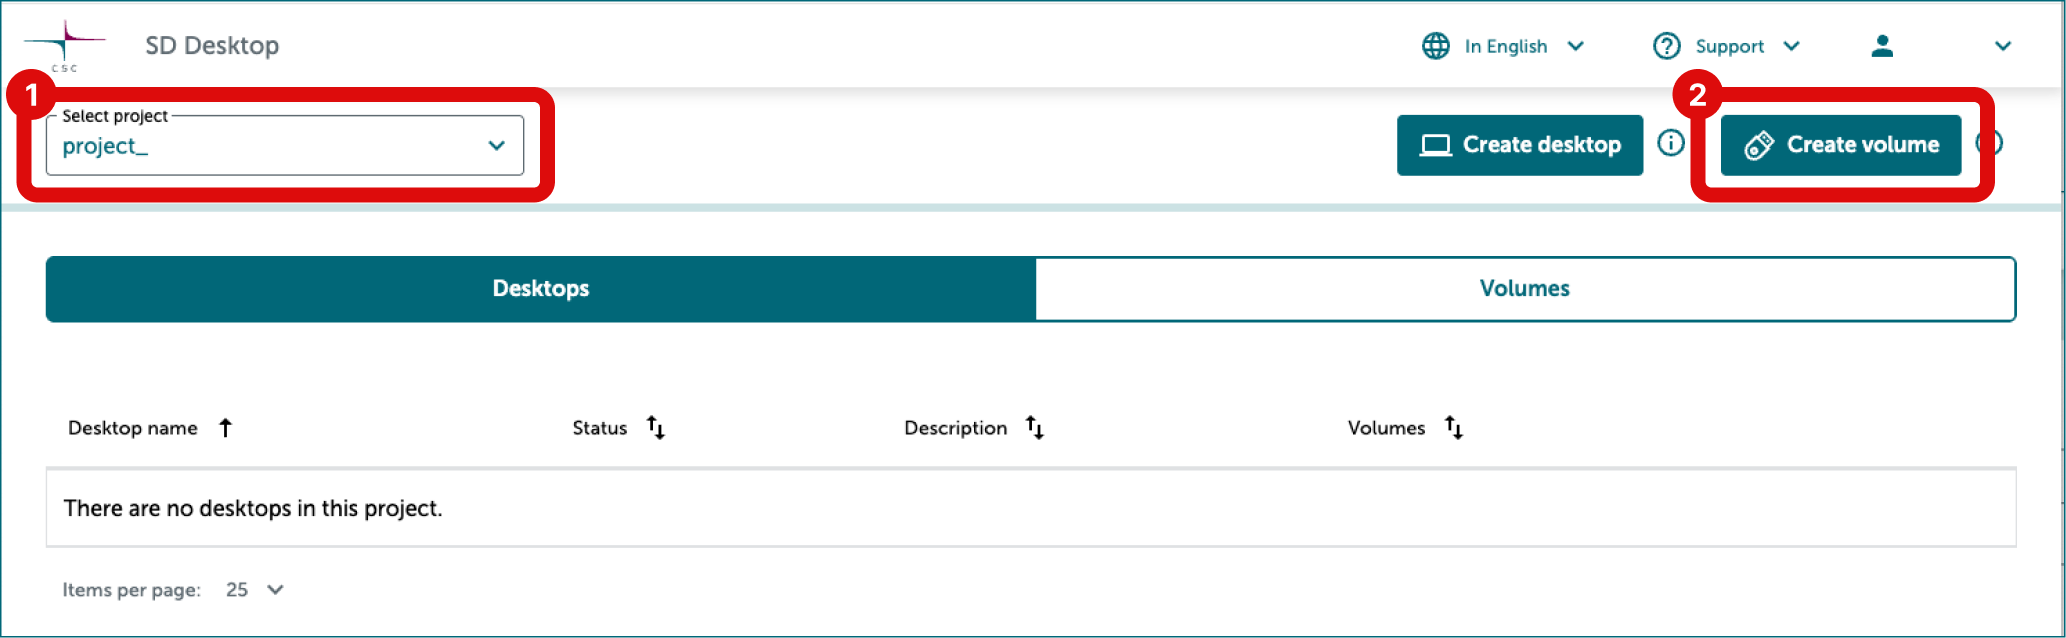
- Select correct CSC project from dropdown on the left side.
- Click Create volume.
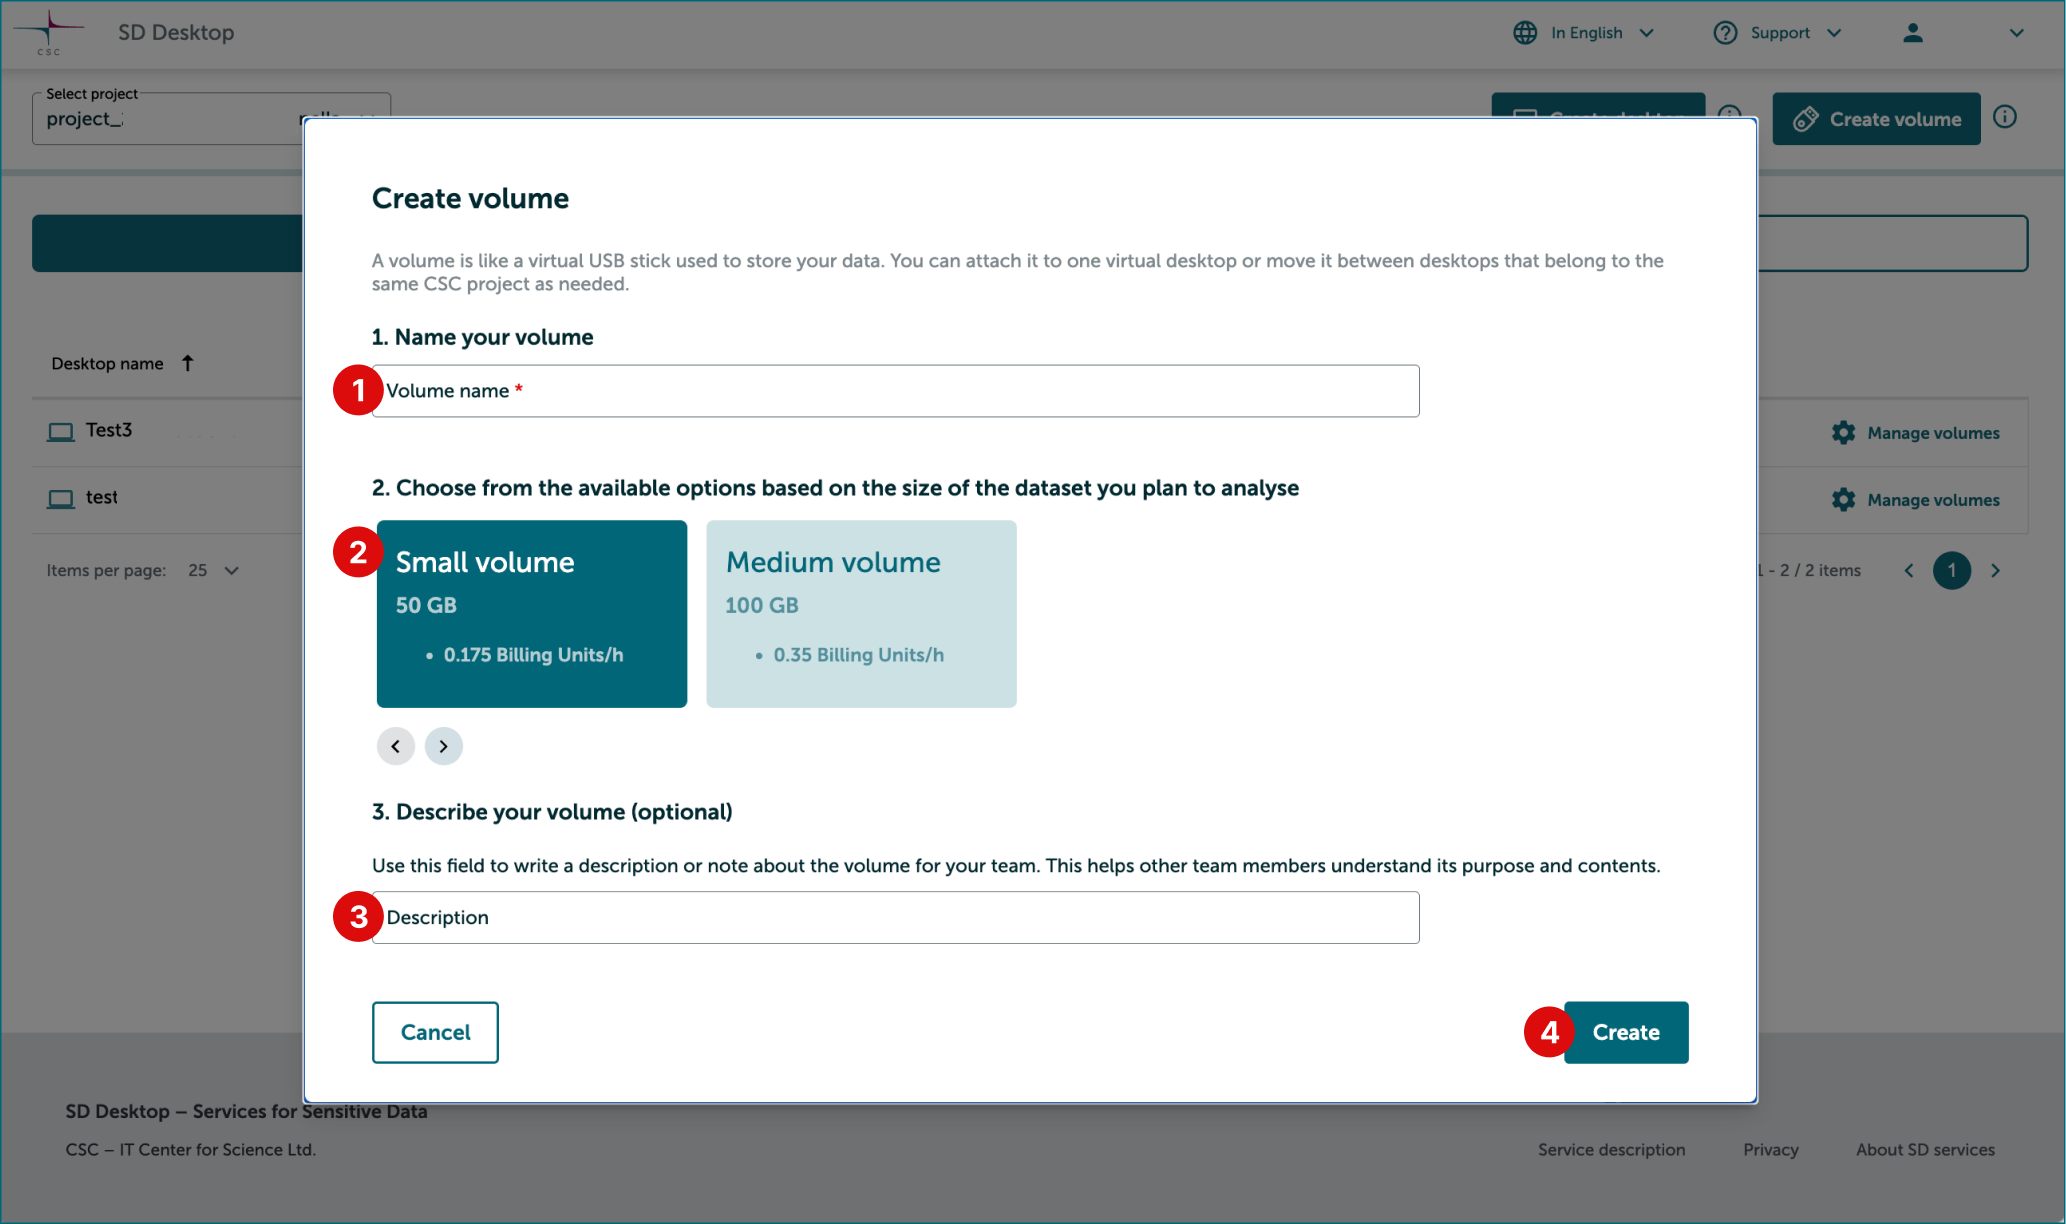
In Create volume window
-
Select a name for your volume. Choose a clear and descriptive name - especially if you're working on multiple projects - and make sure it only contains letters or numbers, with no special characters or spaces.
-
Choose from the available options the one that covers the combined size of your dataset and working files.
-
Write optional description or note about the volume to help your team members understand its purpose and contents.
-
Click Create. The window will now close and volume creation will start.
Back on the main page, you will see a list of your volumes in Volumes tab. You can now proceed to attach it to your desktop.
-
Note
If you have a dataset larger than 1 TB, contact CSC Service Desk.
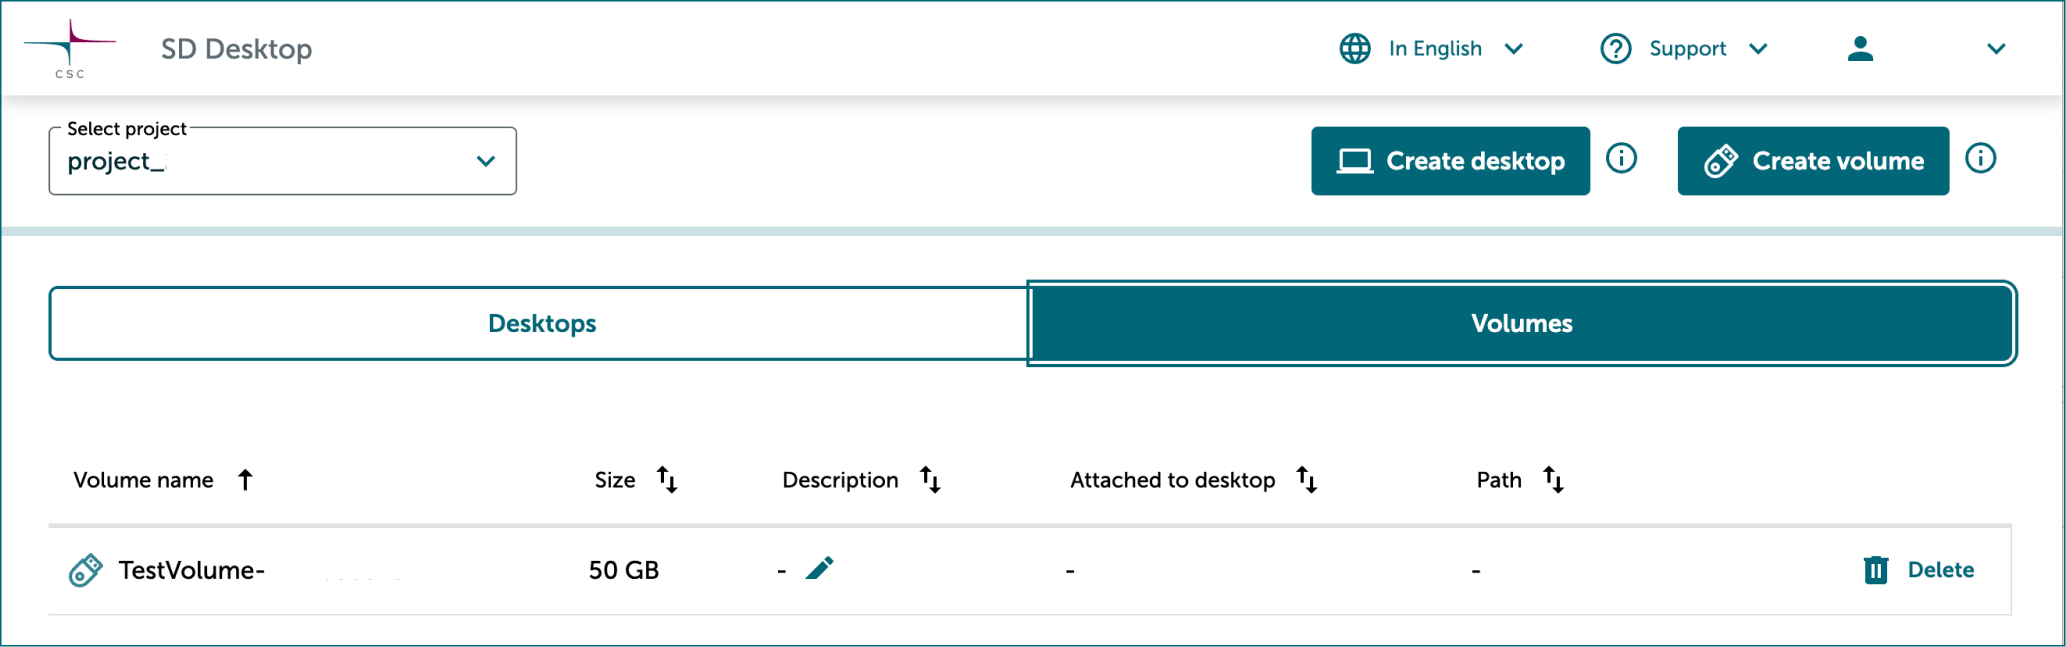
Volume options
| Name | Size (GB) | Cost (BU/TiB/h) |
|---|---|---|
| Small | 200 | 4.7 |
| Medium | 500 | 4.7 |
| Large | 1000 | 4.7 |
Step 6: Attach a volume to a virtual desktop
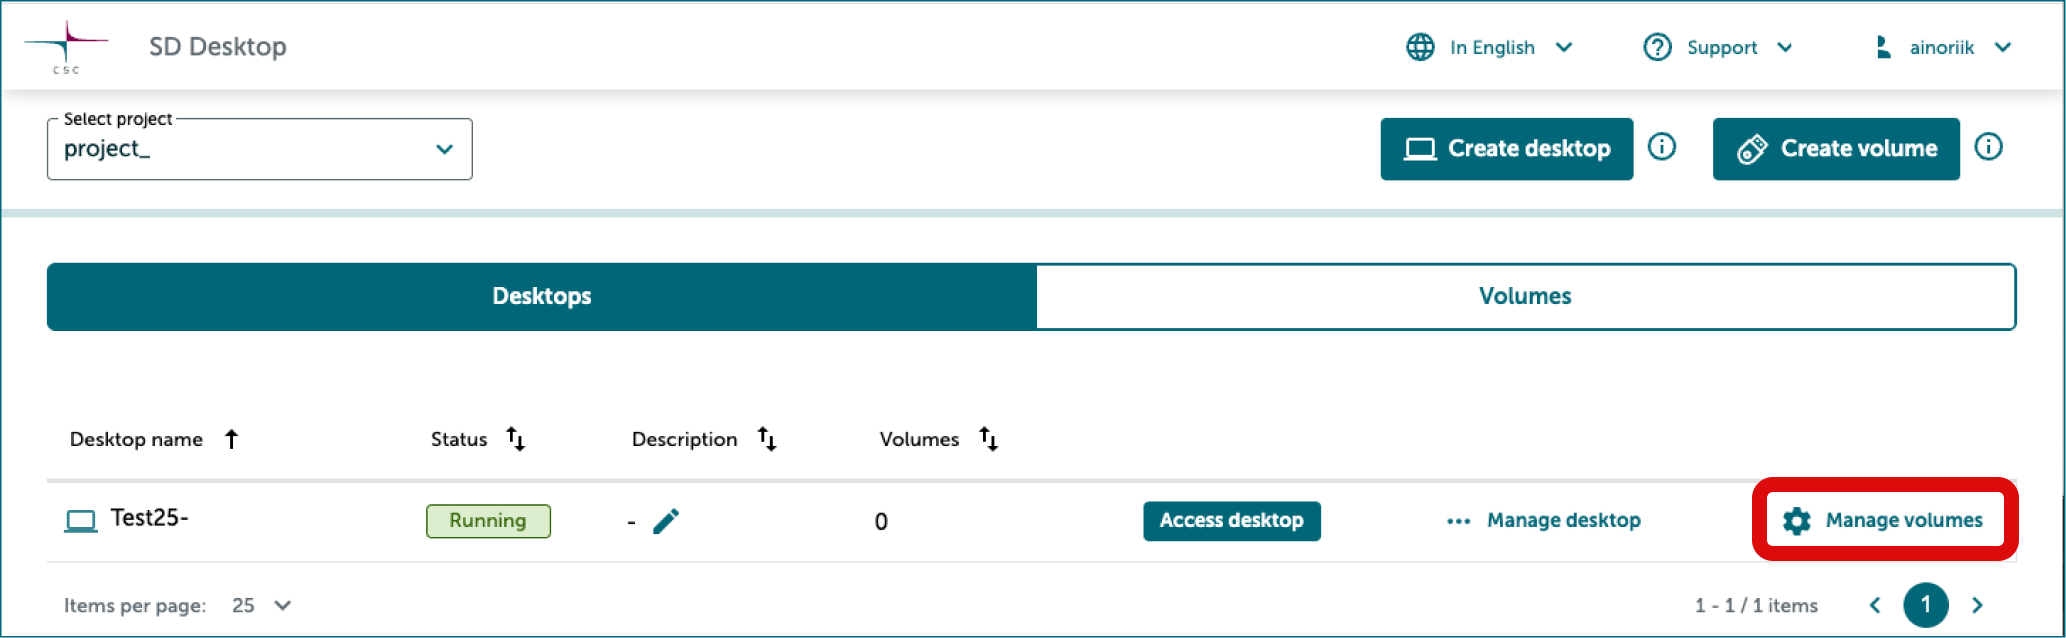
- Log in to SD Desktop. On the SD Desktop homepage, click Manage volumes on the right side of the correct desktop.
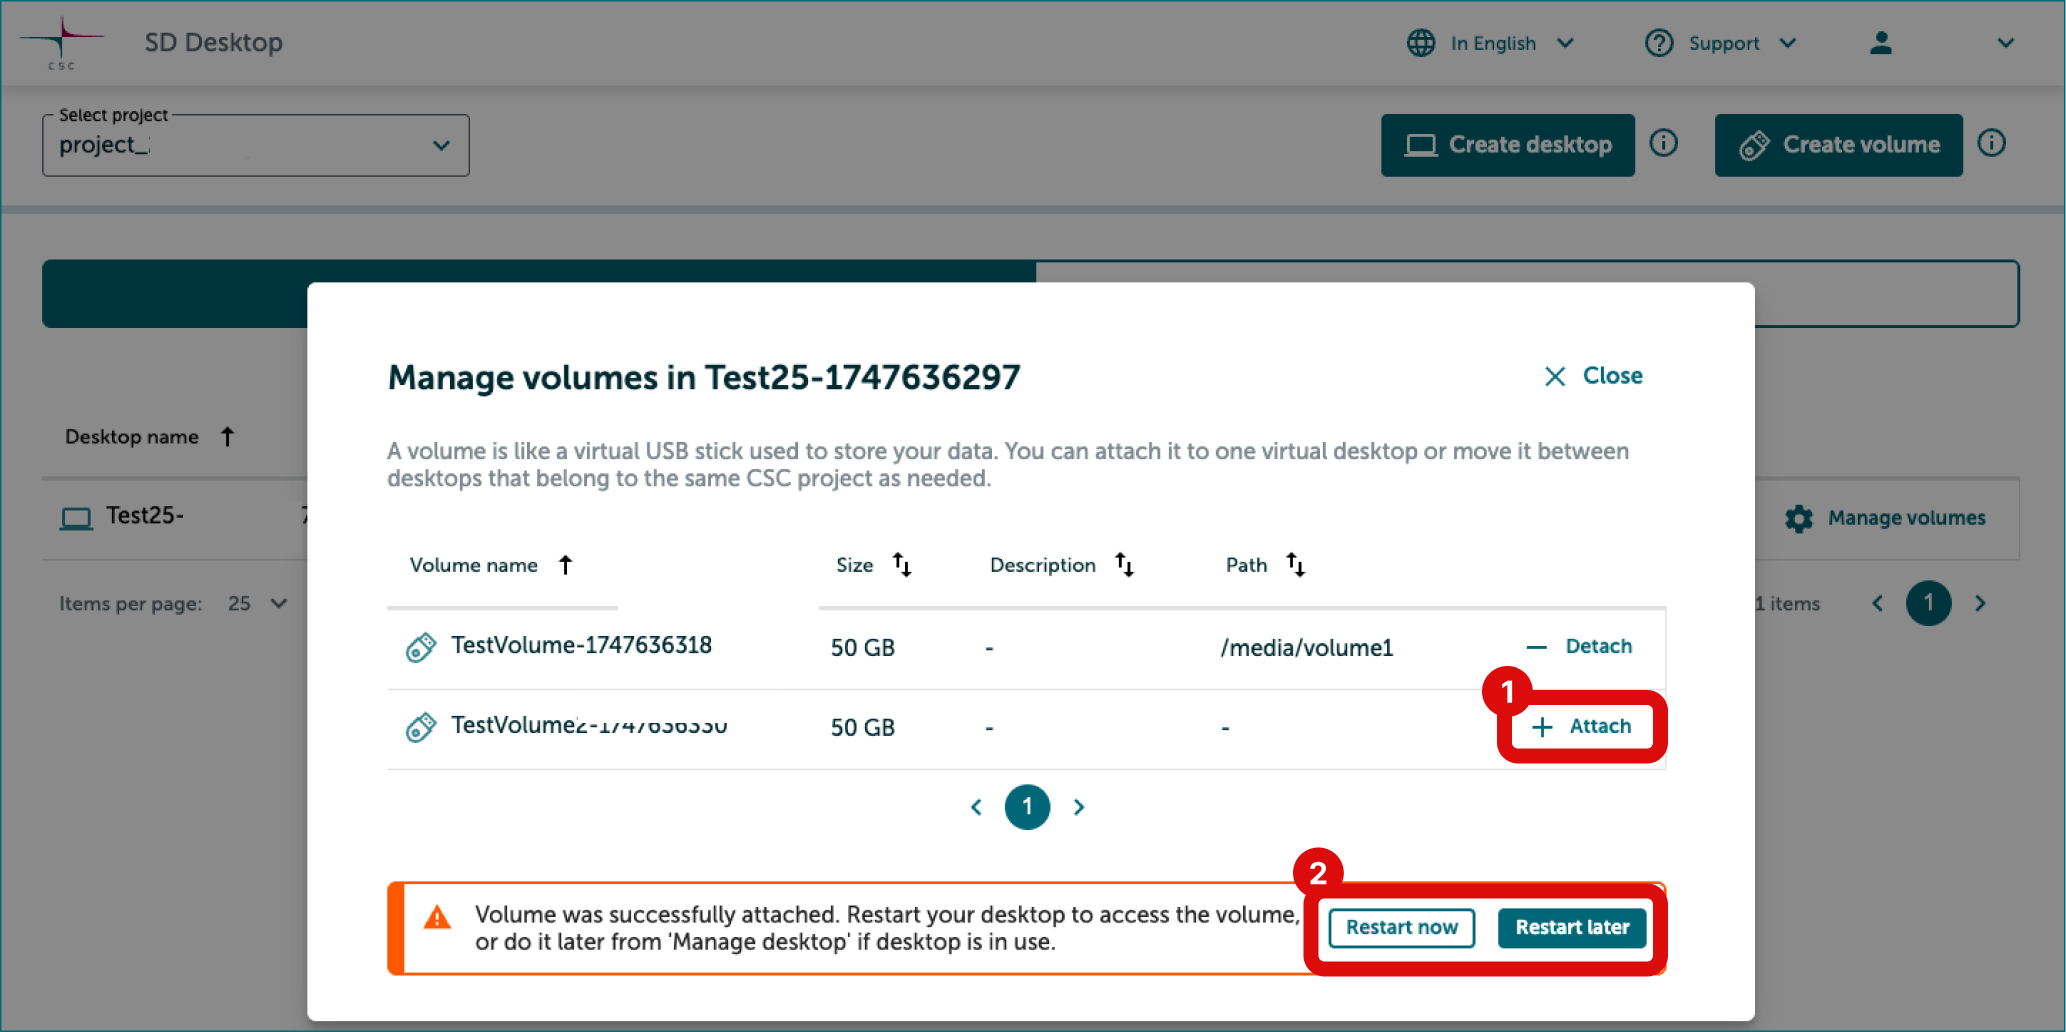
In Manage volumes window
- You will see a list of volumes that are available to be attached and/or are attached to the desktop. Click Attach on the right side of the volume you want to attach to the desktop.
- Close the window when you are ready.
Step 7: Import data to your volume via the Data Gateway application
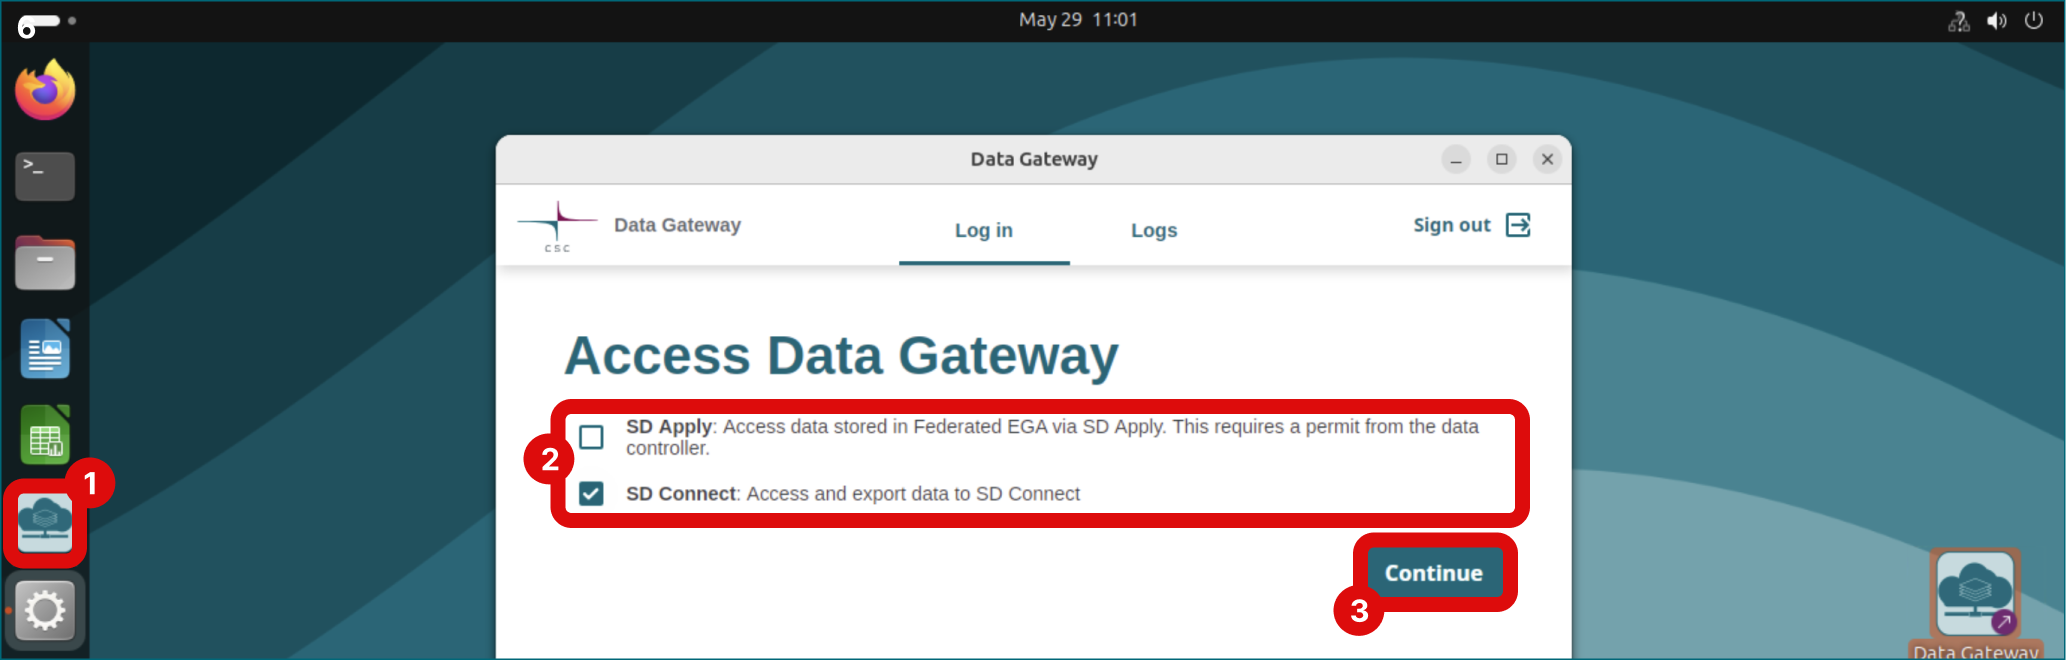
- Access your desktop. Launch Data Gateway by clicking icon on the left side of desktop.
- Select SD Connect.
-
Click Continue.
-
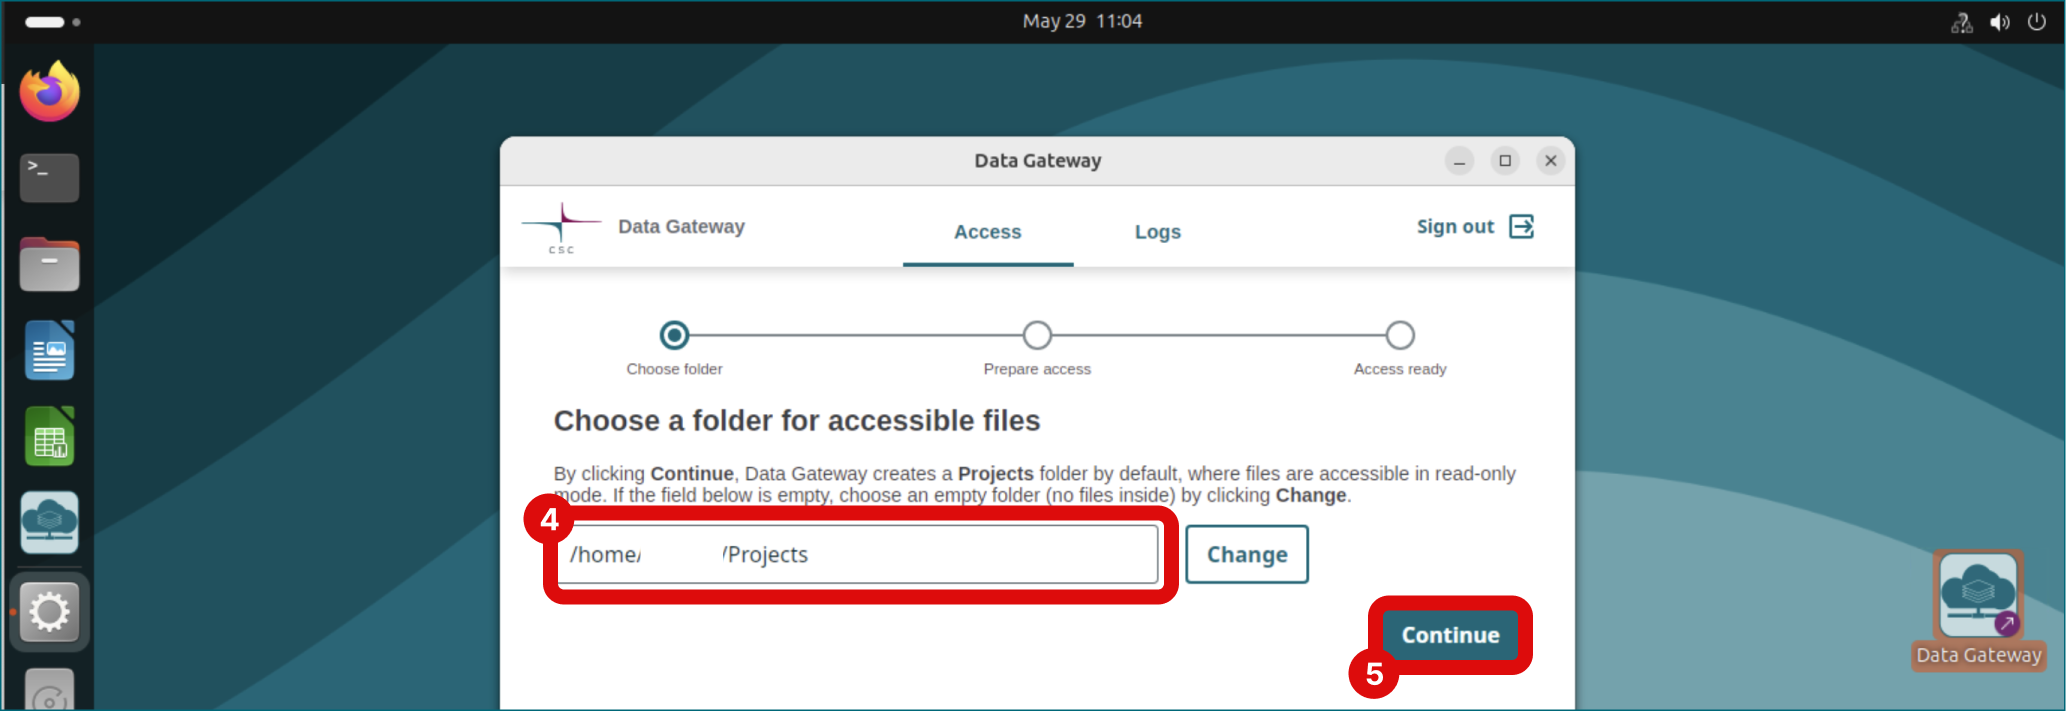
In the next view you are asked to choose a folder for accessible files. Check that Projects folder is selected.
-
Click Continue.
-
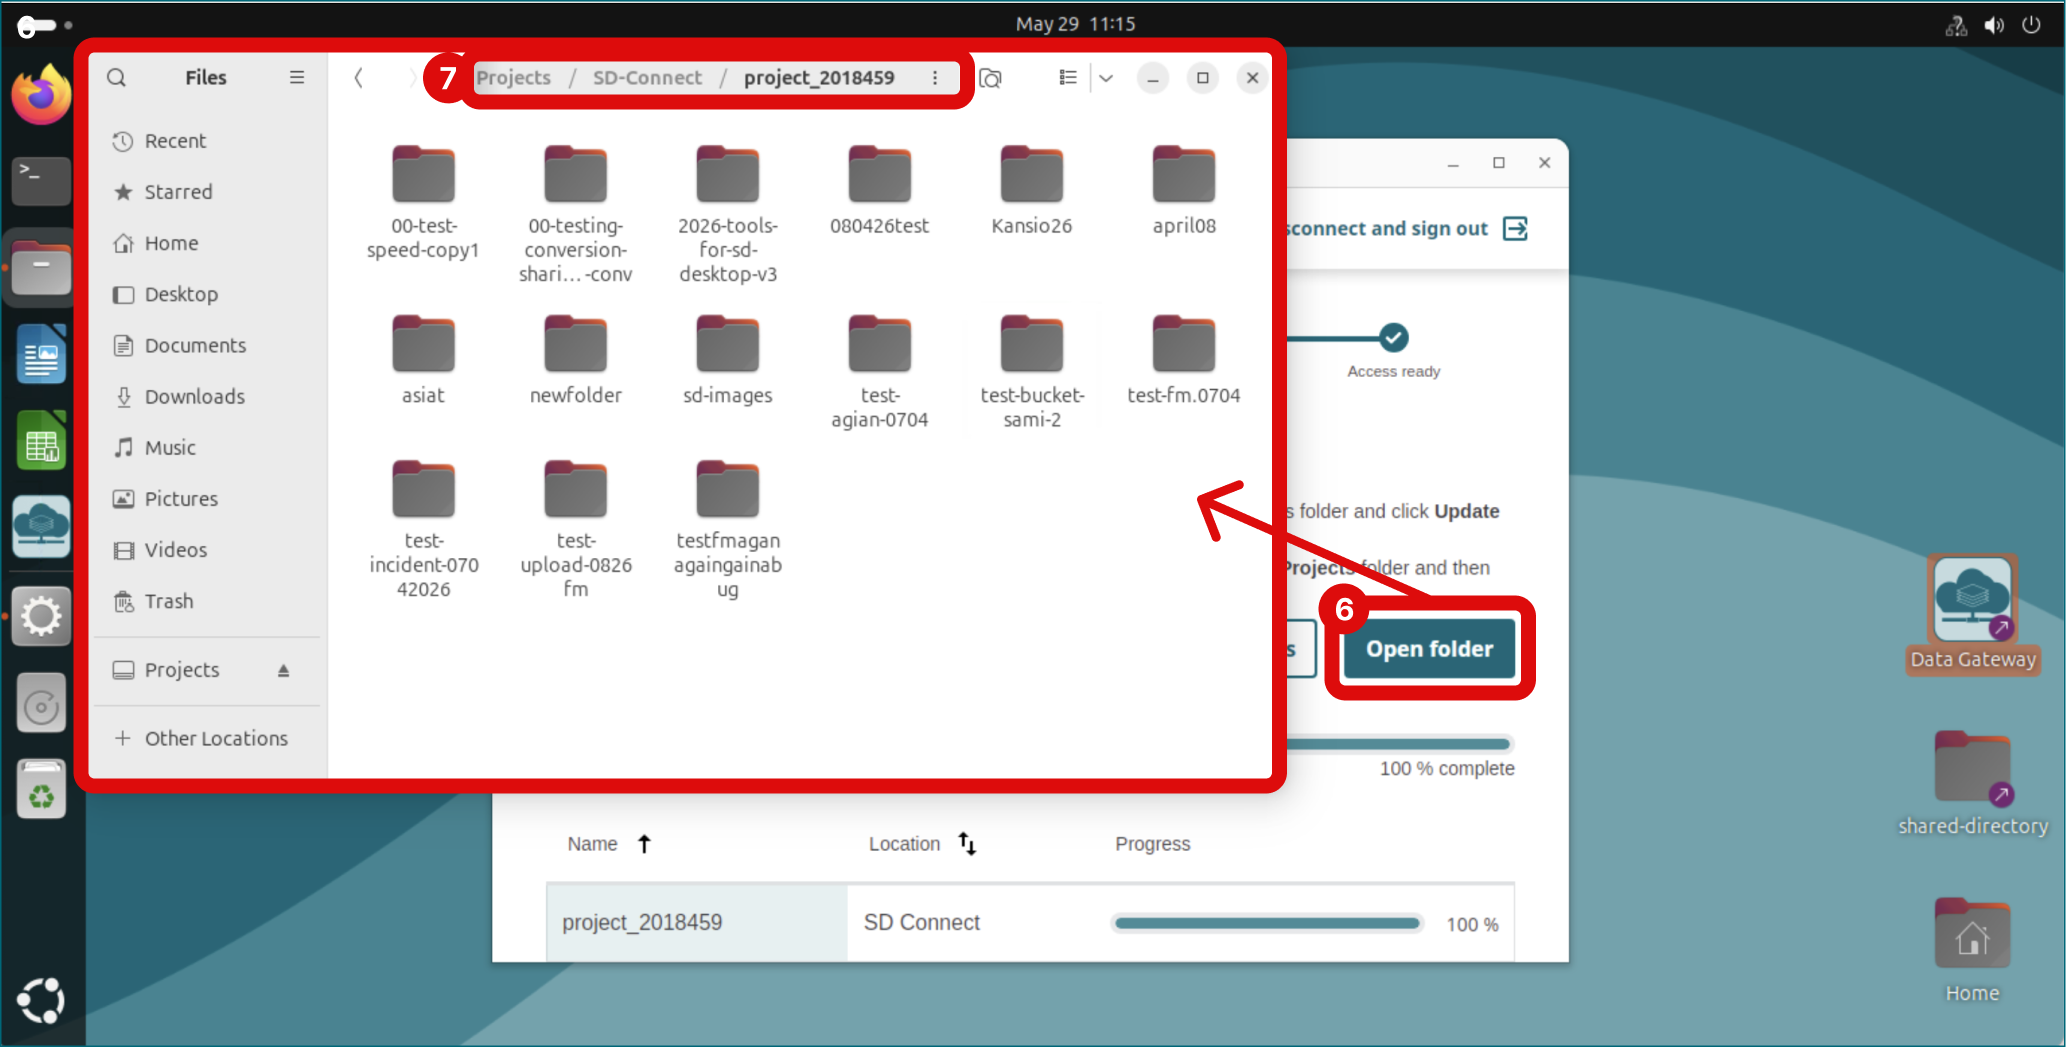
In the next window click Open folder.
-
Now you can see all files stored in SD Connect or SD Apply. Files are available in read-only mode for secure access. To view them, right-click the file and select the desired application to open it. Locate the buckets/files you want to import.
-
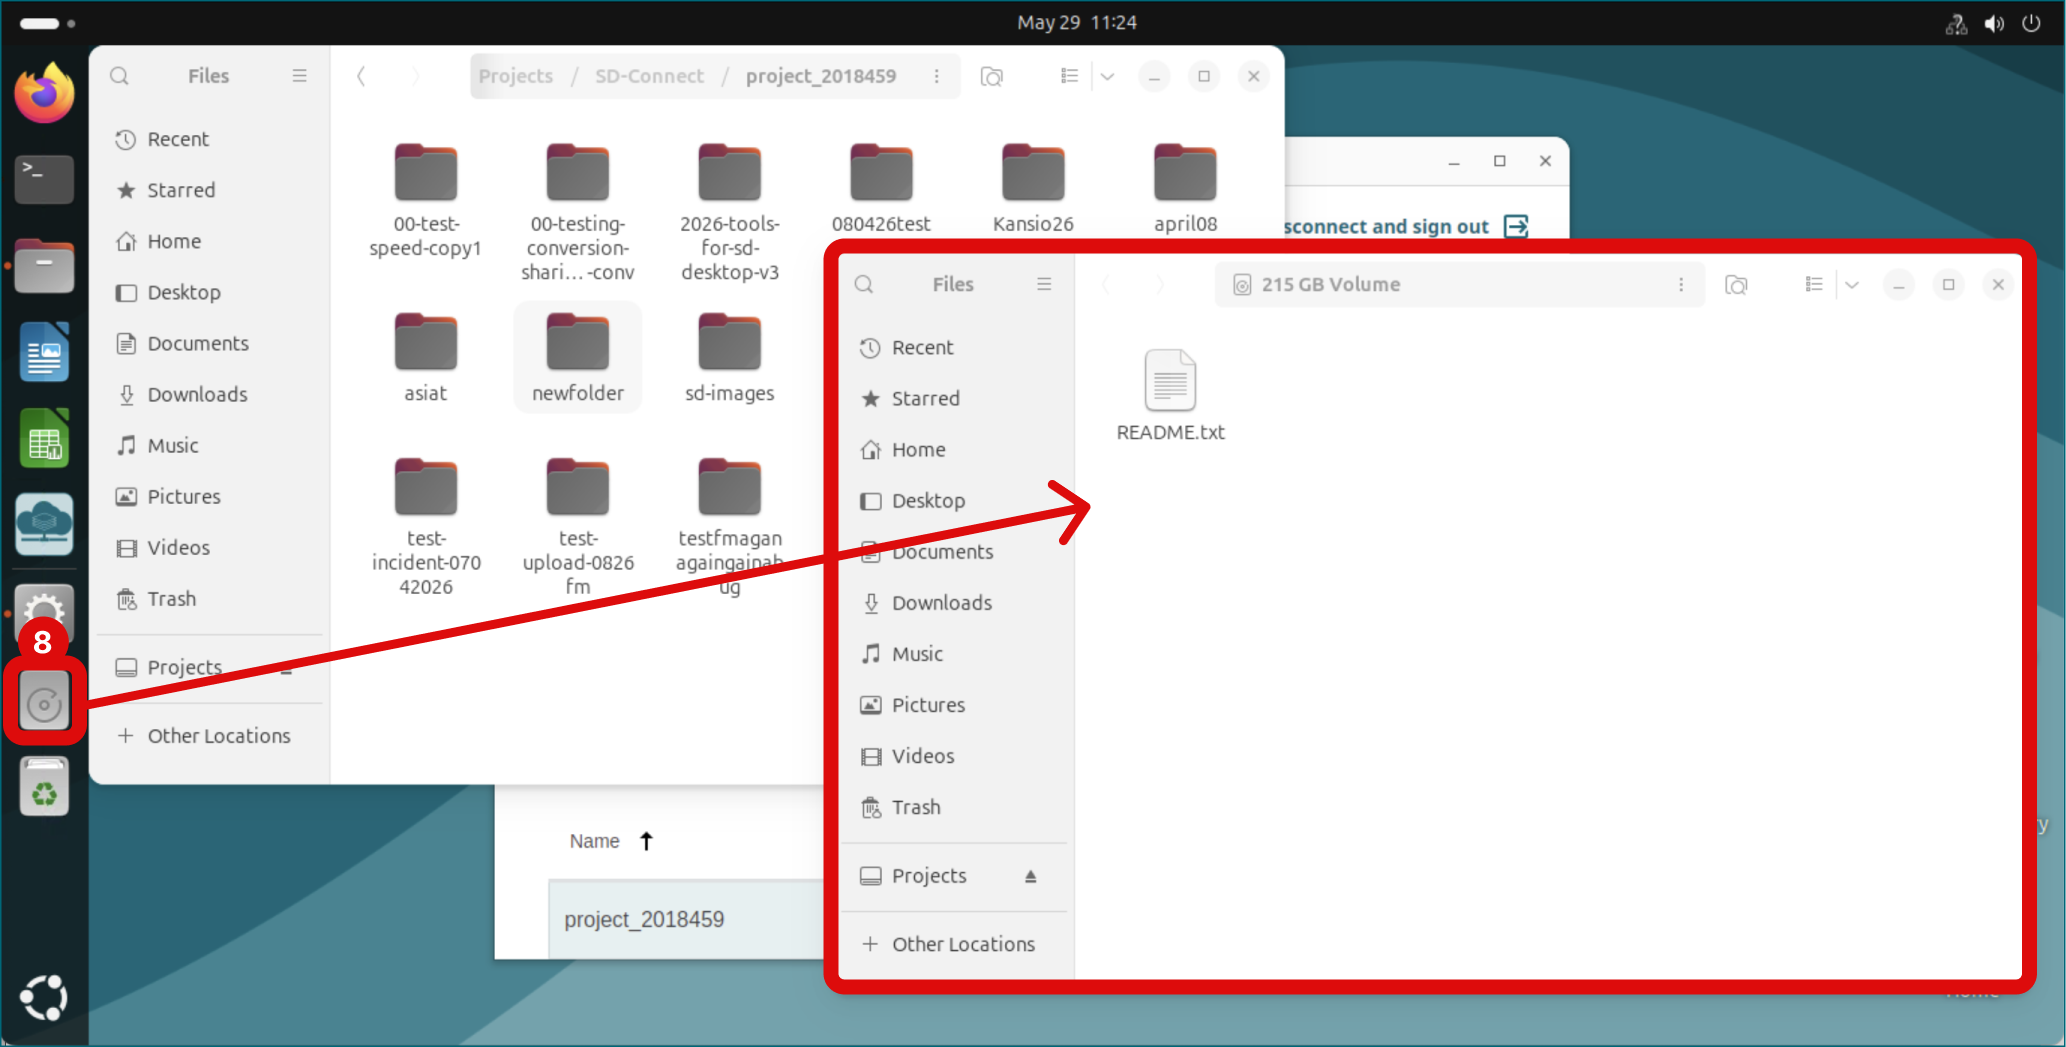
Open Volume from left side menu.
-
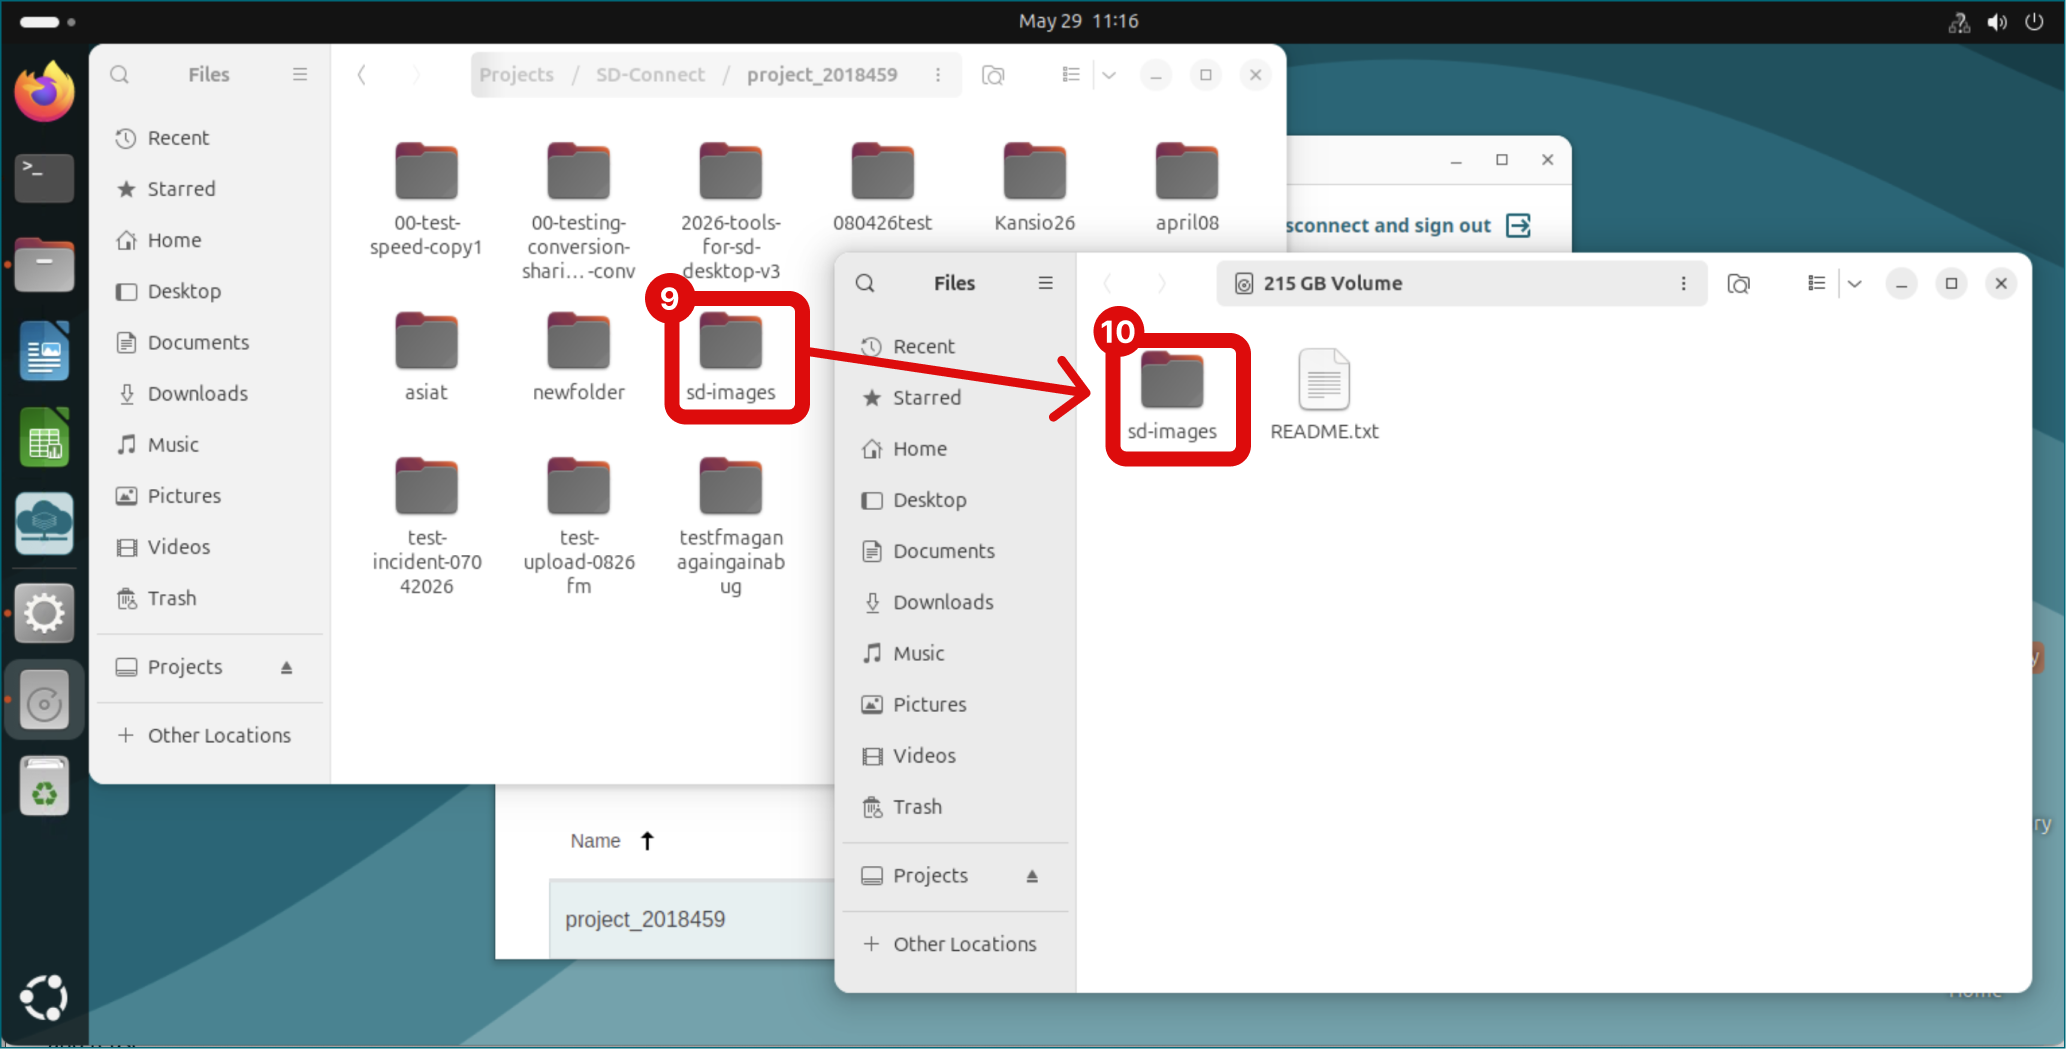
Select and copy the files or buckets from the Projects folder.
-
Paste files or folders into Volume. Files or folders will automatically decrypt during the copy process and become available for analysis.
Step 8: Delete old virtual desktop to save resources
Users should delete old desktops to save resources.
-
Warning
You cannot undo this action. Please contact all the project members before deleting a virtual desktop.
-
Log out of your virtual desktop.
-
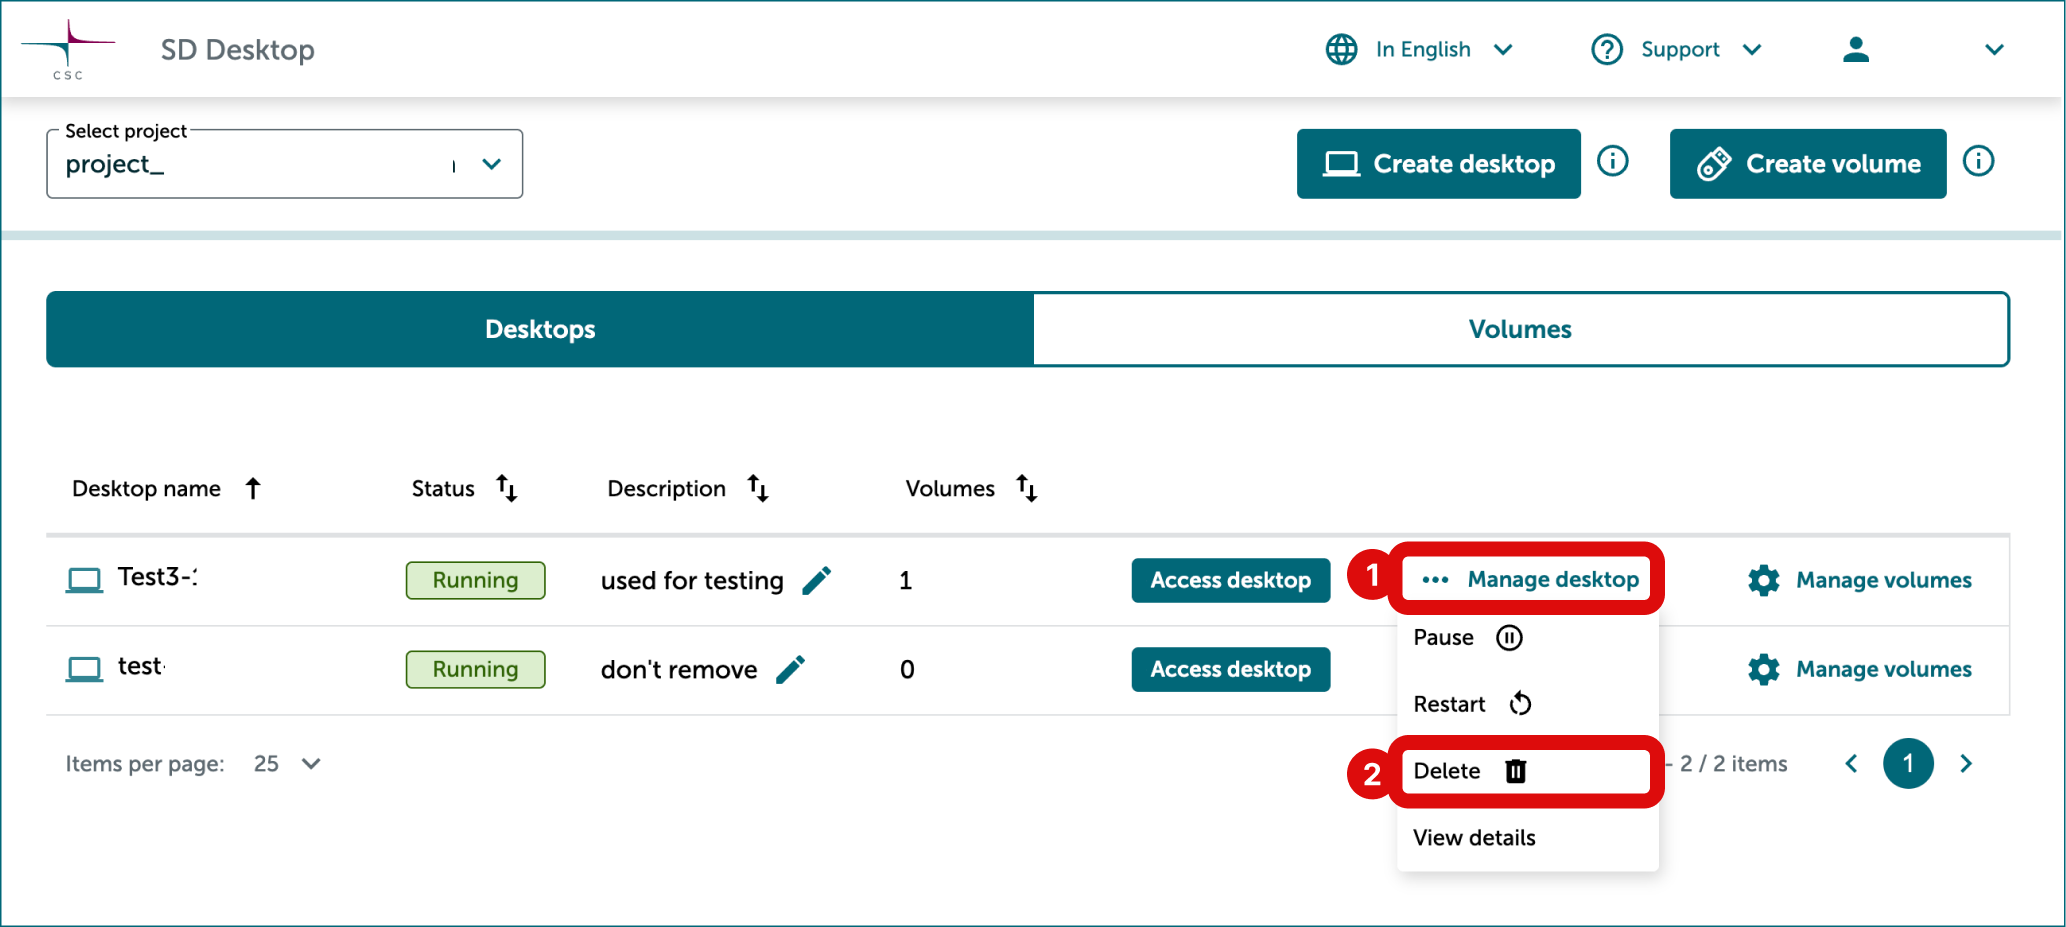
On the SD Desktop homepage, click Manage desktop on the right side of the old desktop.
-
Click Delete.
-
Confirm the operation via the notification.
Step 9: Customising virtual desktop
Continue to customise your desktop and learn about available software.