Table of contents of user guide
Transfer health and social data for secondary use via SD Connect
Prerequisites
On this page:
- Overview: Delivering secondary use data via SD Connect
- Login to SD Connect
- Upload and encrypt data
- Manage datasets: Add data, remove files and cancel data access
1. Overview
Sensitive Data (SD) Connect enables the secure storage and sharing of sensitive data. It automatically encrypts files during upload through an easy-to-use interface. For uploads larger than 100 GB, a command-line tool is available which also provides automated key management.
With secondary use data, it is essential to follow the practises presented in this user guide to comply with the Findata regulation and the Secodary Use Act. Researches can access the data delivered for them only on SD Desktop service and via a specific Secondary Use type CSC project, which restricts the data access only to the authorized individuals and for the duration of the data permit.
-
Key features
- User-friendly interface fully compatible with Chrome web browser.
- Accessible via web browser from your computer (Mac, Linux, or Windows) and any location (no need to install specific programs or use a VPN).
- Uploads up to 100 GB are automatically encrypted during upload via a web browser. For larger uploads, a programmatic tool (SD-lock/unlock) is available. Automated encryption key management.
- Enhanced login security with multi-factor authentication (MFA).
- Supports encryption and storage of any file type: text files, images, audio files, video, and genetic data.
-
Restrictions for secondary use
- Each dataset must be uploaded to a dedicated bucket created by the Sensitive Data services team. Please, wait for the bucket information before uploading any files for a new dataset.
- It is also crucial, that the bucket is shared to a CSC project created specifically for the dataset. The Sensitive Data Services team manages data access by verifying that the researcher's CSC project is of type Secondary Use, approving project members based on the data permit, and verifying that the Share ID used for bucket sharing belongs to the correct project.
- Only the Read to SD Desktop access permission for the shared buckets is allowed with secondary use data. Please, do not change the permissions set by the Sensitive Data services team or share buckets by yourself.
2. Login to SD Connect
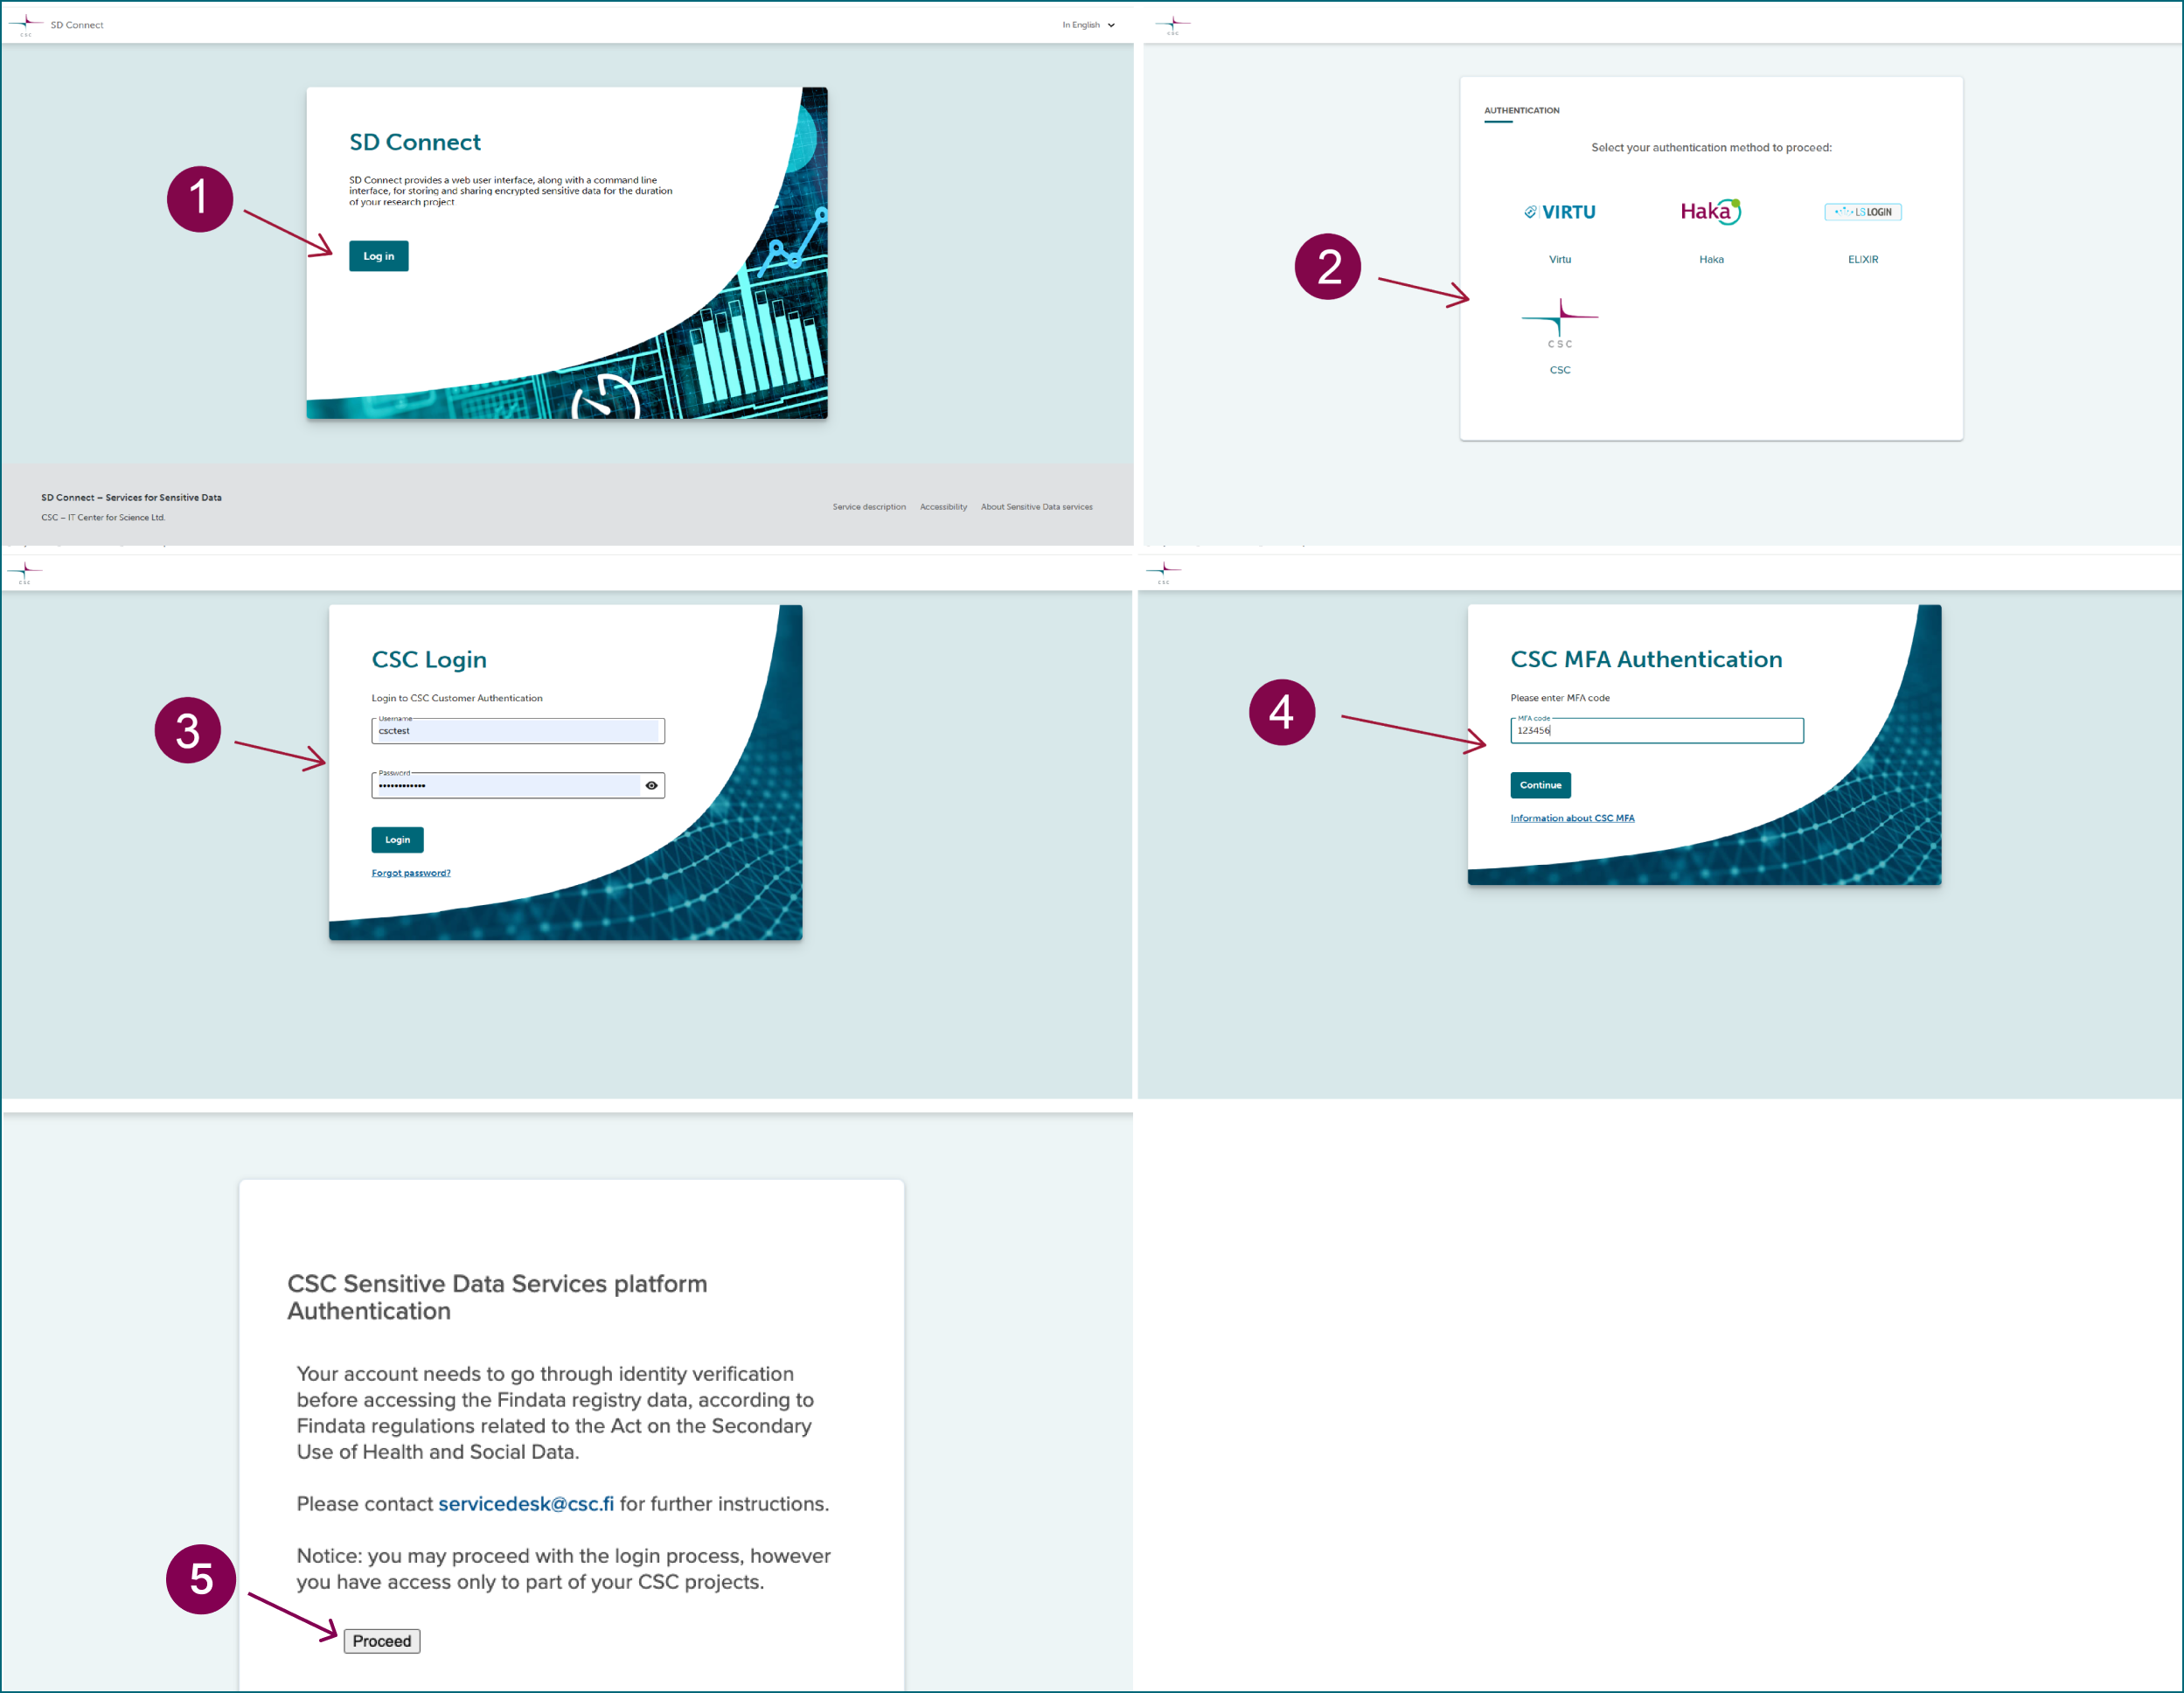
Step by step
- Navigate to SD Connect. We recommend using Google Chrome for the best experience.
- Choose your login method. Select CSC Login, Haka or Virtu then click Login.
- Enter your details. Type in your username and password, then click Login.
- Verify your identity. As a second verification step, enter the temporary code from your mobile authenticator app and click Continue. If prompted, please accept cookies to proceed.
- You should now have access to SD Connect. If you see an additional message about identity verification, click Proceed to continue.
- Troubleshooting tip. If you run into any issues, try clearing your browser history and cookies before logging in again. Note that Firefox private mode is not supported.
3. Upload and encrypt data
Files uploaded to SD Connect are automatically encrypted during upload using the service’s integrated key management system. This functionality supports all file types and formats, with a maximum upload size of 100 GB. Larger files can be uploaded programmatically.
Command line tools and automated key management
Please contact the CSC Service Desk (subject: Sensitive data) before uploading data programmatically to ensure that the tools and interfaces provided by the service will function correctly in your environment and are up-to-date.
SD Connect is built on a cloud object storage infrastructure. Files can only be uploaded into a bucket, created with SD Connect. Bucket is a top-level 'box' used to store files or folders, and each bucket can contain up to 500.000 segmented files. This has several implications for how your data should be organized and managed:
-
Once files are uploaded to SD Connect, they cannot be edited or modified.
-
Uploading files into folders is not supported.
-
Upload duration: Uploading large files or large batches may take several hours. Uploads are automatically stopped after 8 hours.
-
File segmentation: Uploaded files are automatically split into segments to optimize storage and performance. This segmentation is not visible in the user interface but can affect performance.
-
The user interface might be slower when there are more than 2500 files in each folder. In this case please use the command-line tools for upload and automated key management.
-
File uploads are supported in Google Chrome and Mozilla Firefox (incognito mode not supported) browsers. On first use, a browser pop-up may request cookie consent. Accepting cookies enables file and folder uploads.
3.1. Upload and encrypt files to an existing bucket
Sensitive Data support team will create a bucket in SD Connect for each dataset, share the bucket name with you, and grant Read-only access to the bucket for the CSC project in which the data users will analyze the data in the isolated SD Desktop environment.
One bucket is created for each dataset based on a data permit. In other words, each bucket contains only one dataset and should include all data covered by the same data permit.
Data users create their CSC projects based on their data permits and can access only the data uploaded to the bucket shared with their project. If the same data users have multiple separate data permits, the datasets must be uploaded to separate buckets, and the users must have separate CSC projects for each data permit.
Step by step
-
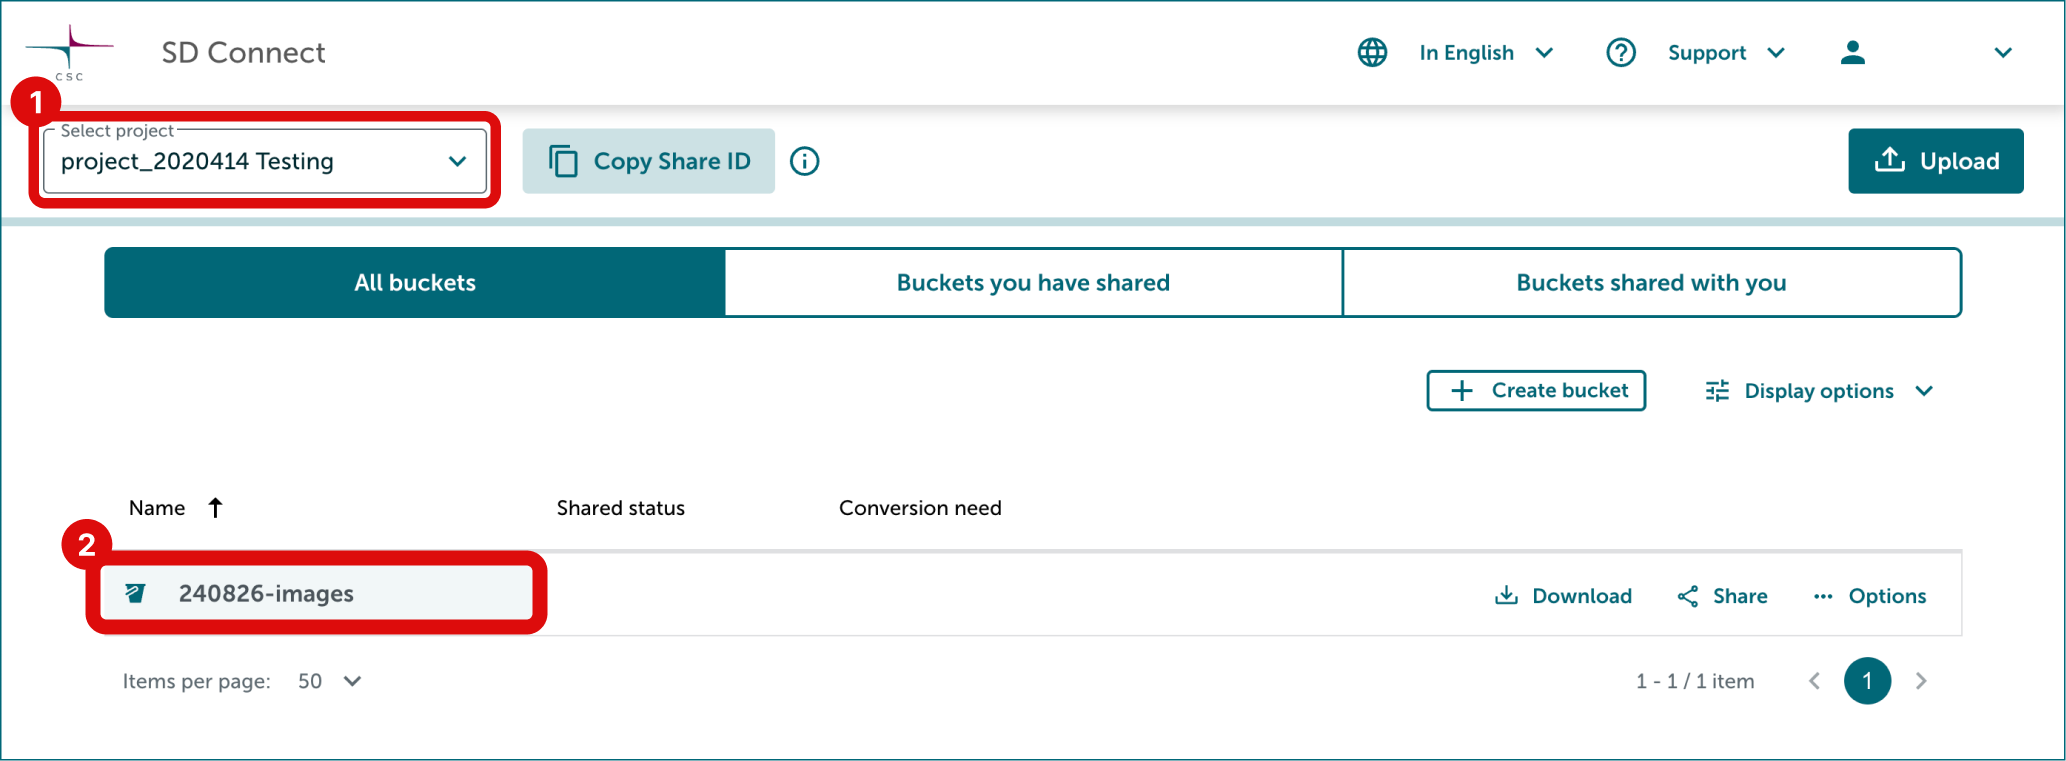
Select the correct project and the bucket created for the dataset.
-
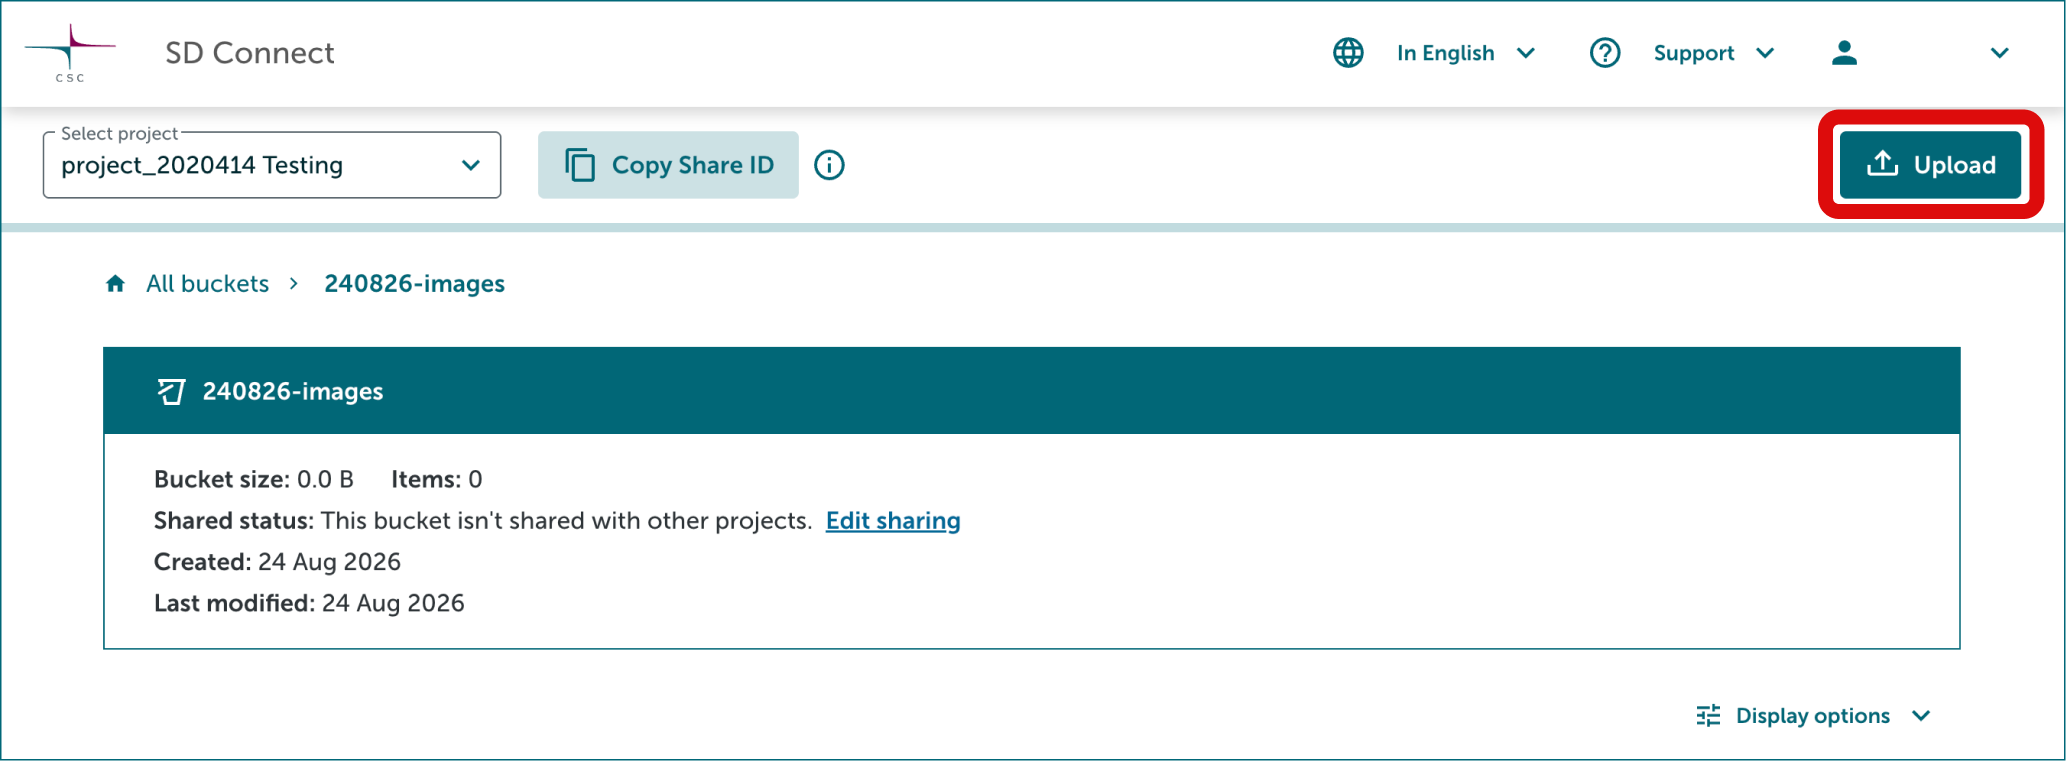
Click Upload in the top right corner.
-
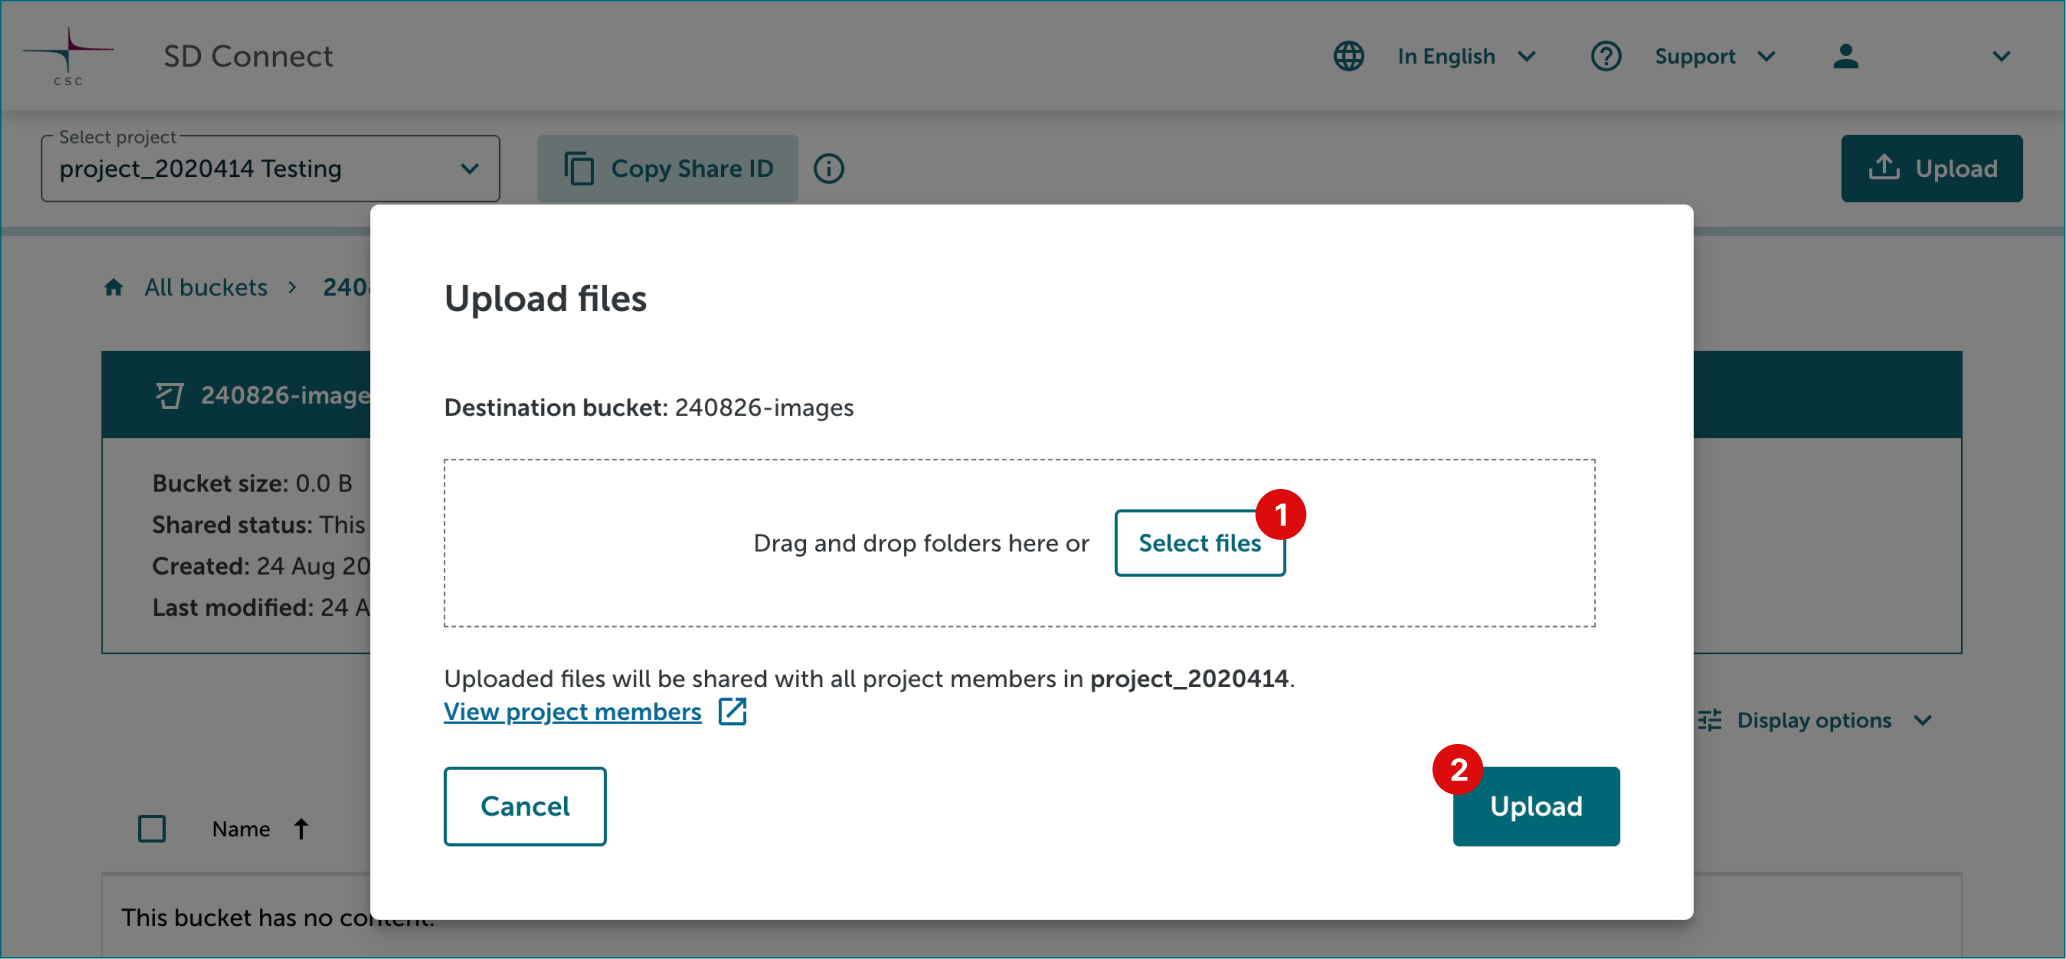
Click Select Files to open a browser window and choose files for upload. If you want to upload folders, drag and drop them into the window. Finally click Upload to start automatic encryption and upload.
Note
- Make sure you use only SD Connect user interface or command line tools for uploading data. If you use Allas user interface or command line tools, the data won't be encrypted, and the data storage is not compatible with the Findata regulation.
- Do not share the buckets directly with users using a Share ID provided by the user. Access granted via a Share ID extends to the entire CSC project, which may include members not covered by the data permit. Only the Sensitive Data support team can verify that the project was created specifically for the shared dataset and contains only users authorized to process the data.
- Only "Read to SD Desktop" permission for data sharing in SD Connect is compatible with the Findata regulation.
4. Manage datasets
The datasets will remain in your control after they are uploaded to the buckets and shared with the users. You can upload more data, remove files, and also remove the data access from the users.
4.1 Delivering additional data
You can add data to any existing dataset by uploading new files to the bucket created for the data permit. Remember to use unique file names to avoid overwriting the old files.
4.2 Removing corrupted or incorrect files
You can remove data from any existing dataset by deleting files from the bucket.
If the researchers are no longer allowed to use these files in their analysis, you need to also request them to remove any possible working copies of the files from their SD Desktop environment.
4.2.1 Deleting a file
-
Select the correct project and bucket.
-
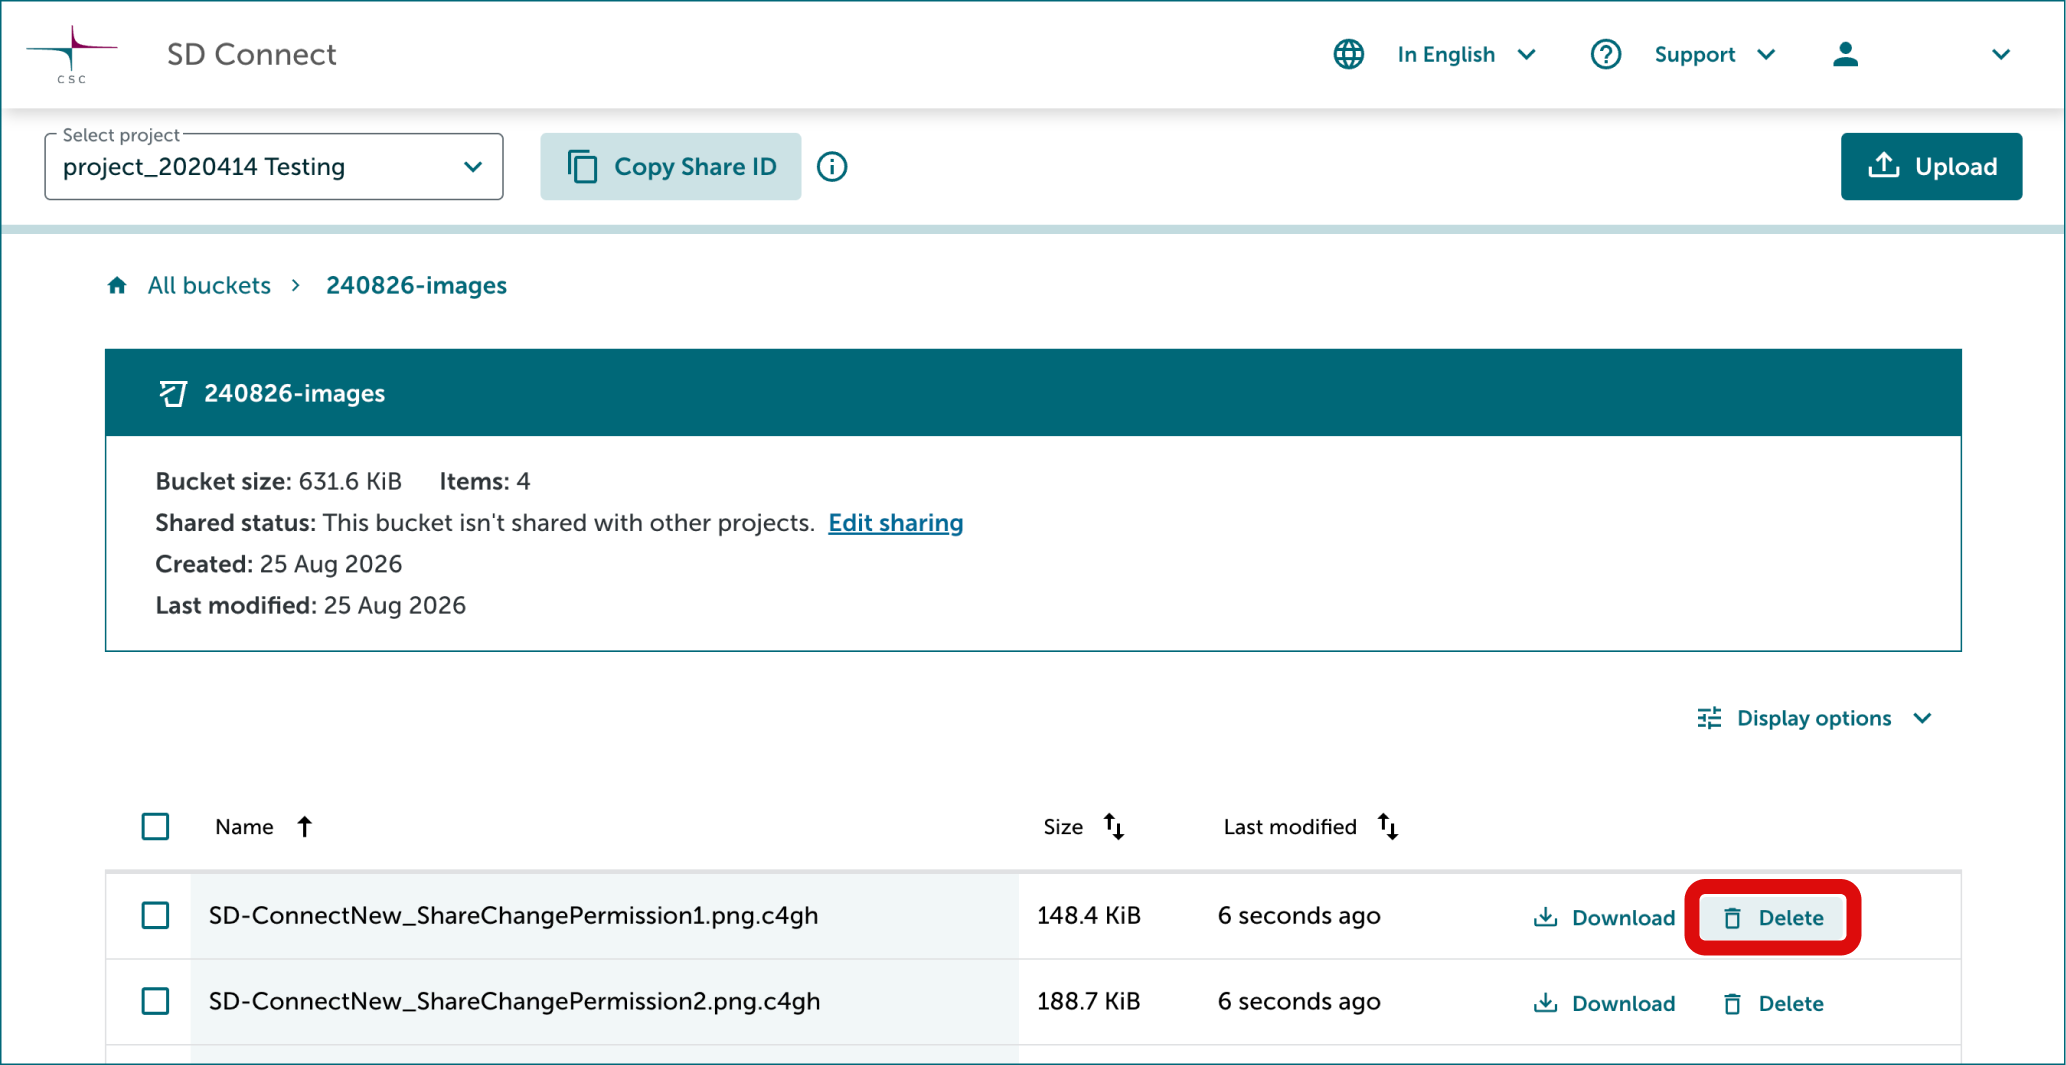
Click Delete on right side of each file you want to delete.
-
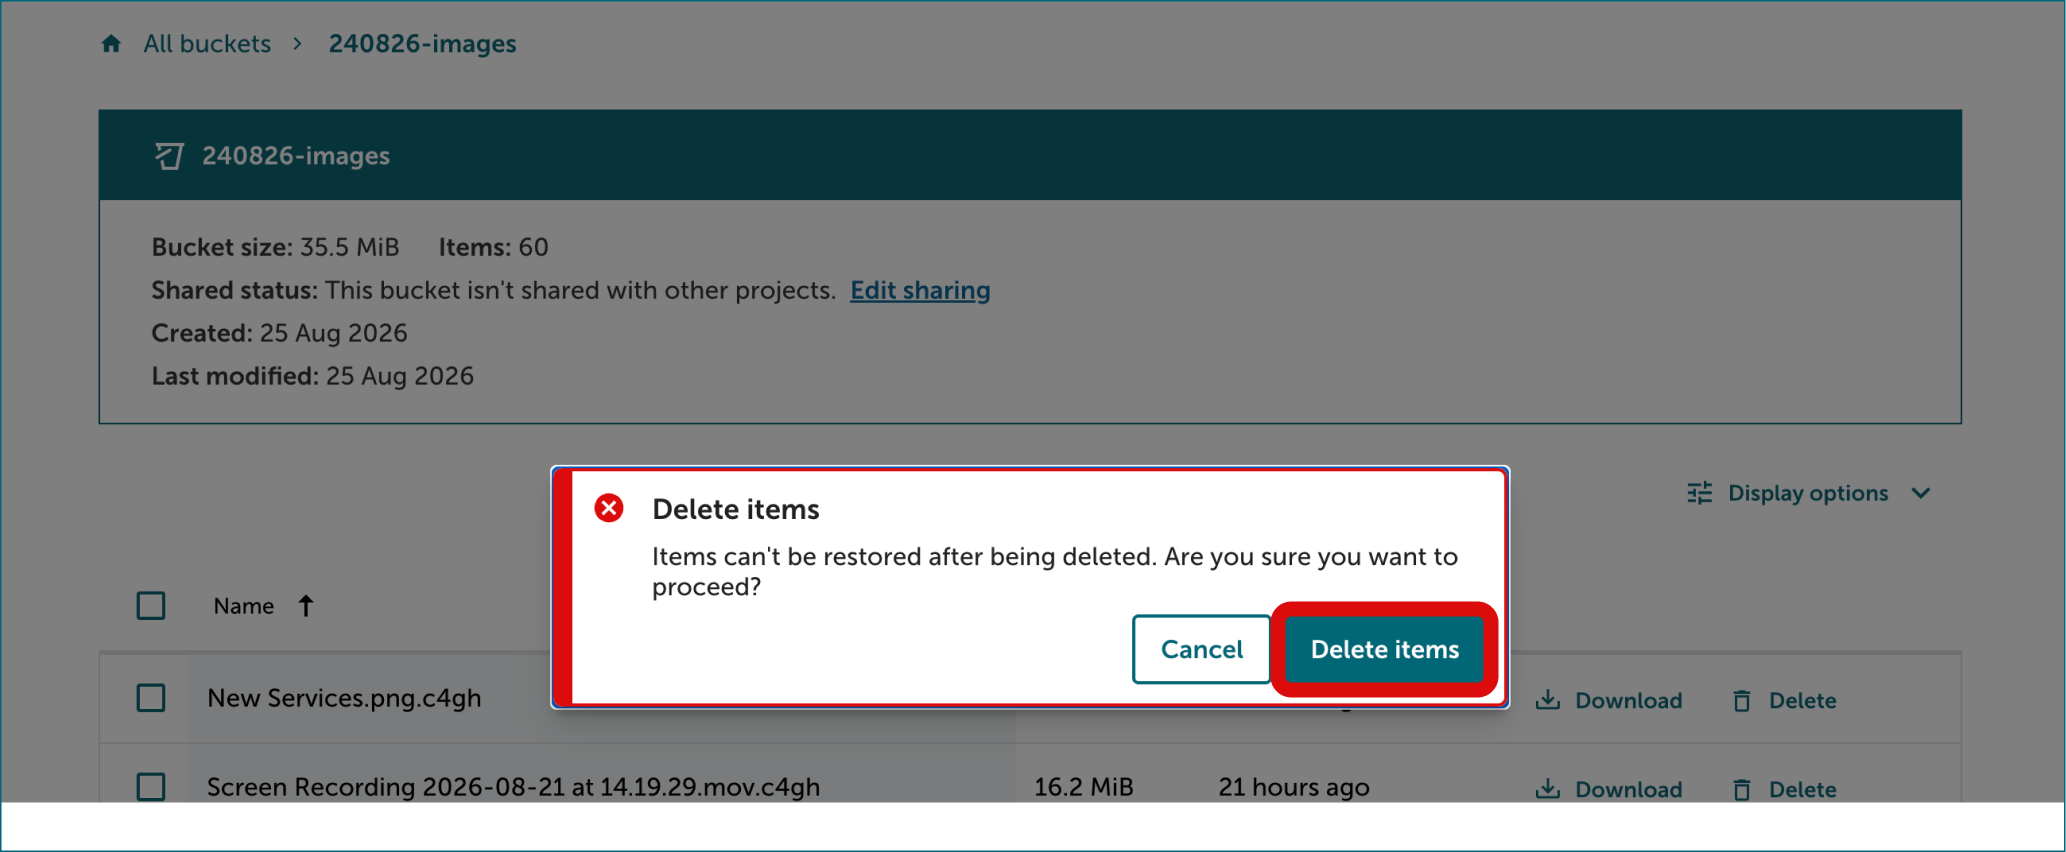
Confirm by clicking Delete items from the notification.
4.2.2 Deleting multiple files
- Select the correct project and bucket.
-
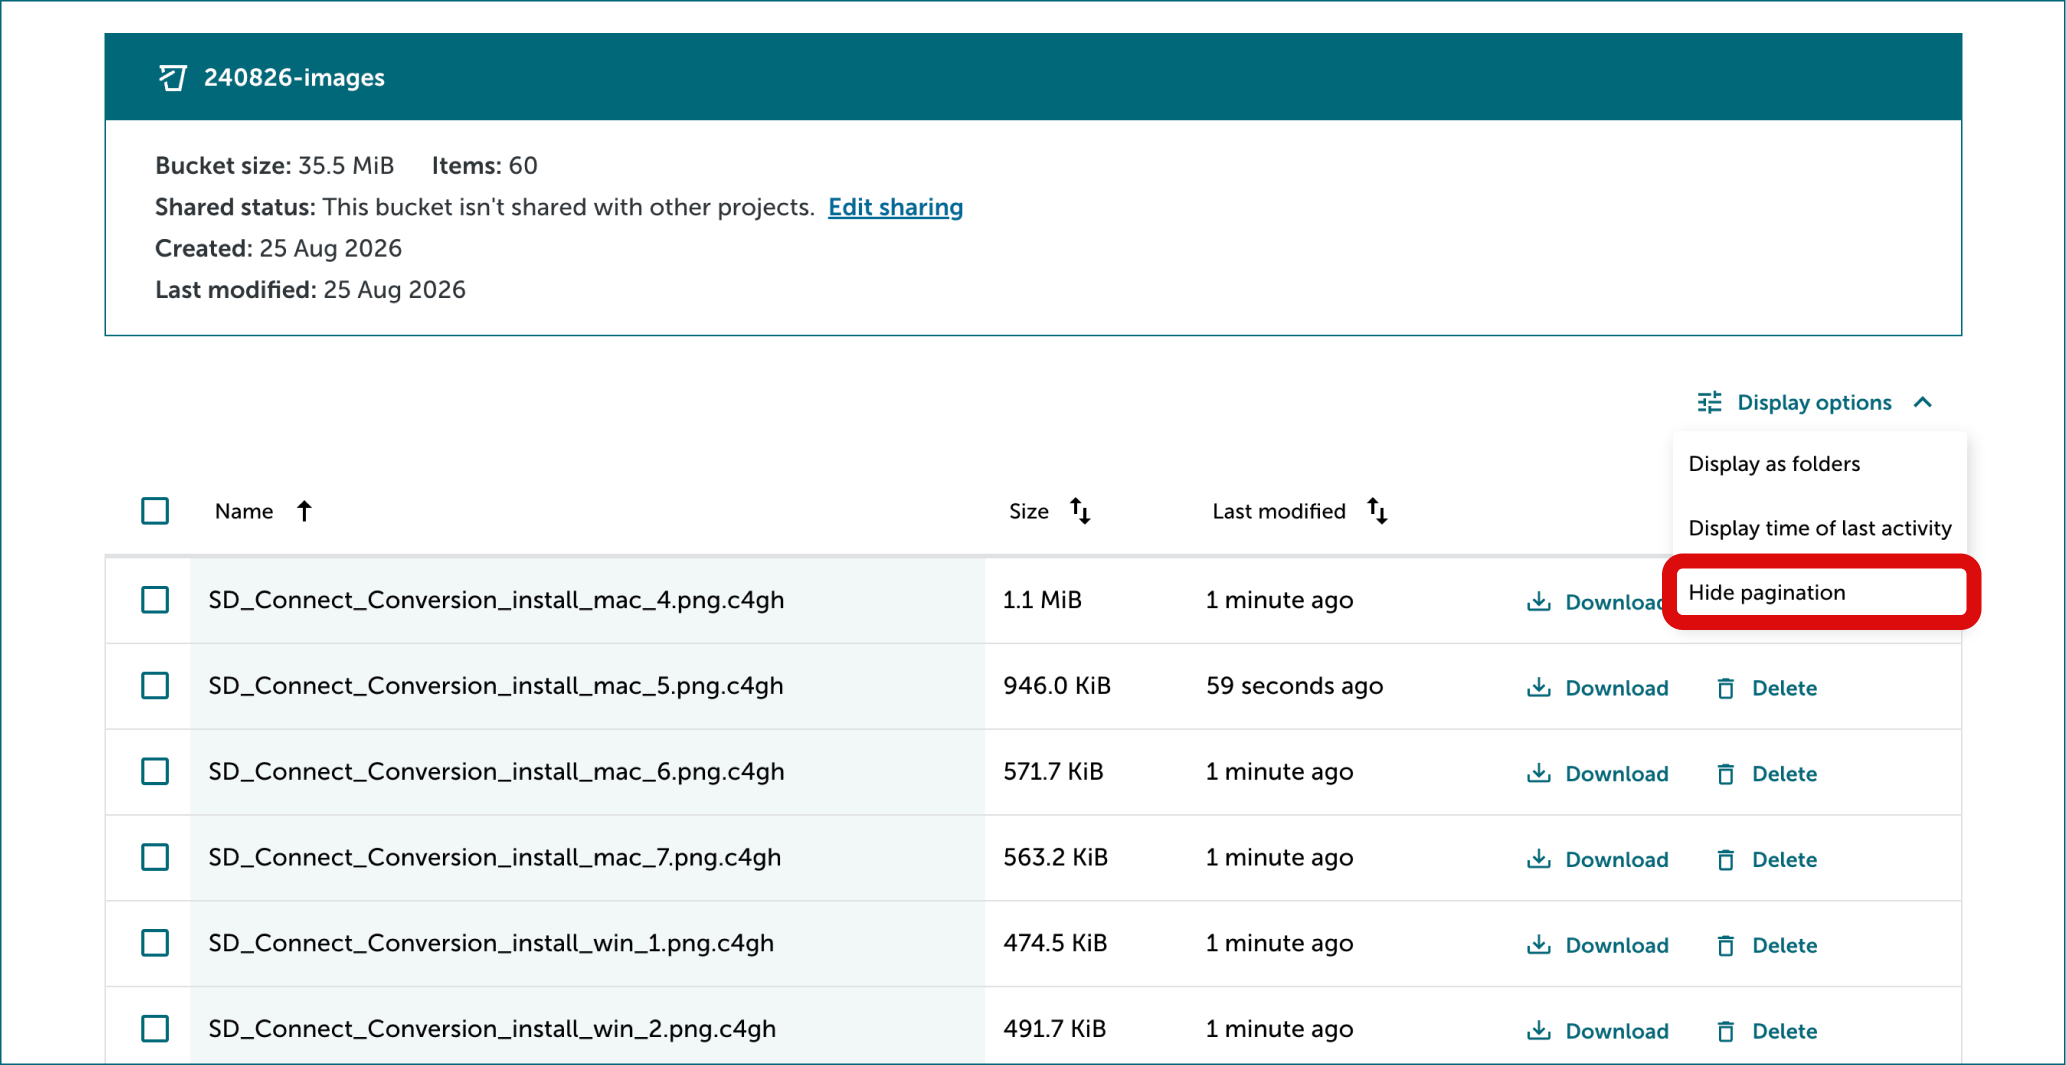
Select Display options from top right corner of file list. Then select Hide pagination from the same menu. Now all files are displayed on one page.
-
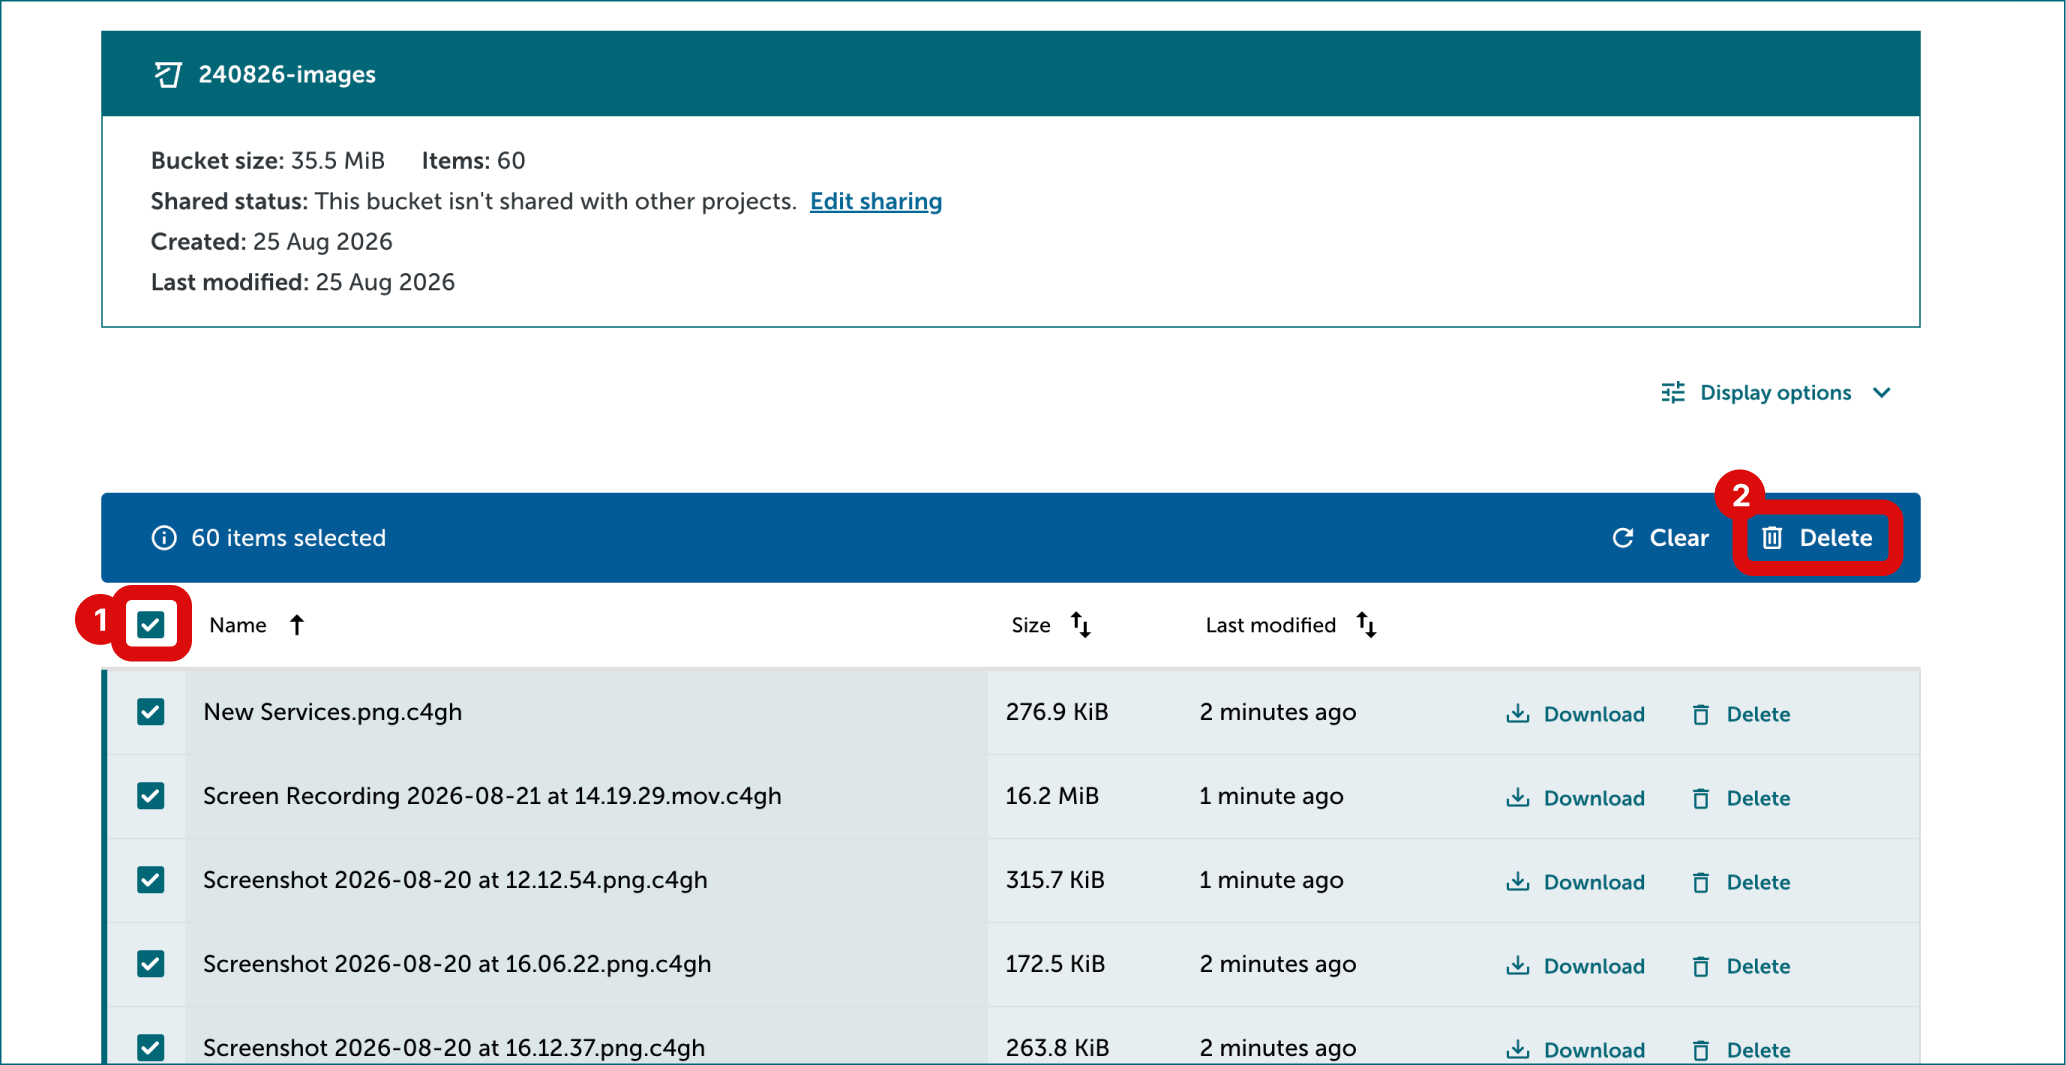
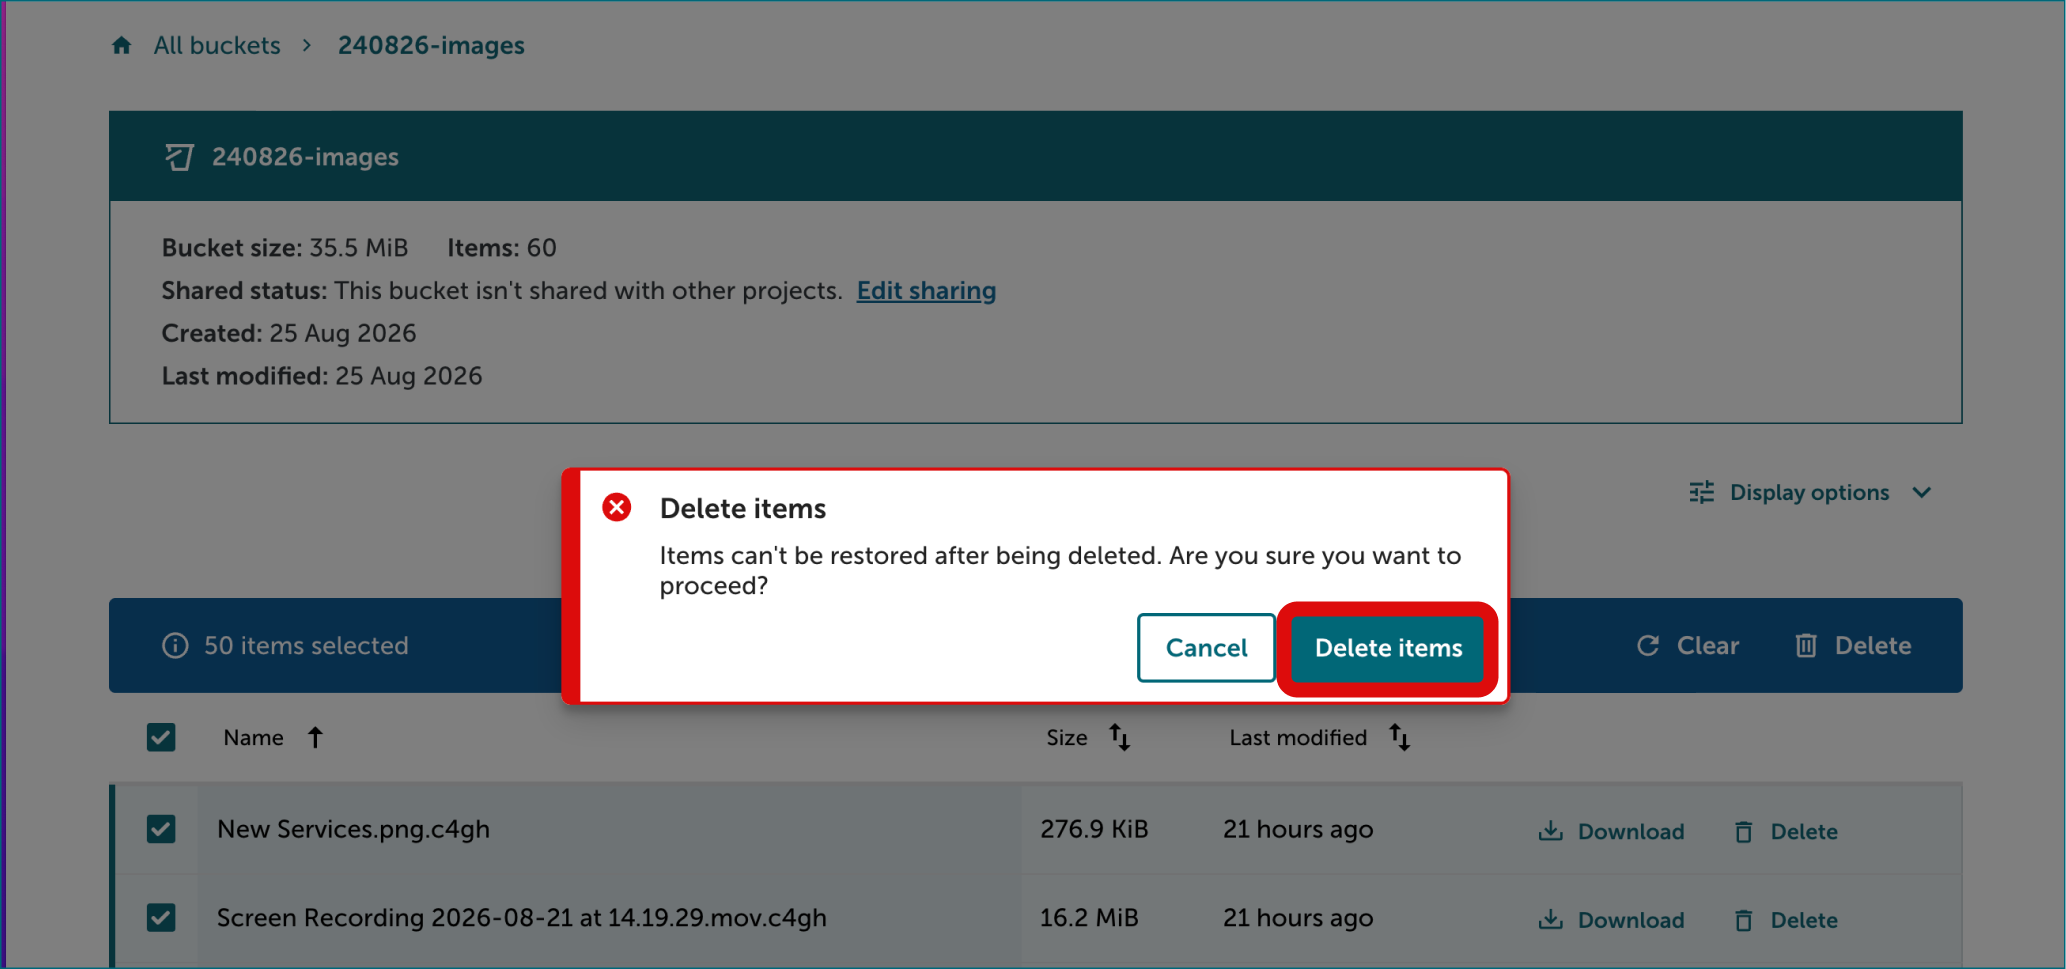
Select checkbox on top left corner of the file list. Click Delete from the toolbar appearing on top of file list.
- Confirm by clicking Delete items from the notification.
4.2.3 Deleting subfolder
- Select the correct project and bucket.
- Find correct subfolder and open it.
- Delete all files inside the subfolder, see instructions. Subfolder is deleted automatically when all files in it are deleted.
4.3 Cancelling the data access
If the researchers are no longer allowed to use these files in their analysis, you need to also request them to remove any possible working copies of the files from their SD Desktop environment.
4.3.1 Delete the data files
You can cancel the data access permanently by deleting the data files.
4.3.2 Delete sharing permission
In addition, you can cancel the data access either permanently or temporarily by deleting the sharing permissions from the bucket.
-
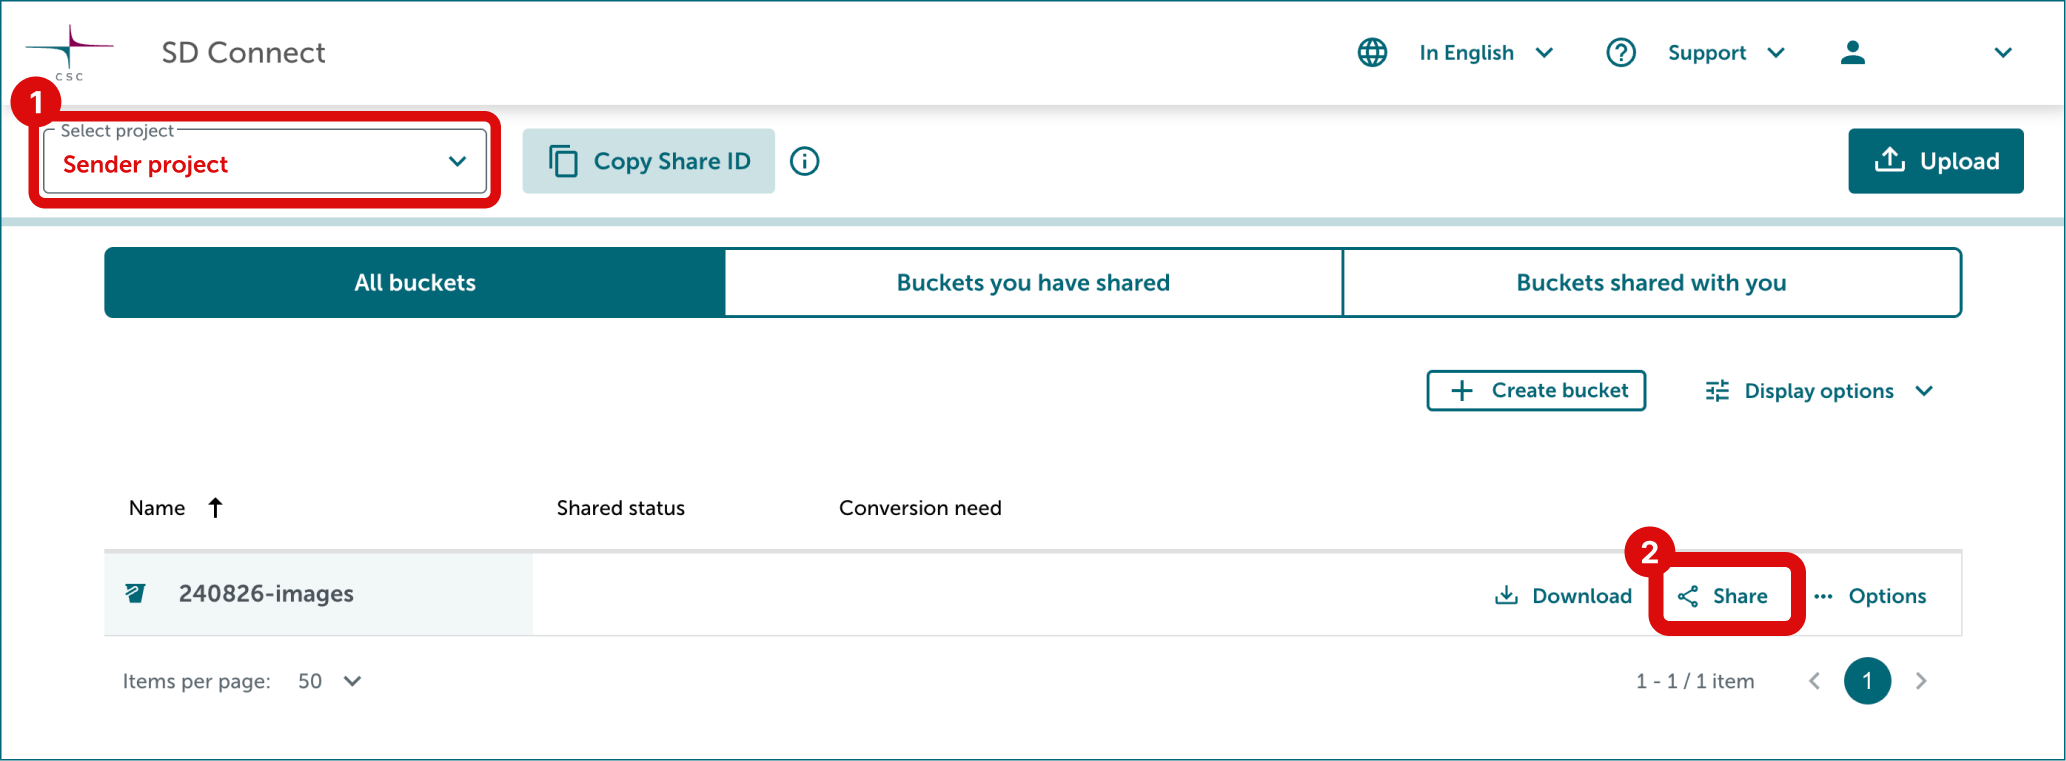
Select correct project from the top-left corner. Click Share button on the right side of the bucket.
-
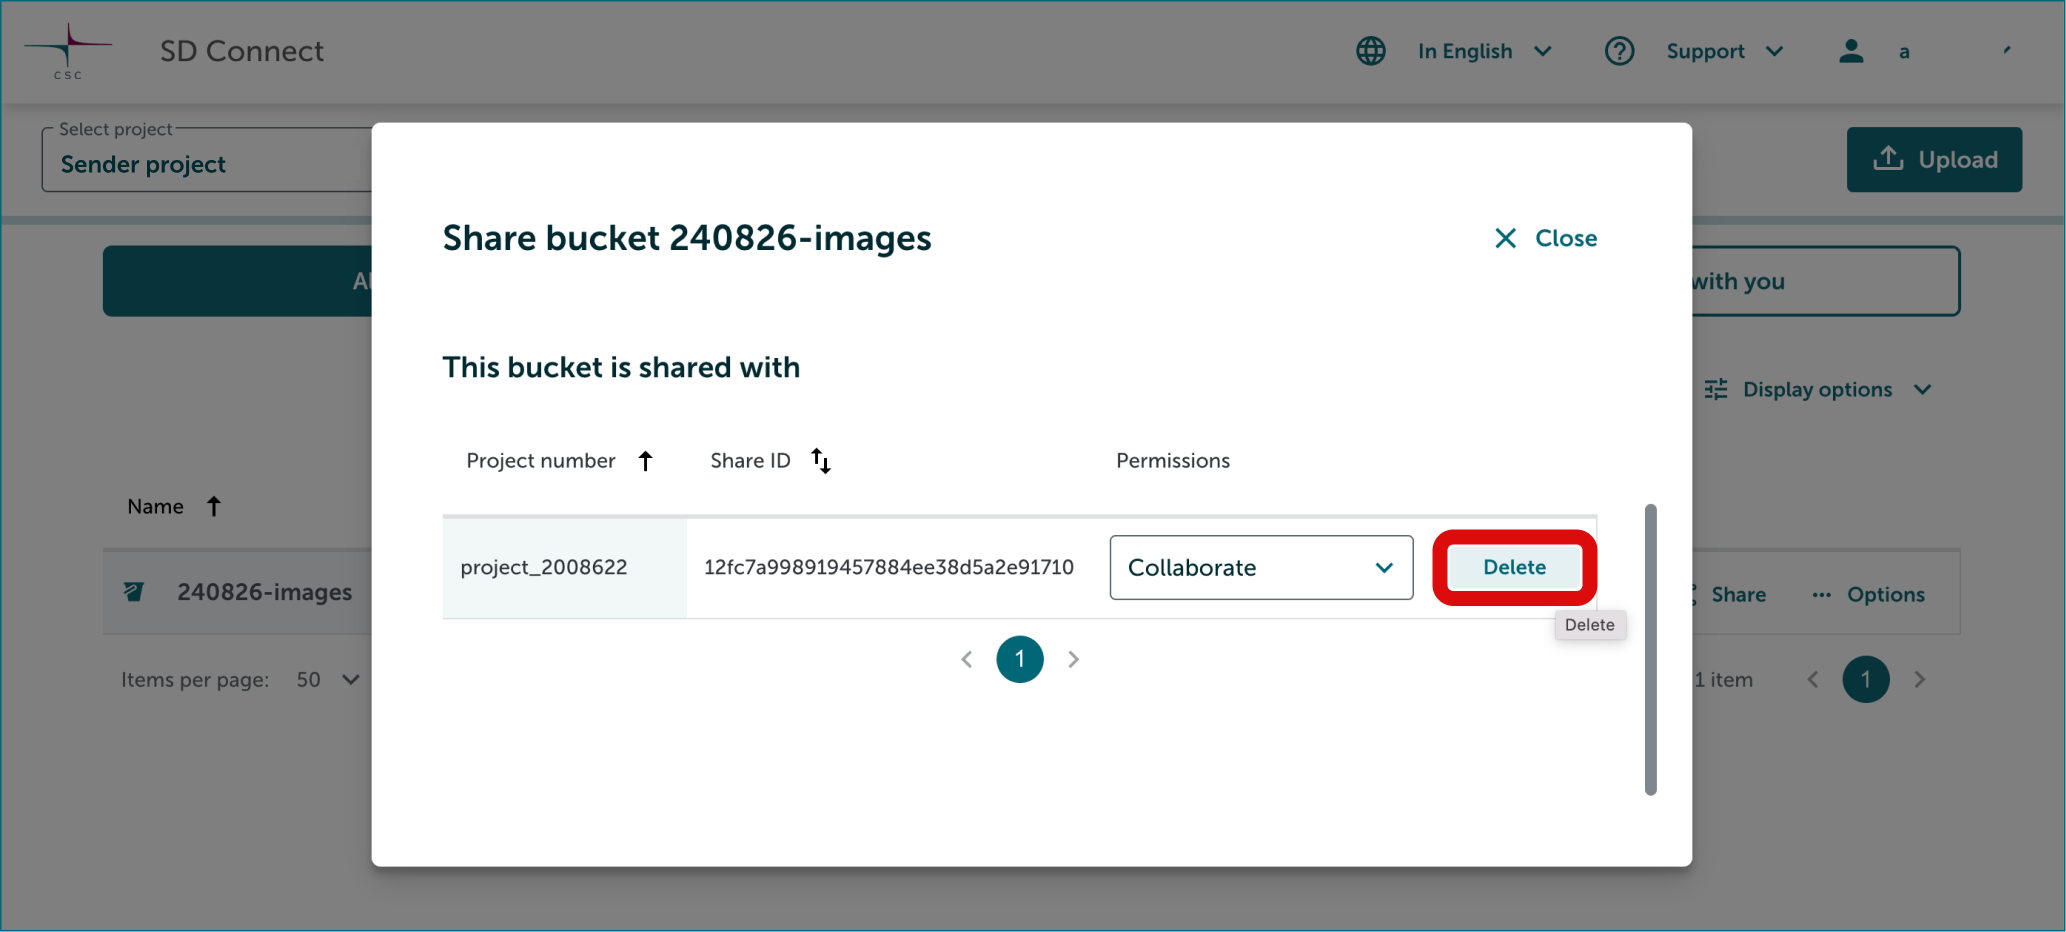
In the Share window scroll down to This bucket is shared to title. Delete permission by clicking Delete button on the right side of the project.
-
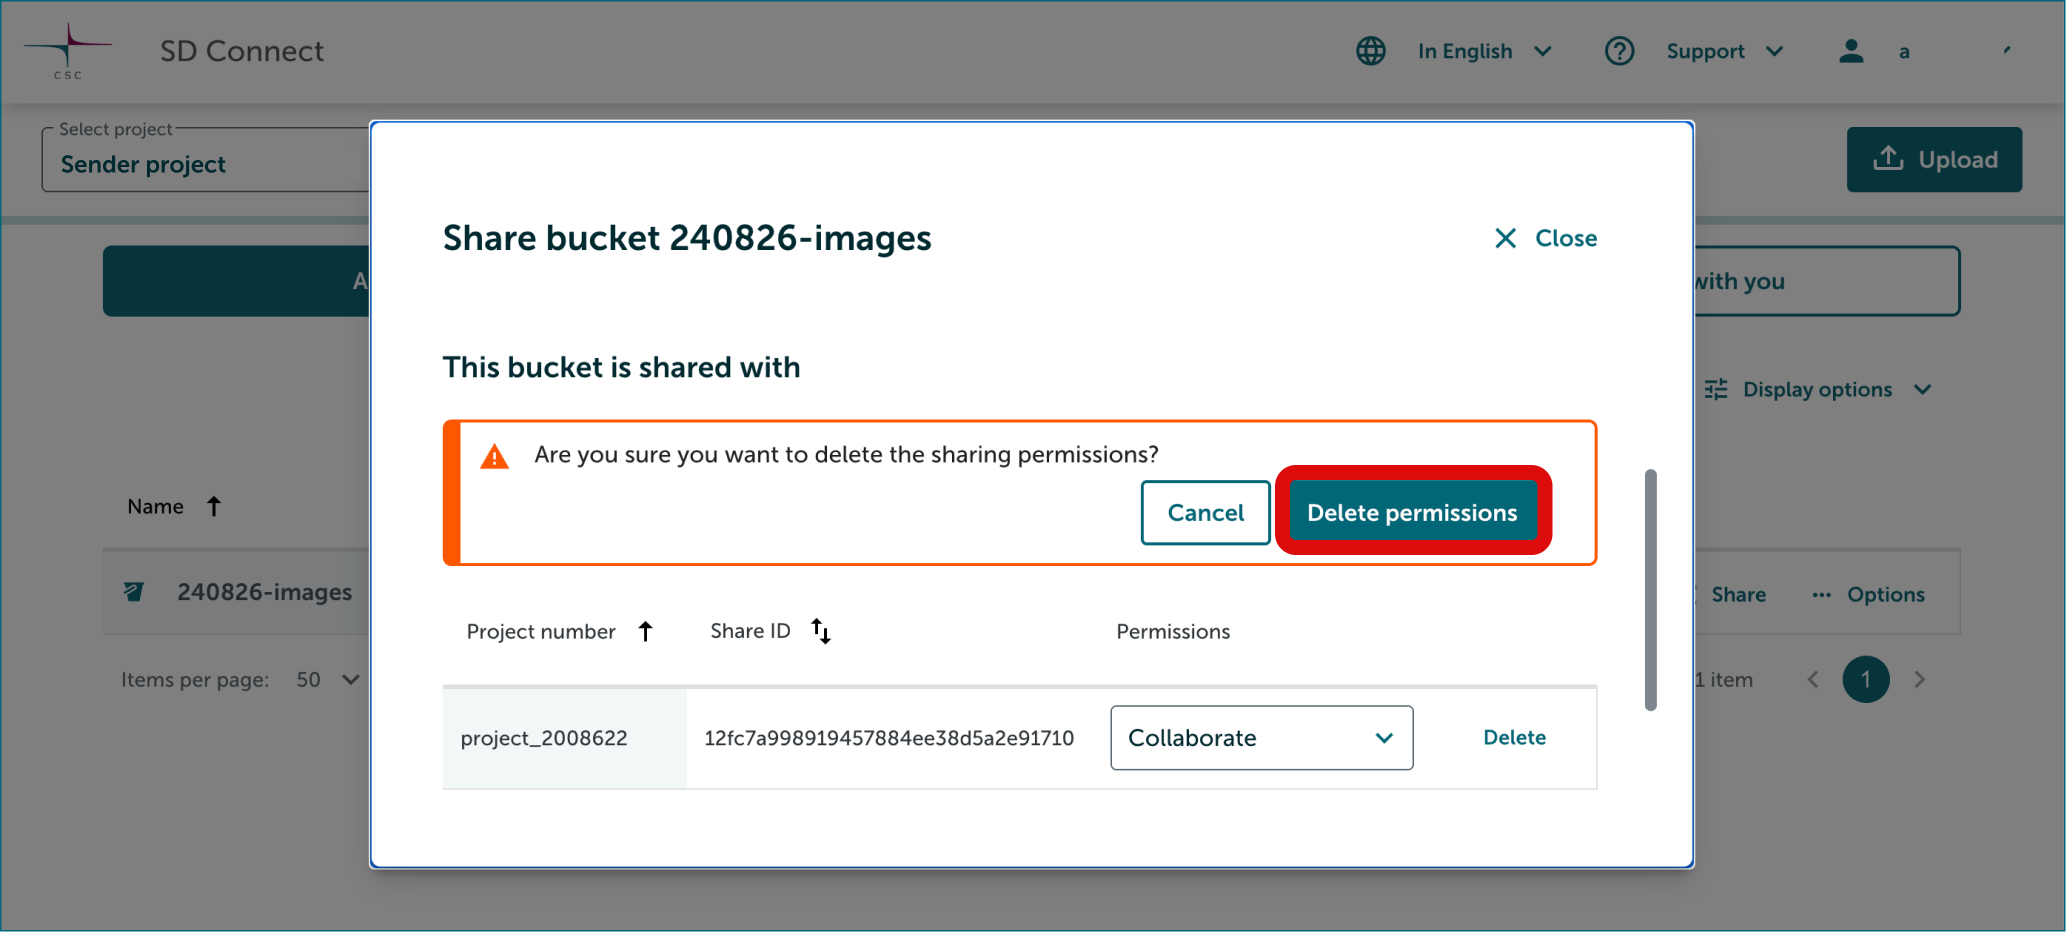
A notification will open above the project list. You may have to scroll up to see it. Confirm your choise by clicking Delete Permissions button.
-
Data permit expiration and data deletion
You can delete datasets from your organisation's project independently in SD Connect. However, when a data permit expires, the Sensitive Data support team will delete all files associated with the dataset from your project. The data will be deleted 90 days after the project in which the data users analyze the data is closed, which usually corresponds to the data permit's expiration date. However, if the project is closed earlier, the data will be removed regardless of whether the data permit remains valid. CSC, as the service provider of the processing environment, removes the data in accordance with the regulations and CSC's data retention policy (see General Terms of Use for CSC's Services for Research and Education).