Resource planning for your CSC Project
Every active CSC project consumes both Billing Units (BUs) and storage quota. When you create a project, CSC grants a default amount of Billing Units (BUs) and storage quota immediately.
Both the CSC project manager and all project members share responsibility for:
- Monitoring how many Billing Units the project has left.
- Monitoring how much of the storage quota is being used.
- Planning 6 months ahead project's resource usage.
- Applying for more Billing Units 2-3 times per year.
This is important because running out of BUs or exceeding quota affects service availability.
-
Restrictions about applying for Billing Units
After you apply for additional Billing Units, there is a two‑week period during which you cannot submit another application. Because of this, it’s important to request additional resources early. You will receive an email notification when your project’s Billing Units are running low, giving you enough time to apply for more before service avaibility is affected.
What are Billing Units
Billing Units (BUs) are used to track how much computing power and processing time your project consumes. CSC uses different types of Billing Units to measure resource usage based on the service:
-
SD Desktop consumes Cloud Billing Units type, which reflect the number of virtual desktops running and the number of volumes you've created. Each virtual desktop in SD Desktop can have a volume, where files can be imported from SD Connect/SD Apply. The volume appears inside the virtual desktop similarly to how a USB drive appears on a personal computer. The volume can be added only during desktop creation (up to 200 GB). If you need larger volume please contact service desk (subject: Sensitive data).
-
SD Connect consumes Storage Billing Units type, which reflect the amount of data stored in CSC’s cloud infrastructure. The more data you store and the longer you store it, the more Storage BUs are used.
-
When you create a project, 30 000 Cloud and Storage BUs are usually enough for initial testing.
How to monitor Billing Units usage
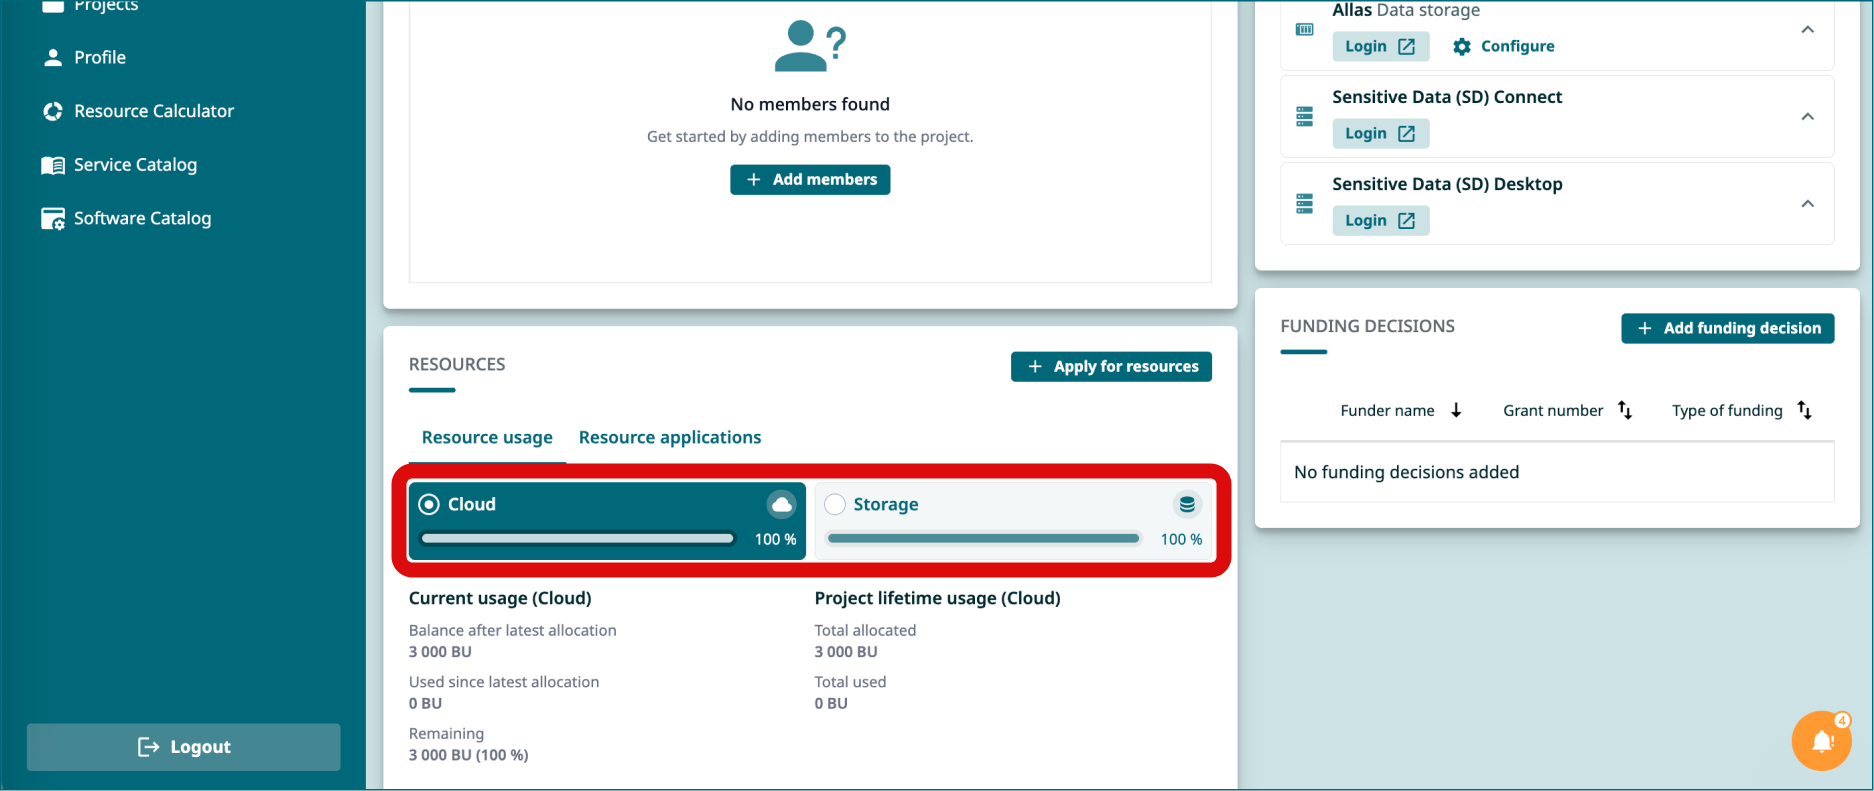
You can monitor Billing Units usage in MyCSC portal.
- Log in to MyCSC.
- Navigate to your project's view.
- Scroll down to Resources window.
- You can see Cloud Billing Units and Storage Billing Units usage under from their respective tabs.
-
When your CSC project runs out of Cloud Billing Units
You will have a limited access to the SD Desktop. This means:
- All virtual desktops currently running will automatically be paused.
- You will not be able to access the virtual desktops content's or unpause them, until you have applied for more Billing Units.
- Your data will remain unaffected and will not be deleted, even if your total amount of Billing Units reach zero or drop below zero.
- Each project member will receive a notification via email from the MyCSC portal when the Billing Units for your CSC project are about to end.
What is Storage Quota
The storage quota defines how much space is available for your project’s data. It represents a capacity limit, not a consumable resource.
For CSC projects with SD Connect enabled, the default quota is 10 TB. If needed, this can be increased up to 200 TB by contacting the Service Desk (subject line: Increase Allas quota).
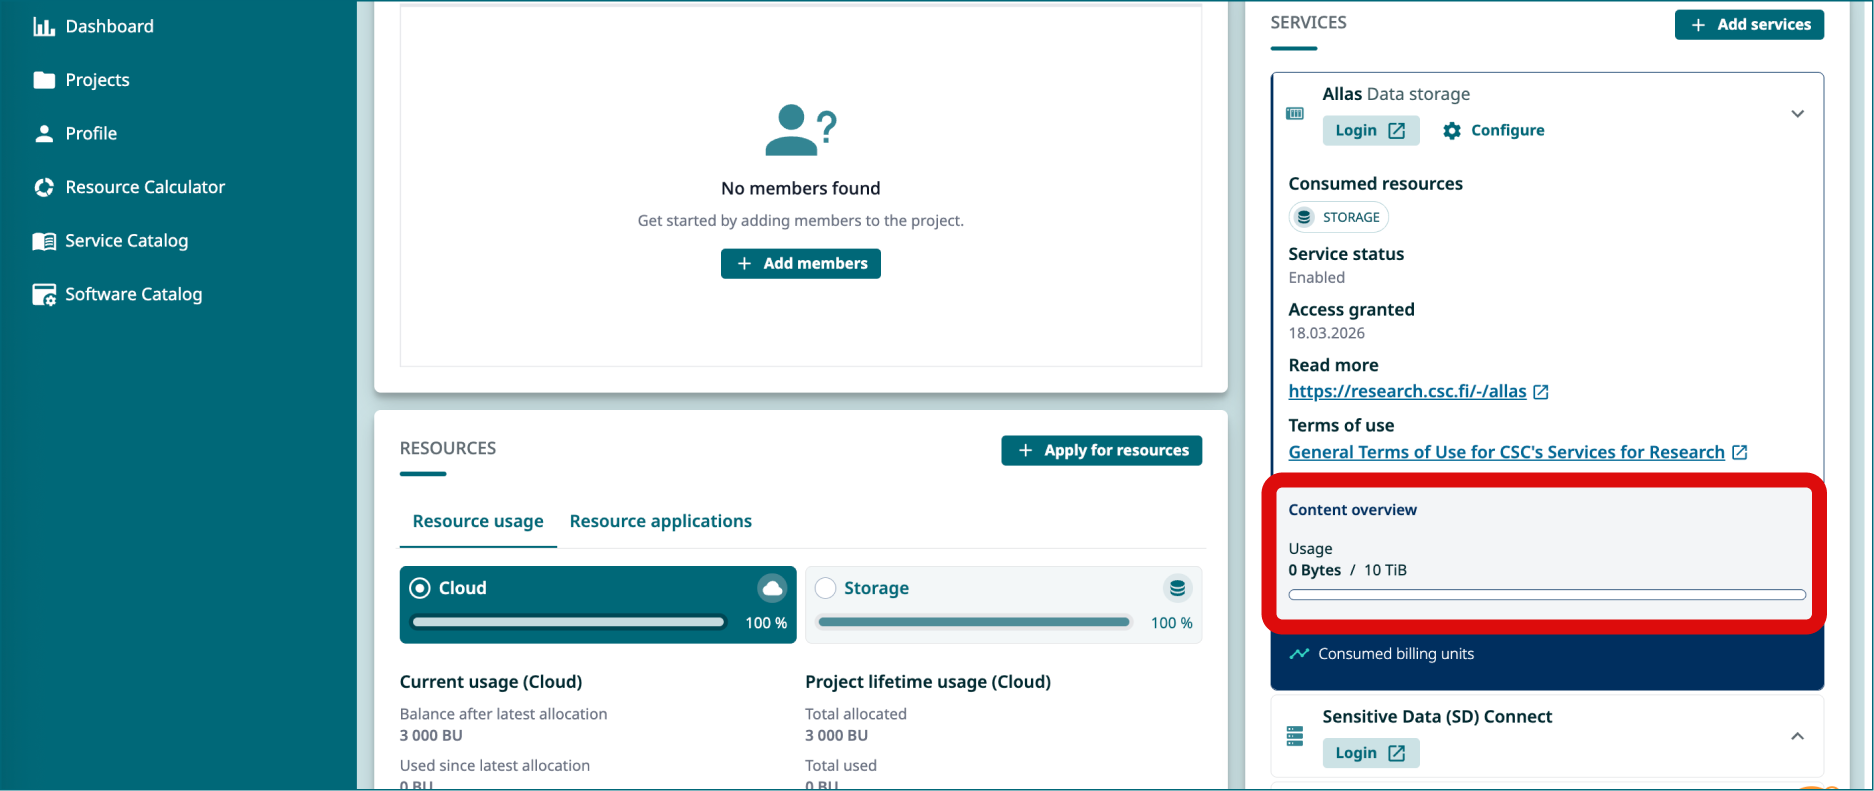
How to monitor storage quota usage
You can monitor storage Quota in MyCSC portal.
- Log in to MyCSC.
- Navigate to your project's view.
- Scroll down to Services window.
- Click Allas. You can see storage quota usage under Usage at the bottom of the window.
-
When your CSC project runs out of storage quota
Once all storage quota (or storage space) has been used:
- Data upload to SD Connect will no longer be possible.
- Data import to SD Desktop will no longer be possible.
Plan resource usage
Step 1: Estimate the appropriate Billing Units packages for your project
Estimate the Billing Units your project will consume over the next six months for SD Desktop (Cloud Billing Units) and SD Connect (Storage Billing Units) using the examples provided below. This will help you determine which package to apply for via MyCSC portal. Before you begin, please note:
-
Billing Unit Packages
- Unused Billing Units expire every six months, so request only what you need.
- The Basic, Small and Medium packages have fixed Billing Unit (BU) allocations, while the Large package is flexible and can be defined by you, up to a maximum of 3,000,000 BUs.
- If your virtual desktop has been paused because all Billing Units have been already consumed, apply for the Small Package (30,000 BUs) from my.csc.fi. It will be assigned immediately, allowing you to resume work. After two weeks, review your usage to see if additional units are needed.
SD Desktop: Cloud Billing Units
SD Desktop consumes Cloud Billing Units type, which reflect the number of virtual desktops running and the number of volumes you've created. Each virtual desktop can also have a volume (also called disk space), where files can be imported from SD Connect/SD Apply.
Here’s a table summarizing the Cloud Billing Units required for using SD Desktop over 6 months for various desktop options:
| Desktop Option | Cloud Billing Rate (units/hour) | Cloud Billing Units ( consumed in 6 months) | Select the correct BU Package in My.csc.fi and application frequency |
|---|---|---|---|
| Small Computation | 5.2 | 22,464 | Small package, 2 times a year: 30.000 BUs assigned immediately |
| Medium Computation | 10.92 | 47,174 | Small package, 3 times a year: 30.000 BUs assigned immediately |
| Heavy Computation | 65 | 280,800 | Medium package, 2 times a year: 300.000 BUs Processed on average within 1-3 days by a Resource Officer |
| Small GPU Computation | 78 | 341,640 | Medium package, 3 times a year: 300.000 BUs Processed on average within 1-3 days by a Resource Officer |
| Big Picture project | 195 | 854,100 | Large package, 2 times a year: 900.00 Bus Generally processed every three weeks by the CSC's Resource Allocation Group |
SD Connect: Storage Billing Units
SD Connect stores data into CSC's infrastructure Allas and provides additional automated encryption and encryption key management. SD Connect consumes Billing Units at a rate of 1.365 Storage BUs per TB per hour.
Here’s a table summarizing the Storage Billing Units required for storing data in SD Connect over 6 months for various storage sizes:
| Storage Size | Storage Billing Units (consumed in 6 months) | Select the correct BU Package in My.csc.fi and application frequency |
|---|---|---|
| 500 GB (0.5 TB) | 2,987 units | Basic package, 3 times a year: 2.500 BUs assigned immediately |
| 1 TB | 5,967 units | Small package, 2 times a year: 30.000 BUs assigned immediately |
| 10 TB | 59,757 units | Small package, 3 times a year: 30.000 BUs assigned immediately |
| 100 TB | 597,570 units | Medium package, 3 times a year: 300.000 BUs Processed on average within 1-3 days by a Resource Officer |
Step 2: Apply for billing units via MyCSC portal
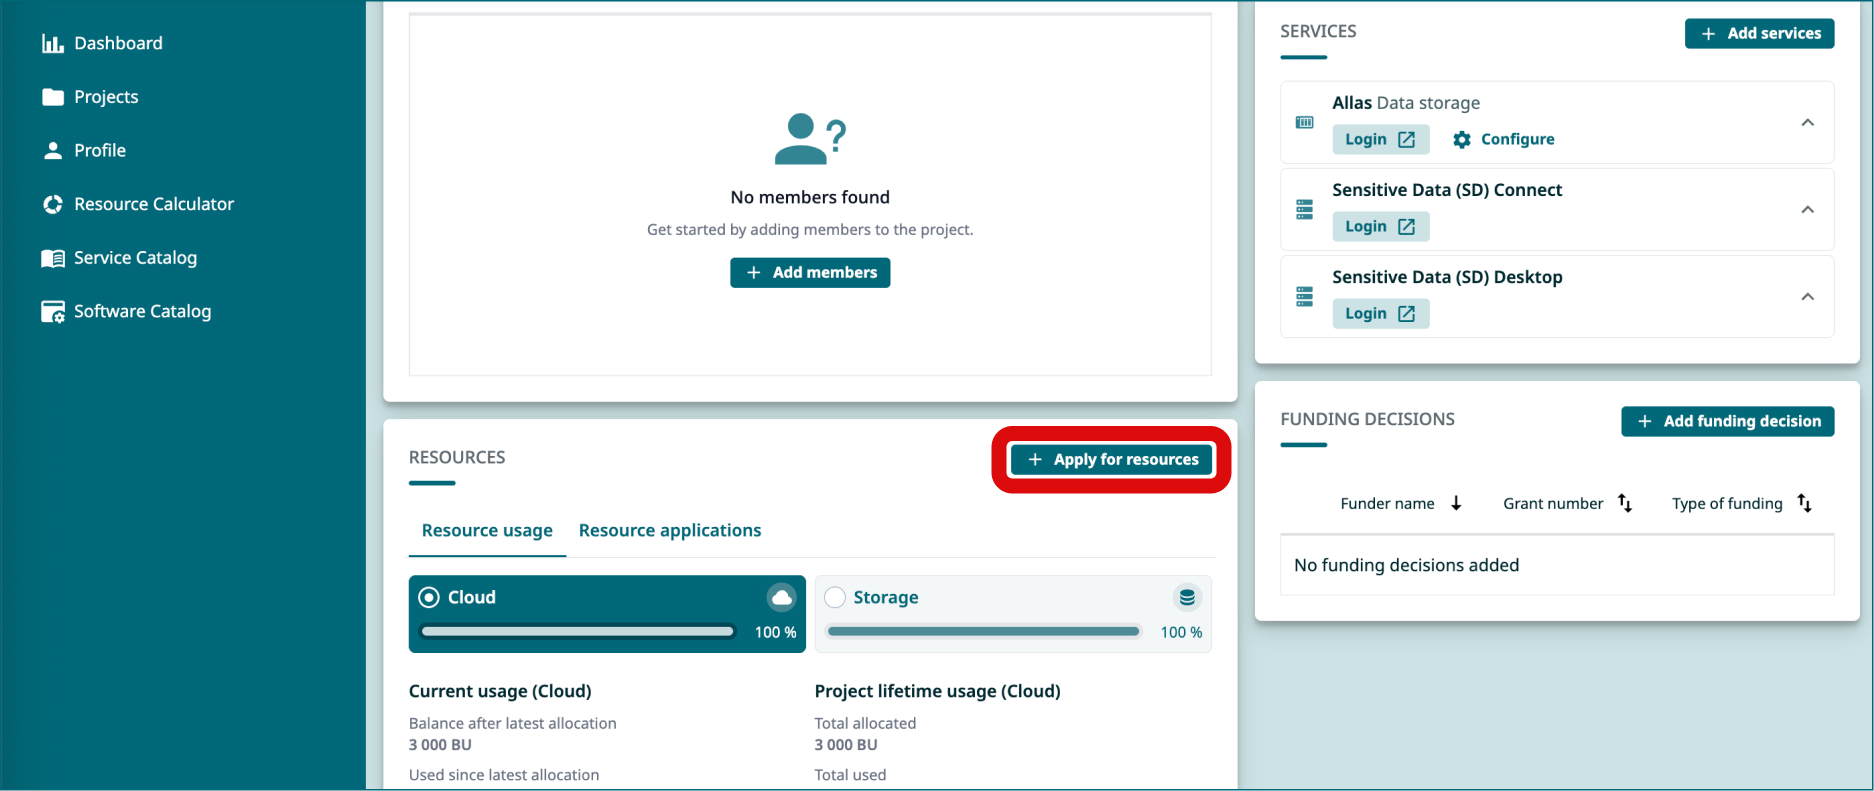
You can apply for more BUs for your CSC project via MyCSC portal.
-
Restrictions about applying for Billing Units
After you apply for additional Billing Units, there is a two‑week period during which you cannot submit another application. Because of this, it’s important to request additional resources early. You will receive an email notification when your project’s Billing Units are running low, giving you enough time to apply for more before service avaibility is affected.
- Sign in to MyCSC with your Haka or Virtu credentials.
- Go to Projects page (left side menu or a hamburger menu at the top right corner).
- Choose a project and click to open it.
- In the new view, scroll down to Resources window and click Apply for resources. A new window will appear (this might take up to 8 seconds).
-
In the new window you will see the services you have active in the project (in gray). Press Next.
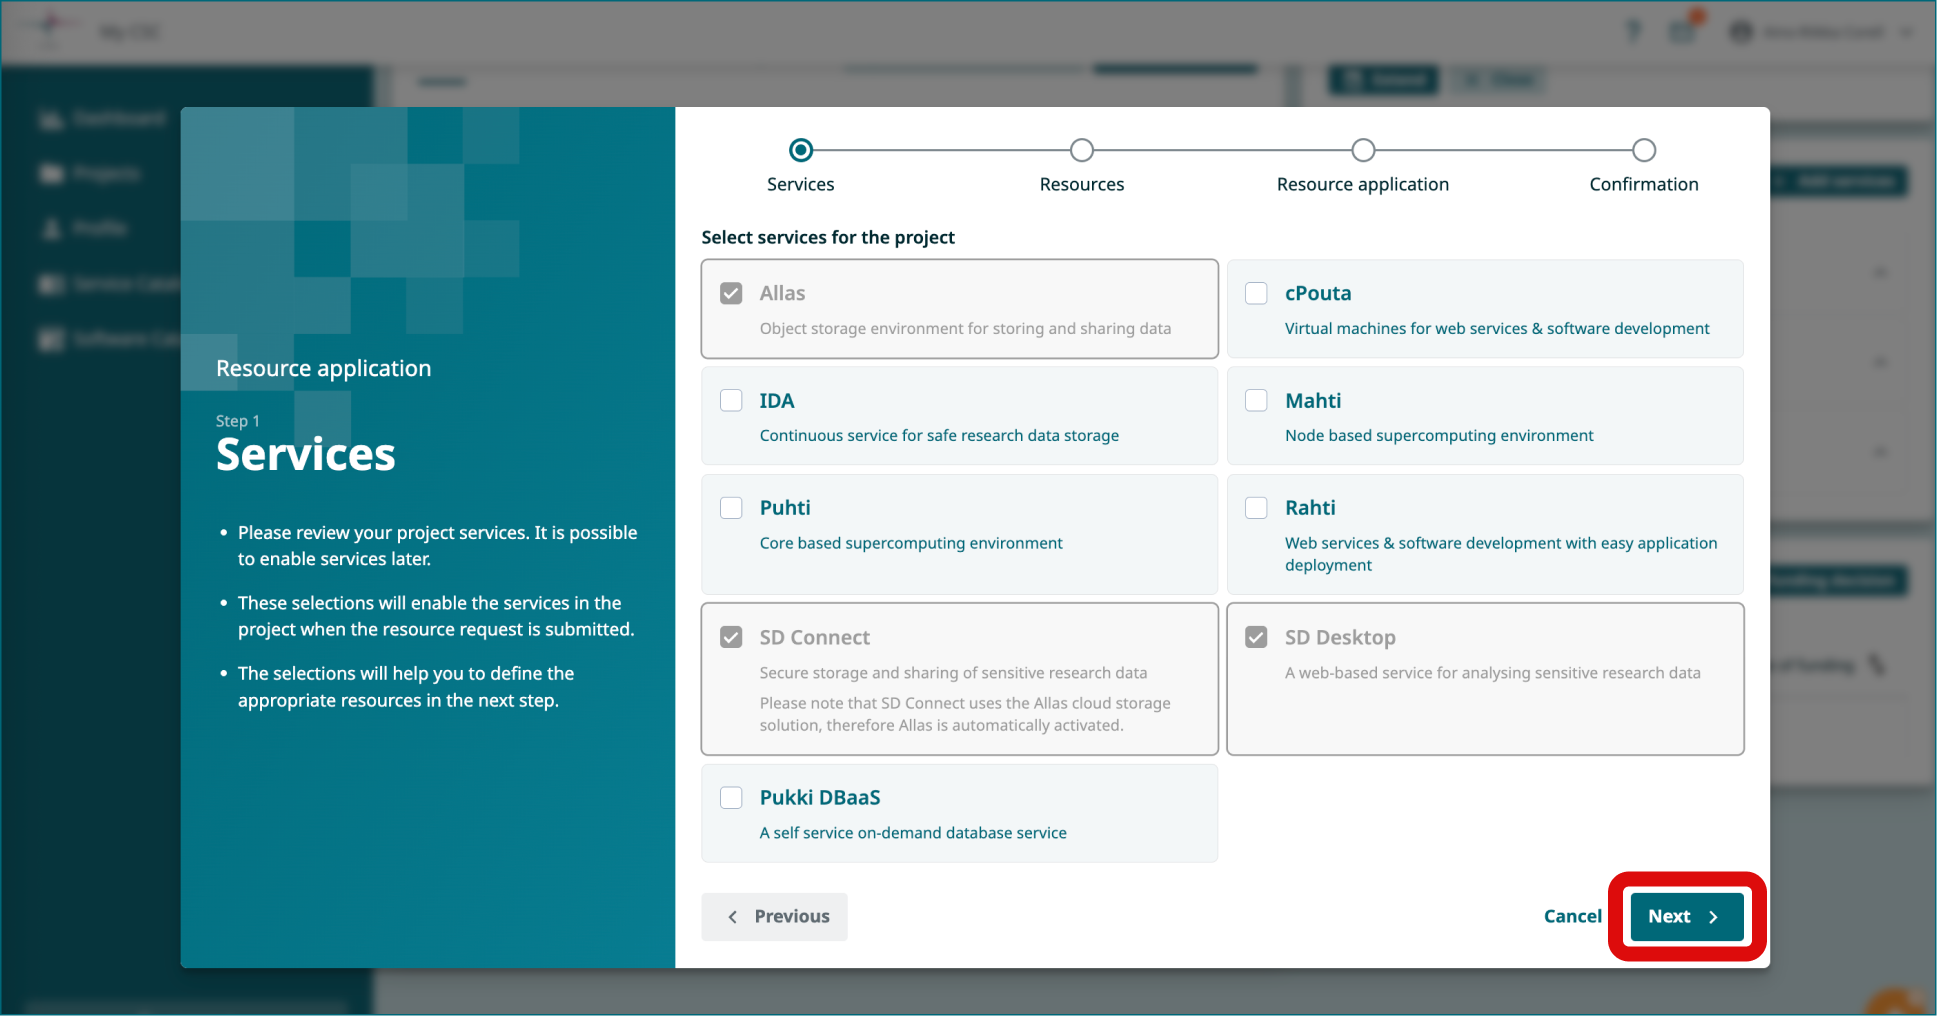
-
In the second view, click on the Billing Units package you need for
- Cloud Billing Unit type (used by SD Desktop)
- Storage Billing Units type (for SD Connect)
- Click Next.
-
In the next view, click Add publications. In the new window, you can search or add publications manually. Note: Undestandably, if you don't have publications related to this work yet, you can add here any past publication from your research group, even if the project is not directly related. Click Add.
-
Next, you will be asked to add keywords. These will become tags that will help you search for the project. Add a keyword (e.g. research) and press Add.
-
Next, you need to fill in two more fields: Short overview of (expected) results and Program, software, methods used. Click Next.
-
In the last view, you can review the project description and field of science. Finally, you can click Submit.
-
When the Biling Units will be assigned to the CSC Project you will receive an email notification.
Log into services
- Now all the preparations are ready and you can start using the services. Below you'll find links to related user guides:
SD Connect:
SD Desktop: