CSC’s Sensitive Data Services - Exercise: Automated speech recognition with Whisper
Working in a secure service designed for storing and analysing sensitive data can feel very different from using a regular computer. Tools may behave differently, extra security layers apply and some workflows require new habits.
This tutorial can be used in two ways:
To learn how to use the automated speech recognition software Whisper: a simple, step‑by‑step guide for researchers who want to transcribe audio or video files within SD Services.
To practice using SD Services: a hands‑on exercise for researchers new to the secure environment, helping them understand how it works and build confidence before handling real sensitive data.
Outline:
1. Before you start
Before starting the work, make sure of the following:
1.1 You have a CSC user account
If you do not have an account, see account instructions. Note that for this exercise you will need to use both your Haka and CSC accounts, so make sure you remember the password for your CSC account.
1.2 You have two-factor authentication (MFA) enabled for your CSC account
1.3 You are a member in a CSC project that has SD Desktop and SD Connect enabled
- Log in to MyCSC.
- Go to the Projects page and open the correct project.
- Scroll down to Services window.
- If SD Desktop and SD Connect appear in the list, they are active.
- If they are missing, ask your project manager to activate them via the project page.
2. Collecting sensitive material via SD Connect
2.1 Record an interview or download example file
Record a short interview with your phone or laptop, asking the person next to you the following things:
- First name
- What has been most interesting in this first part of the seminar
The interview can be a video or an audio recording. Do not make it longer than one minute. Name the interview file on your device so that it is easy to identify (do not use spaces or special characters in the name).
Alternativerly you can download this example file
2.2 Upload the recording
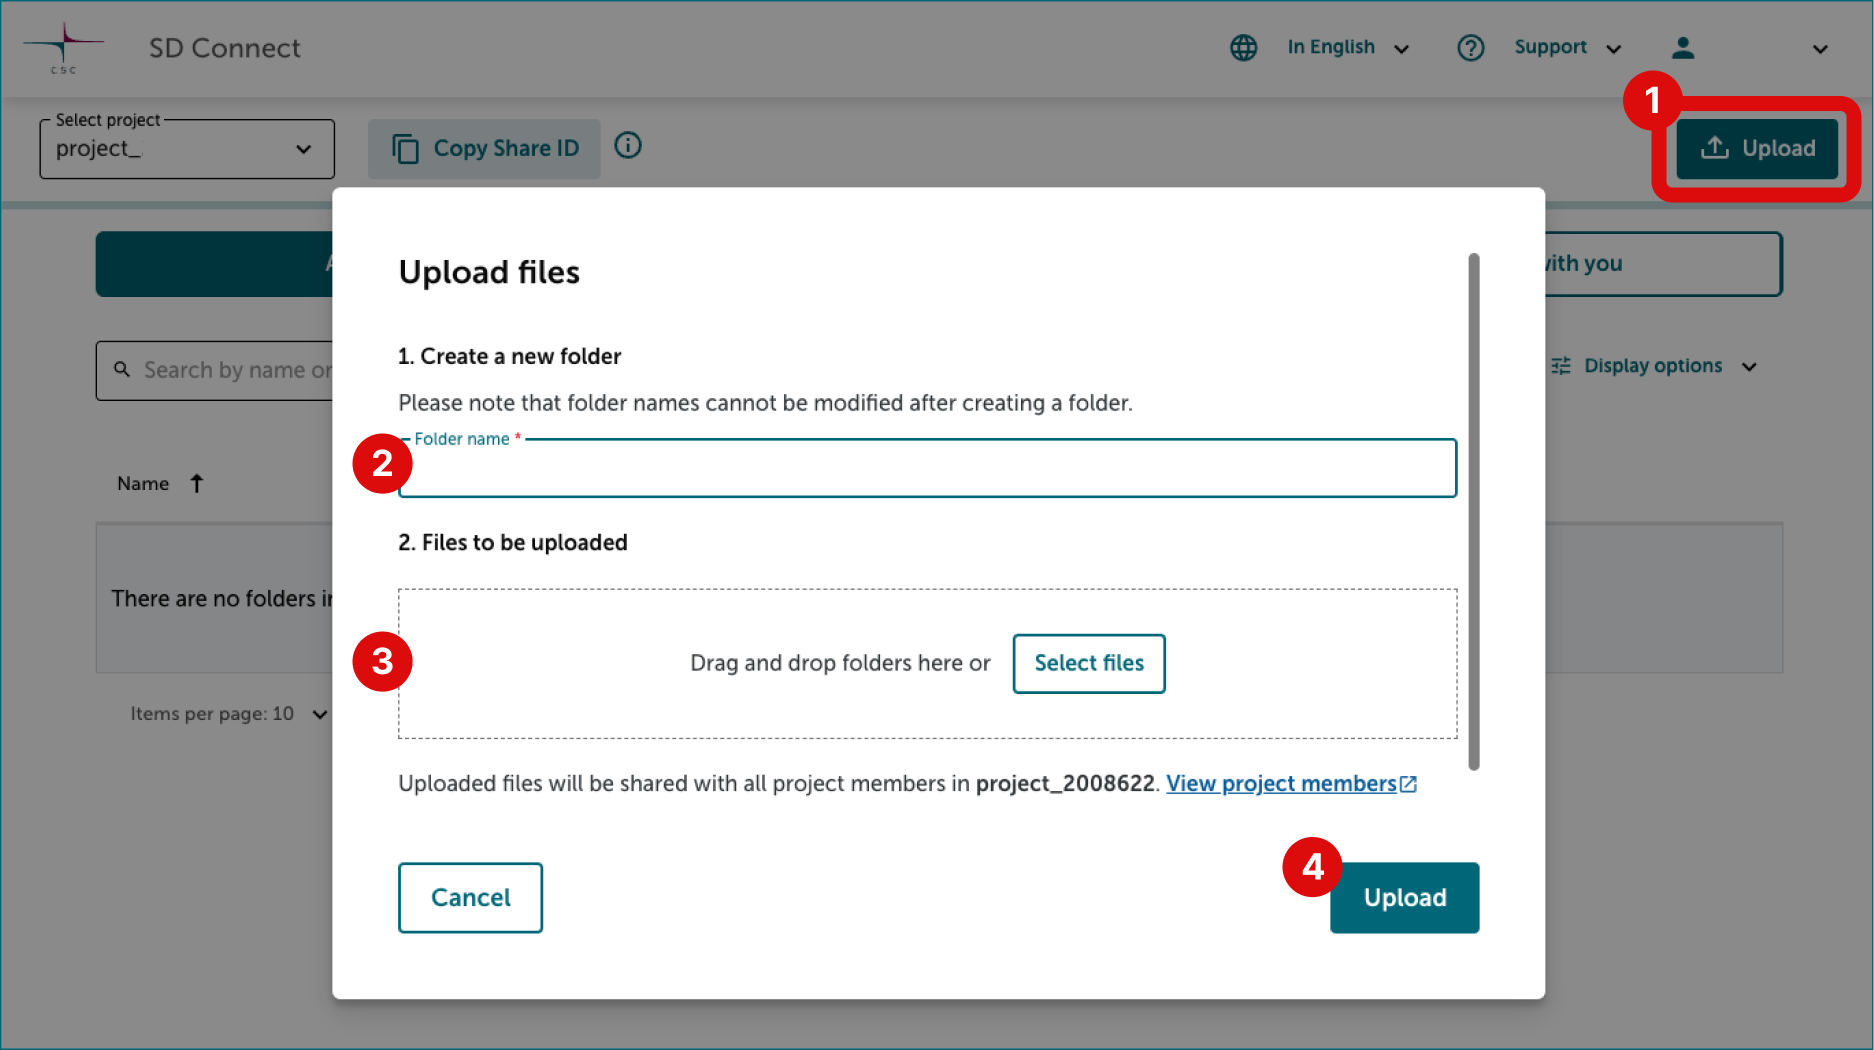
When the interview is ready, open the browser on your phone or laptop and upload the interview to the SD Connect service.
- Log in to SD Connect service.
- Select the correct project (2000828 or your own project).
-
Go to the folder2000828-social-data and upload the recording from your phone using the Upload function.
3. Data import via SD Desktop
3.1 Create a virtual desktop
If you are following this tutorial as part of a course, you can skip this step and move to the next one. The instructor has already completed the necessary setup for you.
If you are trying this tutorial on your own, switch to your laptop, log in to the SD Desktop service and create a virtual desktop following these steps and by choosing these options:
-
Operating system: Default Ubuntu
-
Virtual desktop option: Medium
-
Storage volume: 200 GB
The virtual desktop will be ready for use in approximately 30 minutes.
3.2 Log in to the virtual deskop
- Switch to your laptop and log in to the SD Desktop service.
- After logging in, you will be in the Connections view of the SD Desktop service.
- Scroll to All connections section and click the + sign in front of your CSC project or project_2000828. This opens a list of virtual desktops currently running on the project.
-
Select socialdatavm-1764247746. This will open the virtual desktop in your browser window.

-
Open the virtual desktop’s Data Volume disk on the left side.
- In the volume, create a new folder by right-clicking on an empty area and selecting “New Folder” from the menu.
-
Name the folder according to your username so that other users can easily identify the owner.

3.3 Importing data from SD Connect to SD Desktop
In this step, you will create a secure connection between your virtual desktop (your virtual computer) and the files you have stored in SD Connect and then import those files into the virtual desktop. They will be automatically decrypted during the transfer, making them ready for analysis.
-
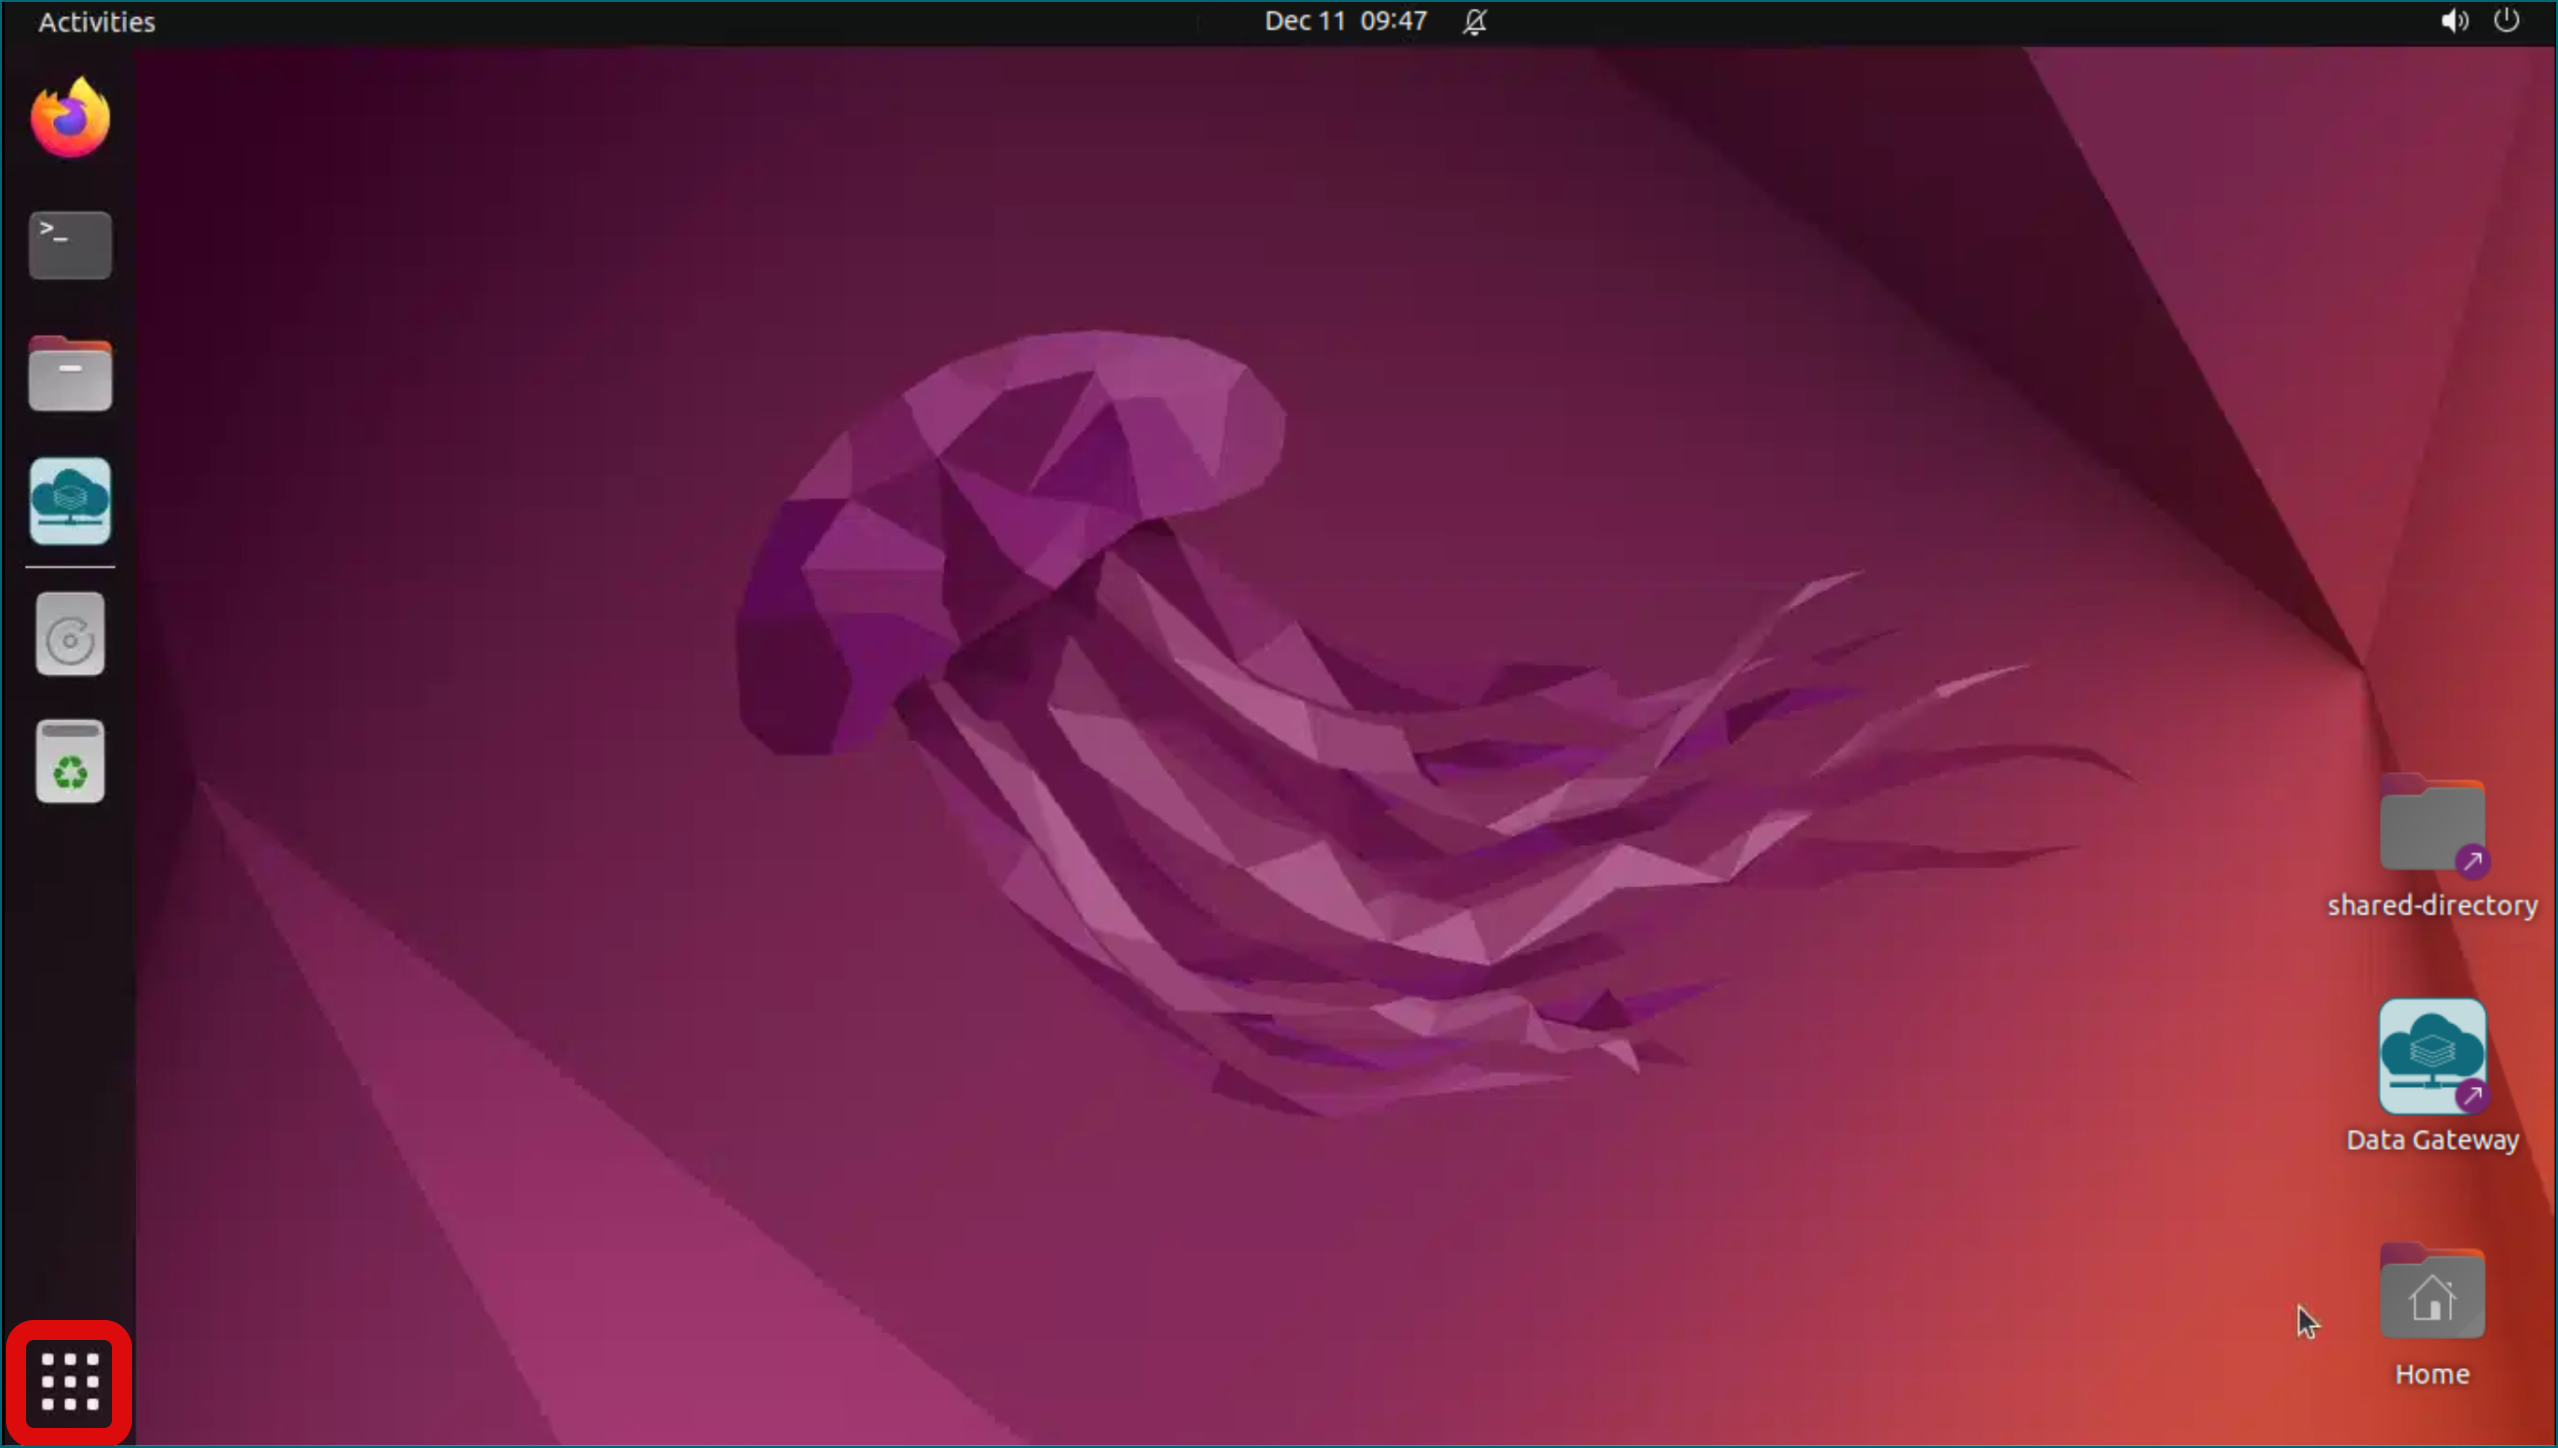
Launch Data Gateway application by clicking the icon on the left side of the desktop.
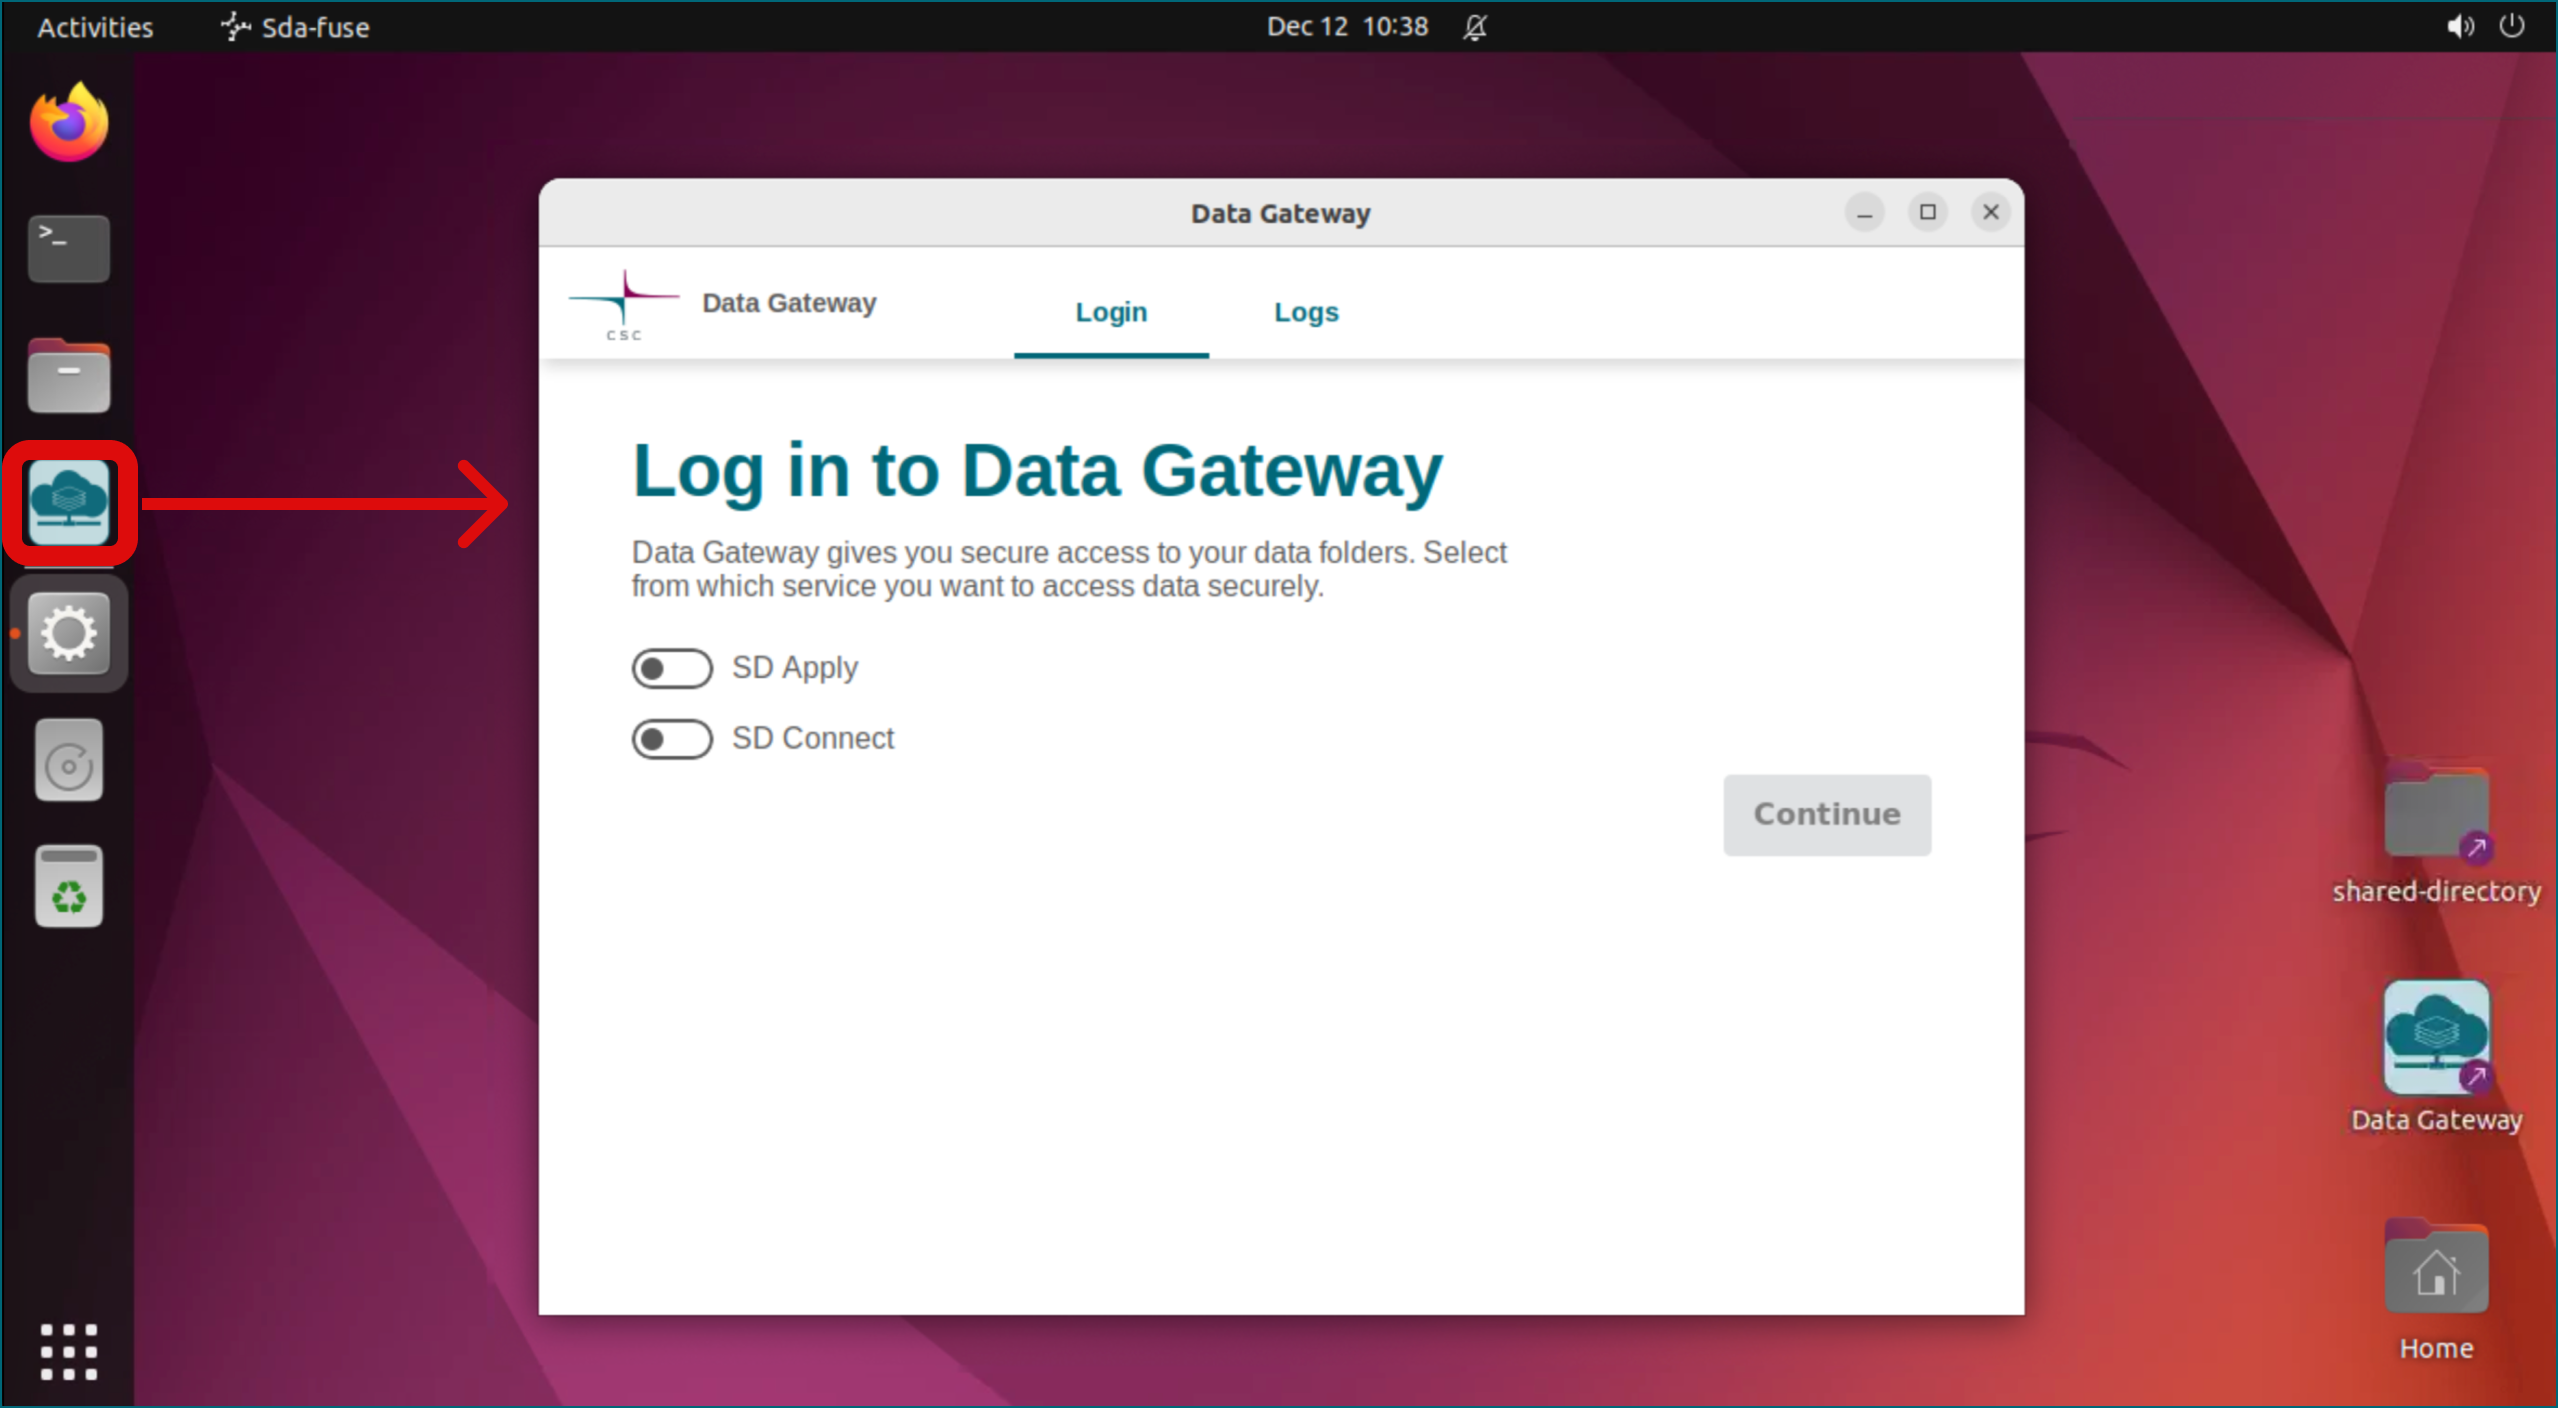
-
Select the option to connect to the SD Connect service. During login, you must enter your CSC username and password (Haka cannot be used here).
- Once the connection is established, minimise Data Gateway by clicking the “_” symbol in the upper-right corner of the Data Gateway window.
-
Next, open the File Browser and navigate to your home directory (Home).
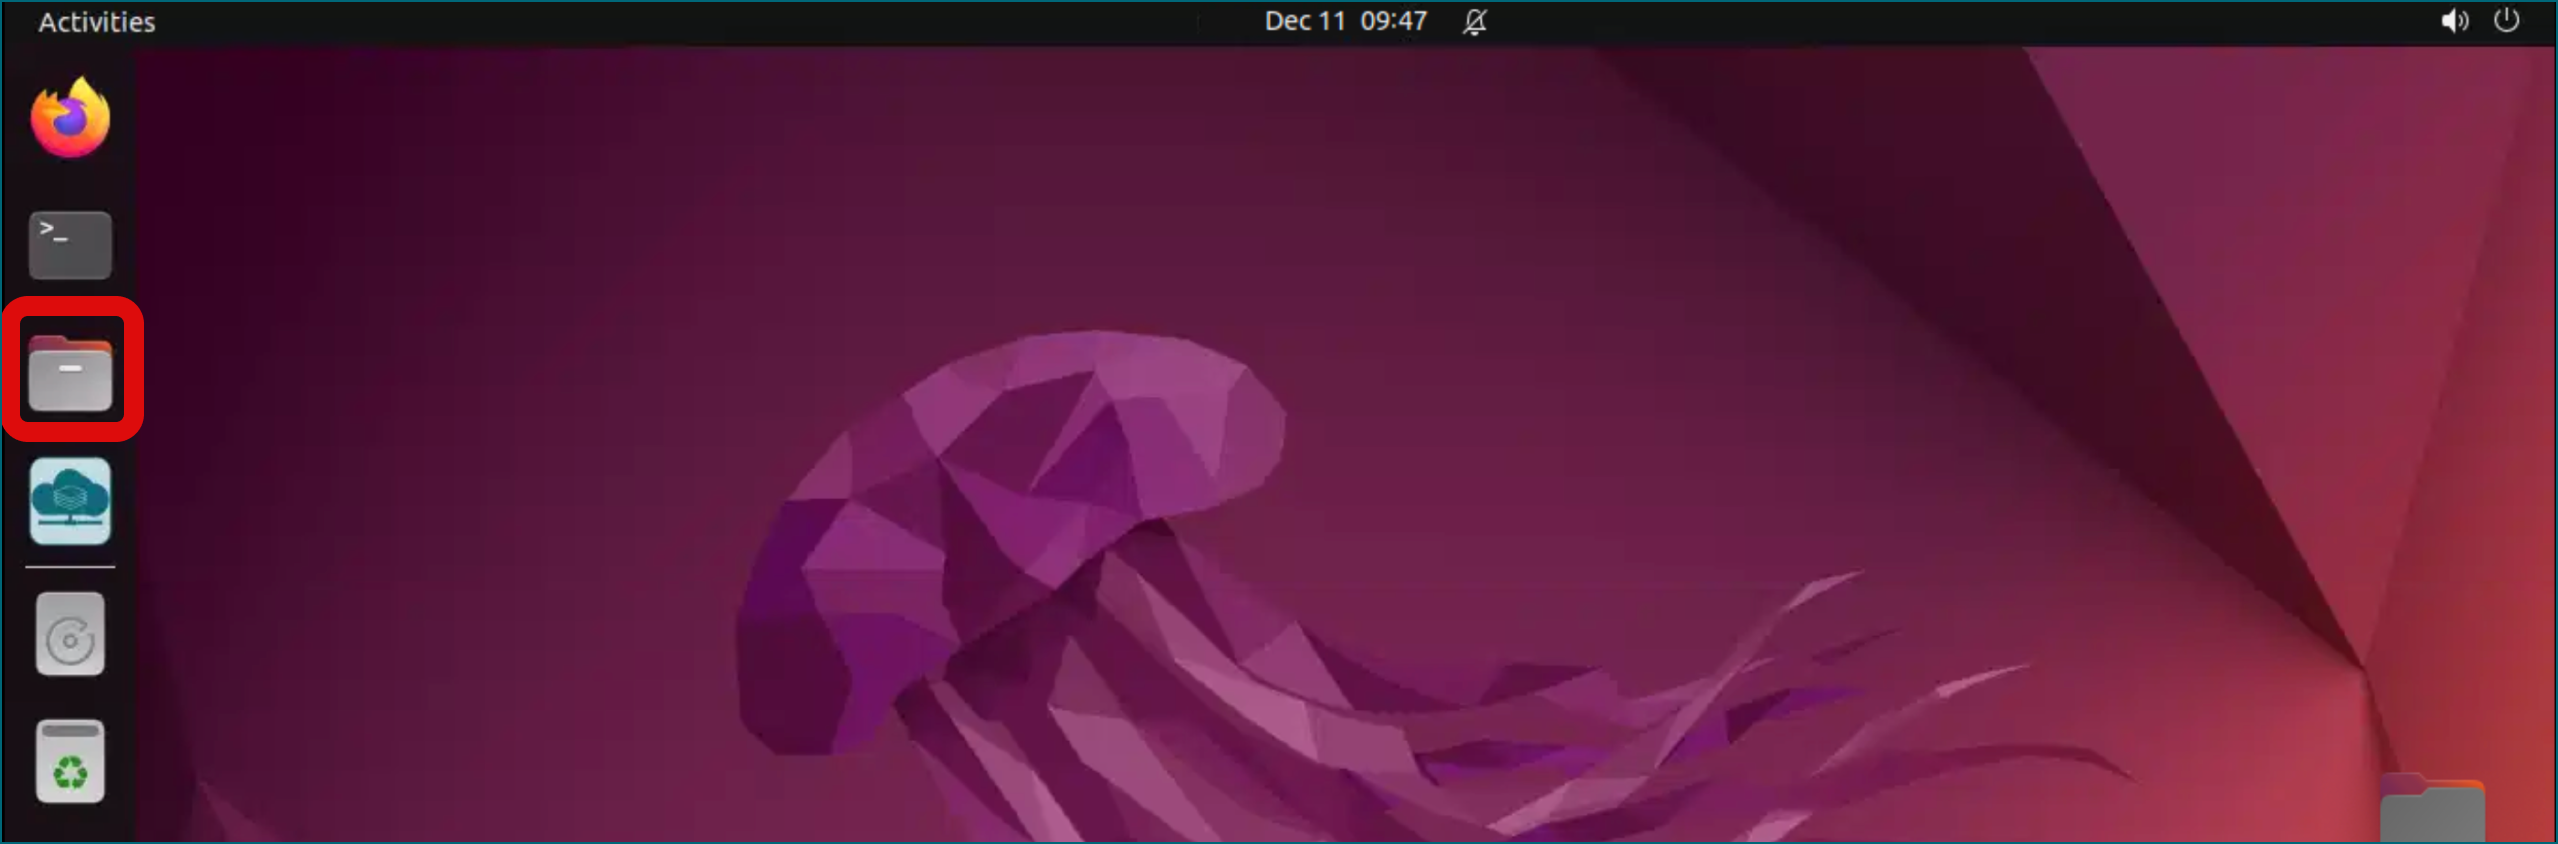
-
Continue through the following path: Projects → SD-Connect → project_2000828 → 2000828-social-data
- Copy the recording you made from the 2000828-social-data folder to the folder you created on the Volume disk. You can copy by right-clicking the file and selecting “Copy to”.
- In the next dialog, the Volume disk can be found on the left side by expanding “+ Other locations”. Alternatively, you can open two file browser windows and drag the file from one folder to the other. Note that copying may take some time.
- Once the file has been copied to your folder on the Volume disk, right-click it and select: “Open With Other Application”
- Then choose: Video Player.
- If the video player can play the beginning of the recording, the transfer was successful and you can close the player.
4 Accessing Whisper in the virtual deskotp
4.1 Installing Whisper (self‑paced setup)
If you are following this tutorial as part of a course, you can skip this step and move to the next one. The instructor has already completed the necessary setup for you.
If you are following this tutorial independently, please use the SD Software Installer to install Whisper on your virtual desktop by completing steps 1–4 as described in software installation guide
4.2 Accessing Whisper (if already installed)
If course instructure or if another member of your CSC project has already installed Whisper on the virtual desktop, you can easily access the software by following the steps below:
- In the Data Gateway application navigate to: Home → Projects → SD-Connect → project_2000828 → tools-for-sddesktop
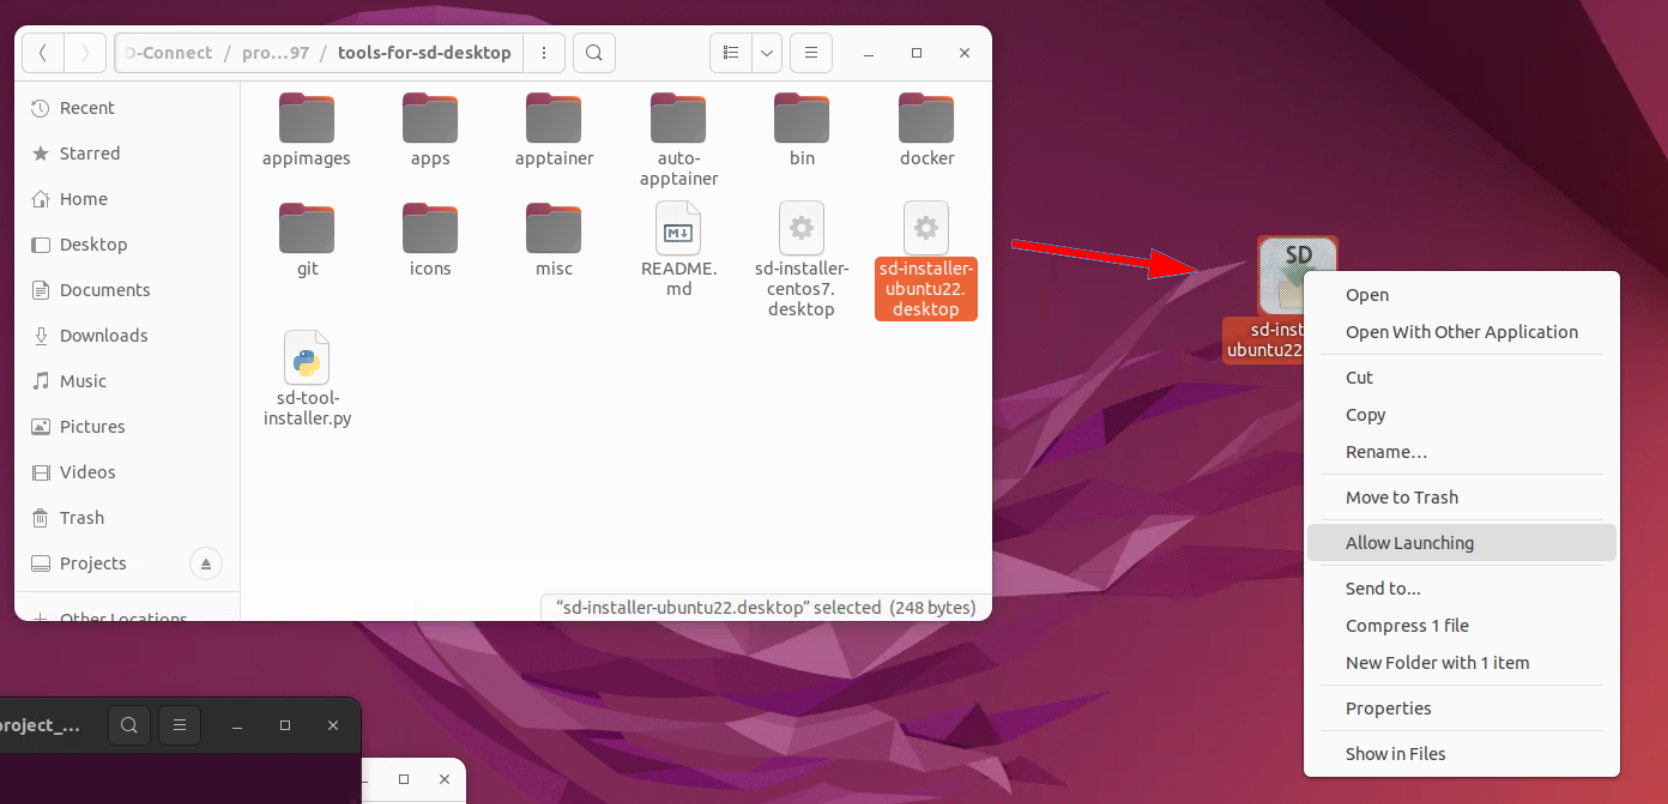
- Copy the file sd-installer-ubuntu22.desktop from this folder and paste it to the virtual desktop.
- Right-click the copied file on the desktop and select “Allow Launching”. Then double-click the file. This opens the installer tool.
- Click the “Whisper” button in the tool to install the speech recognition software.
-
Note that this step will also install bu default VS Code and automatically add the launch icons for any software that other project members have placed in the shared folder.
5 Your first steps with Whisper
Whisper is now ready to use in the Terminal, also called the command‑line tool. The Terminal is a simple window where you type instructions (called commands) and the virtual desktop carries them out. You don’t need any programming skills, just type or paste the commands exactly as shown in the steps below and Whisper will create your audio or video transcripts for you.
You can enter commands in two ways:
- type them manually in the Terminal or
- paste them into the virtual desktop using the built‑in Clipboard tool.
Important:
Regular copy‑paste between your laptop and the virtual desktop is blocked for security reasons. However, you can still paste text into the virtual desktop using its special Clipboard feature. The Clipboard can behave differently depending on your browser and computer, so it might take a few tries to get used to. Also, the Clipboard only works one way: from your computer to the virtual desktop, not the other way around. For more details on how the Clipboard tool works, see the video tutorial and instructions here.
5.1 Open the Terminal in the correct folder
When you open the Terminal inside the folder where your audio or video file is stored, Whisper automatically knows where to look for that file and where to save the results. This keeps the next steps simpler.
-
Open the Virtual Desktop Volume (left navigation panel).
-
Go to the folder where your audio or video file is saved.
-
Right‑click on an empty area in that folder and select Open in Terminal. A Terminal window opens in that folder.
-
You can now type one of the commands and press Enter to run them.
5.2 Beginner‑friendly commands
Below you will find a list of simple example commands that show how to use Whisper to transcribe an audio or video file and save the output. You can copy these commands and replace the example filenames and folder names with your own.
5.2.1 How to create an English transcript and save it as a text file
To create a transcript from an audio or video file and save it as a text (.txt) file in the folder where your Terminal is currently open, type:
Where:
filename The name of the file you want to transcribe. Example: interview.mp3
--language en Use this if your audio is in English. Change it to fi for Finnish, or another language code if needed.
--output_format txt Save the transcript as a plain text file (.txt).
--output_dir . The dot (.) means: “Save the output in the current folder I am in.” Whisper will place all generated files in the folder you are currently working in, the same one where you opened the Terminal.
Whisper automatically names the output file based on your input filename.
Example using real file names:
If your audio input file is called interview.mp3 Whisper will create he transcript interview.txt and save it in your current folder.
5.2.2 how to specify the folder output
To create a transcript from an audio or video file and save it as a text (.txt) file in a folder you choose, type the following command in the Terminal:
Where:
filename The name of the audio or video file you want to transcribe. Example: interview.mp3
--language en Use this if your audio is in English. Change it to another language code (for example fi for Finnish) if needed.
--output_format txt This tells Whisper to save the transcript as a plain text file.
--output_dir foldername This is the folder where Whisper will save the generated transcript. Replace foldername with the name of the folder you want to use.
Whisper automatically names the output file based on your input filename.
Example using real names:
If your input audio file is called interview.mp3 Whisper will create the transcript interview.txt and save it in your the folder called transcripts.
5.2.3 How to transcribe a long audio or video file faster
Now that you’ve learned how to create transcripts and save them in the format and location you want, you can start using Whisper to transcribe real audio or video files from your research. If your recordings are long or large, you may want to speed up the transcription process by adding the option:
This tells Whisper to use 4 CPU cores. Using more cores usually speeds up the transcription process. You can think of cores as the “computing power” of your virtual desktop. The more cores you have, the more tasks it can handle at the same time—and the faster Whisper can process your audio.Full example:
whisper filename --model medium --language en --output_format txt --output_dir foldername --threads 4
Important notes:
-
Using more threads can increase speed, but only up to the number of CPU cores available.
-
If too many threads are used on a machine with limited resources, performance can decrease.
-
On shared systems (for example, a virtual desktop other people also use), using many threads can slow down the entire machine for everyone.
A safe starting point is to try --threads 2 or --threads 4 and increase only if the virtual desktop option is suitable.
5.2.4 How to transcribe a audio or video file where multiple people are speaking
You can also ask Whisper to try to recognize different speakers in your audio (for example, in an interview) by adding:
This tells Whisper to run an extra step that attempts to label who is speaking when.
However, please note: Diarization makes the transcription process significantly slower, especially for interviews or long recordings. The results are not always perfect and may require some manual correction. If you only need a simple transcript, we recommend not using diarization.
Full example:
whisper --model medium --language en filename --output_dir foldername --output_format txt --threads 4 --diarize pyannotate_v3.0
5.2.5 How to create a transcript without defining the language
If you don’t specify a language, Whisper will listen to the first ~30 seconds of your audio and try to guess the language automatically. This usually works well, but:
- Automatic detection sometimes makes mistakes
- It may take slightly longer
- It can be confused by background noise or mixed languages
To help Whisper and improve accuracy, it’s best to manually set the language when you already know it, for example Finnish:
Full example:
5.2.6 How to create several output formats including subtitles
Whisper can save your transcription in different file formats all at once with the command:
Full example:
This will generate txt, srt, vtt, tsv, and json versions of your transcript.
Here are the most common options that you can also specific instead of using all:
srt — Subtitle file Creates a subtitle file with timestamps, widely used for videos (e.g., YouTube subtitles).
txt — Plain text Creates a simple text file without timestamps (easy to read or edit).
vtt — Web subtitle format Similar to .srt, but used mainly for web players.
tsv — Table-style output Creates a tab‑separated file containing timestamps and text — useful for analysis.
json — Structured output Saves the transcript in JSON format, including metadata.
all — all formats
5.3 Advanced terminal usage for Whisper
This section explains how to run Whisper using the terminal directly, how to check available commands, and how to inspect the files created during transcription. Commands are typed into the terminal window and executed by pressing Return/Enter.
The basic structure of commands is:
5.3.1 Checking your files in the terminal
Use the commands ls and ls -l to list the contents of the directory:
5.3.2 Checking that Whisper is installed
You can check that the whisper command is available by running:
This command prints the usage instructions for whisper. According to the instructions, the basic syntax is:
5.3.3 Running Whisper manually
Check your recording file name by running ls again. Use the medium model. The command should look like this:
Replace VID_43455_888.mp4 with your actual file name.
The command will take some time to run. When it finishes, check the directory contents with:
6 Accessing the trascript
You can then open the generated .txt file in LibreOffice Writer. LibreOffice is found under “Show Applications” in the lower‑left corner of the SD Desktop.