SD Desktop action required: migrate to a supported version in January 2026
All virtual desktops created before 8 September 2023 use an operating system that will no longer be supported in 2026. To keep your data, you must save it to the virtual desktop’s volume and migrate it to a new Ubuntu-based virtual desktop. Below you can find the exact steps needed.
NOTE: Correct access permissions must be set before detaching the volume from your virtual desktop to avoid permanent data loss. To assist you, we offer step-by-step online sessions on the dates below. Please confirm your preferred time slot via email, the process should take about one hour.
Available time slots:
-
Mondays at 12:00
-
Thursdays at 14:00
Moving volume to a new virtual desktop: step by step
Step 1: Login to SD Desktop and second verification step
-
Go to login page: https://sd-desktop.csc.fi
-
Log in with MyCSC credentials or Haka. Enter your username and password.
-
You need to verify your identity with a second verification step (i.e. Multi-factor Authentication, MFA). Enter the verification code provided via your MFA mobile application (e.g. Google Authenticator) from your organisation via HAKA or the one provided by CSC when using CSC username and password (more information available here.
-
Press Continue
Step 2: access your virtual desktop
-
All your virtual desktops are listed at the home page under All connections.
-
Select project (e.g.
project_NNNNN) and click plus icon. -
Now you can see all desktops that belongs to this project (
desktopname-NNNNNNNNNN). Access virtual desktop by clicking the name.
Note
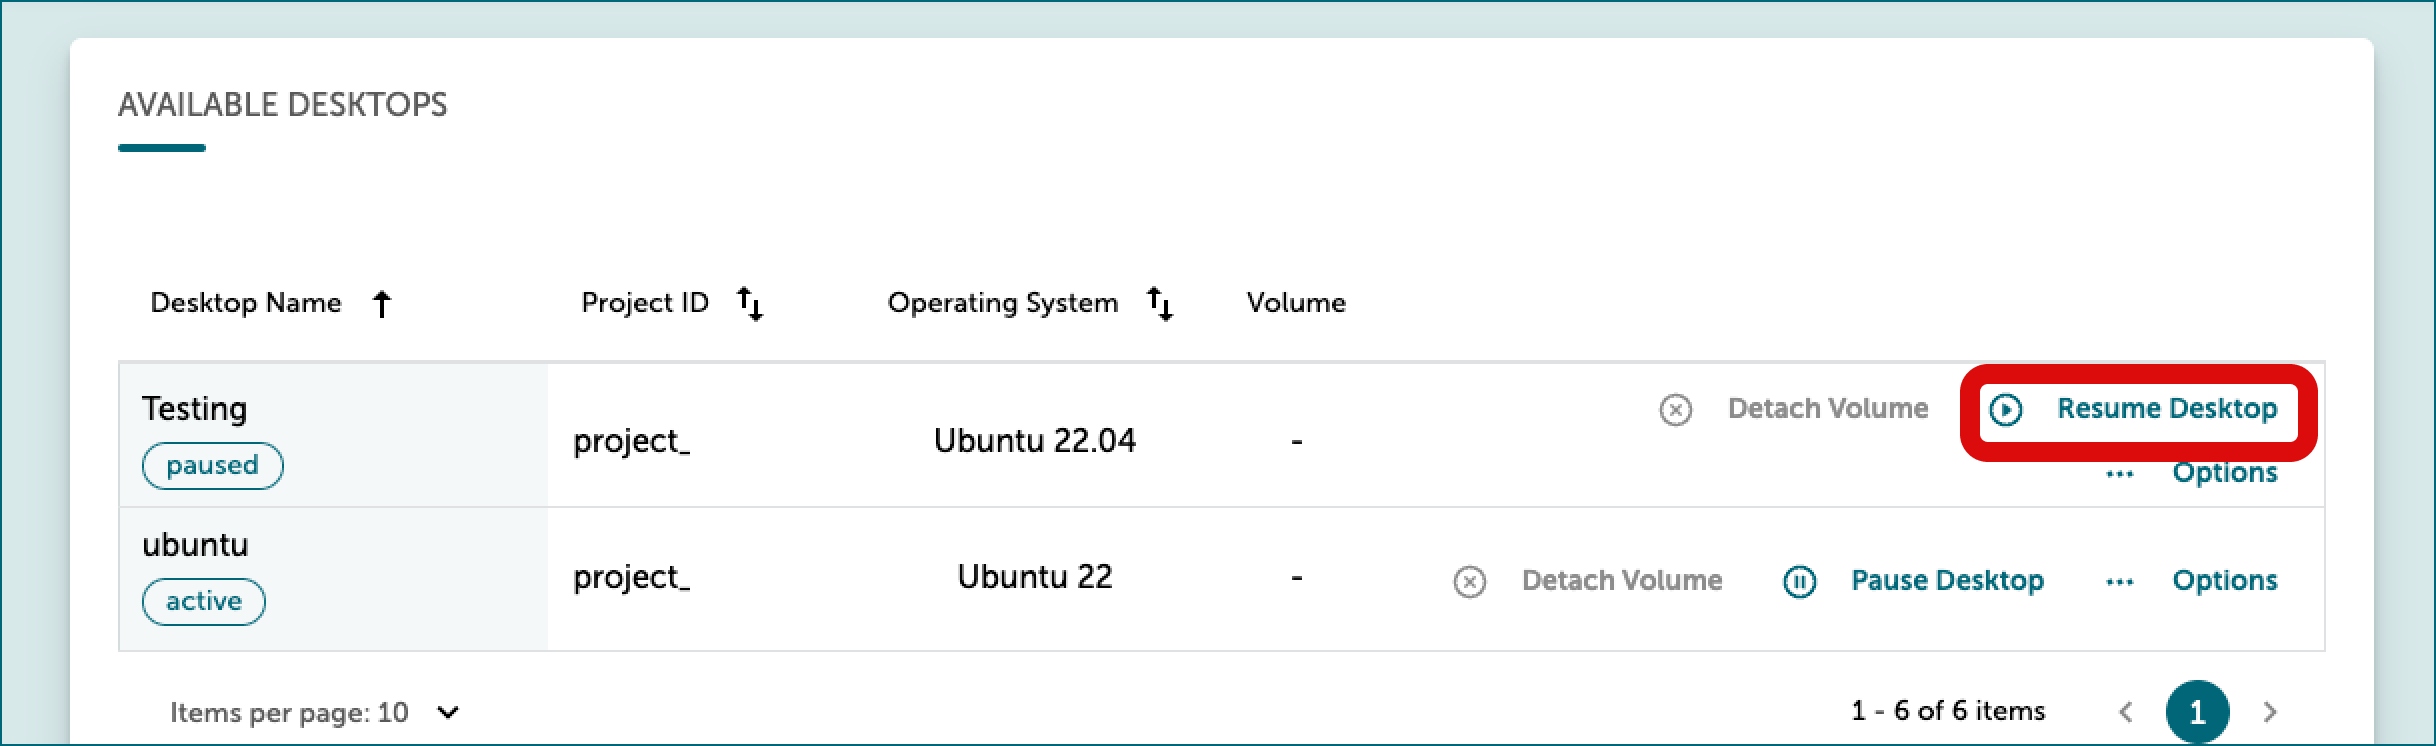
If you encounter a black screen, your virtual desktop might be paused. To resume it, on the SD Desktop homepage, click Go To SD Desktop Management.
- At the bottom of the page, under Available desktops, select the correct virtual desktop. In the same row, click Options on the right, then choose Resume.
Note
Resuming a paused desktop is only possible for active CSC projects with available Cloud Billing Units.

Step 3: save all the necessary data on the desktop volume
-
What is an external volume? This volume acts like an external hard drive that can be detached and reattached to different desktops, allowing project members to share and edit files stored there.
-
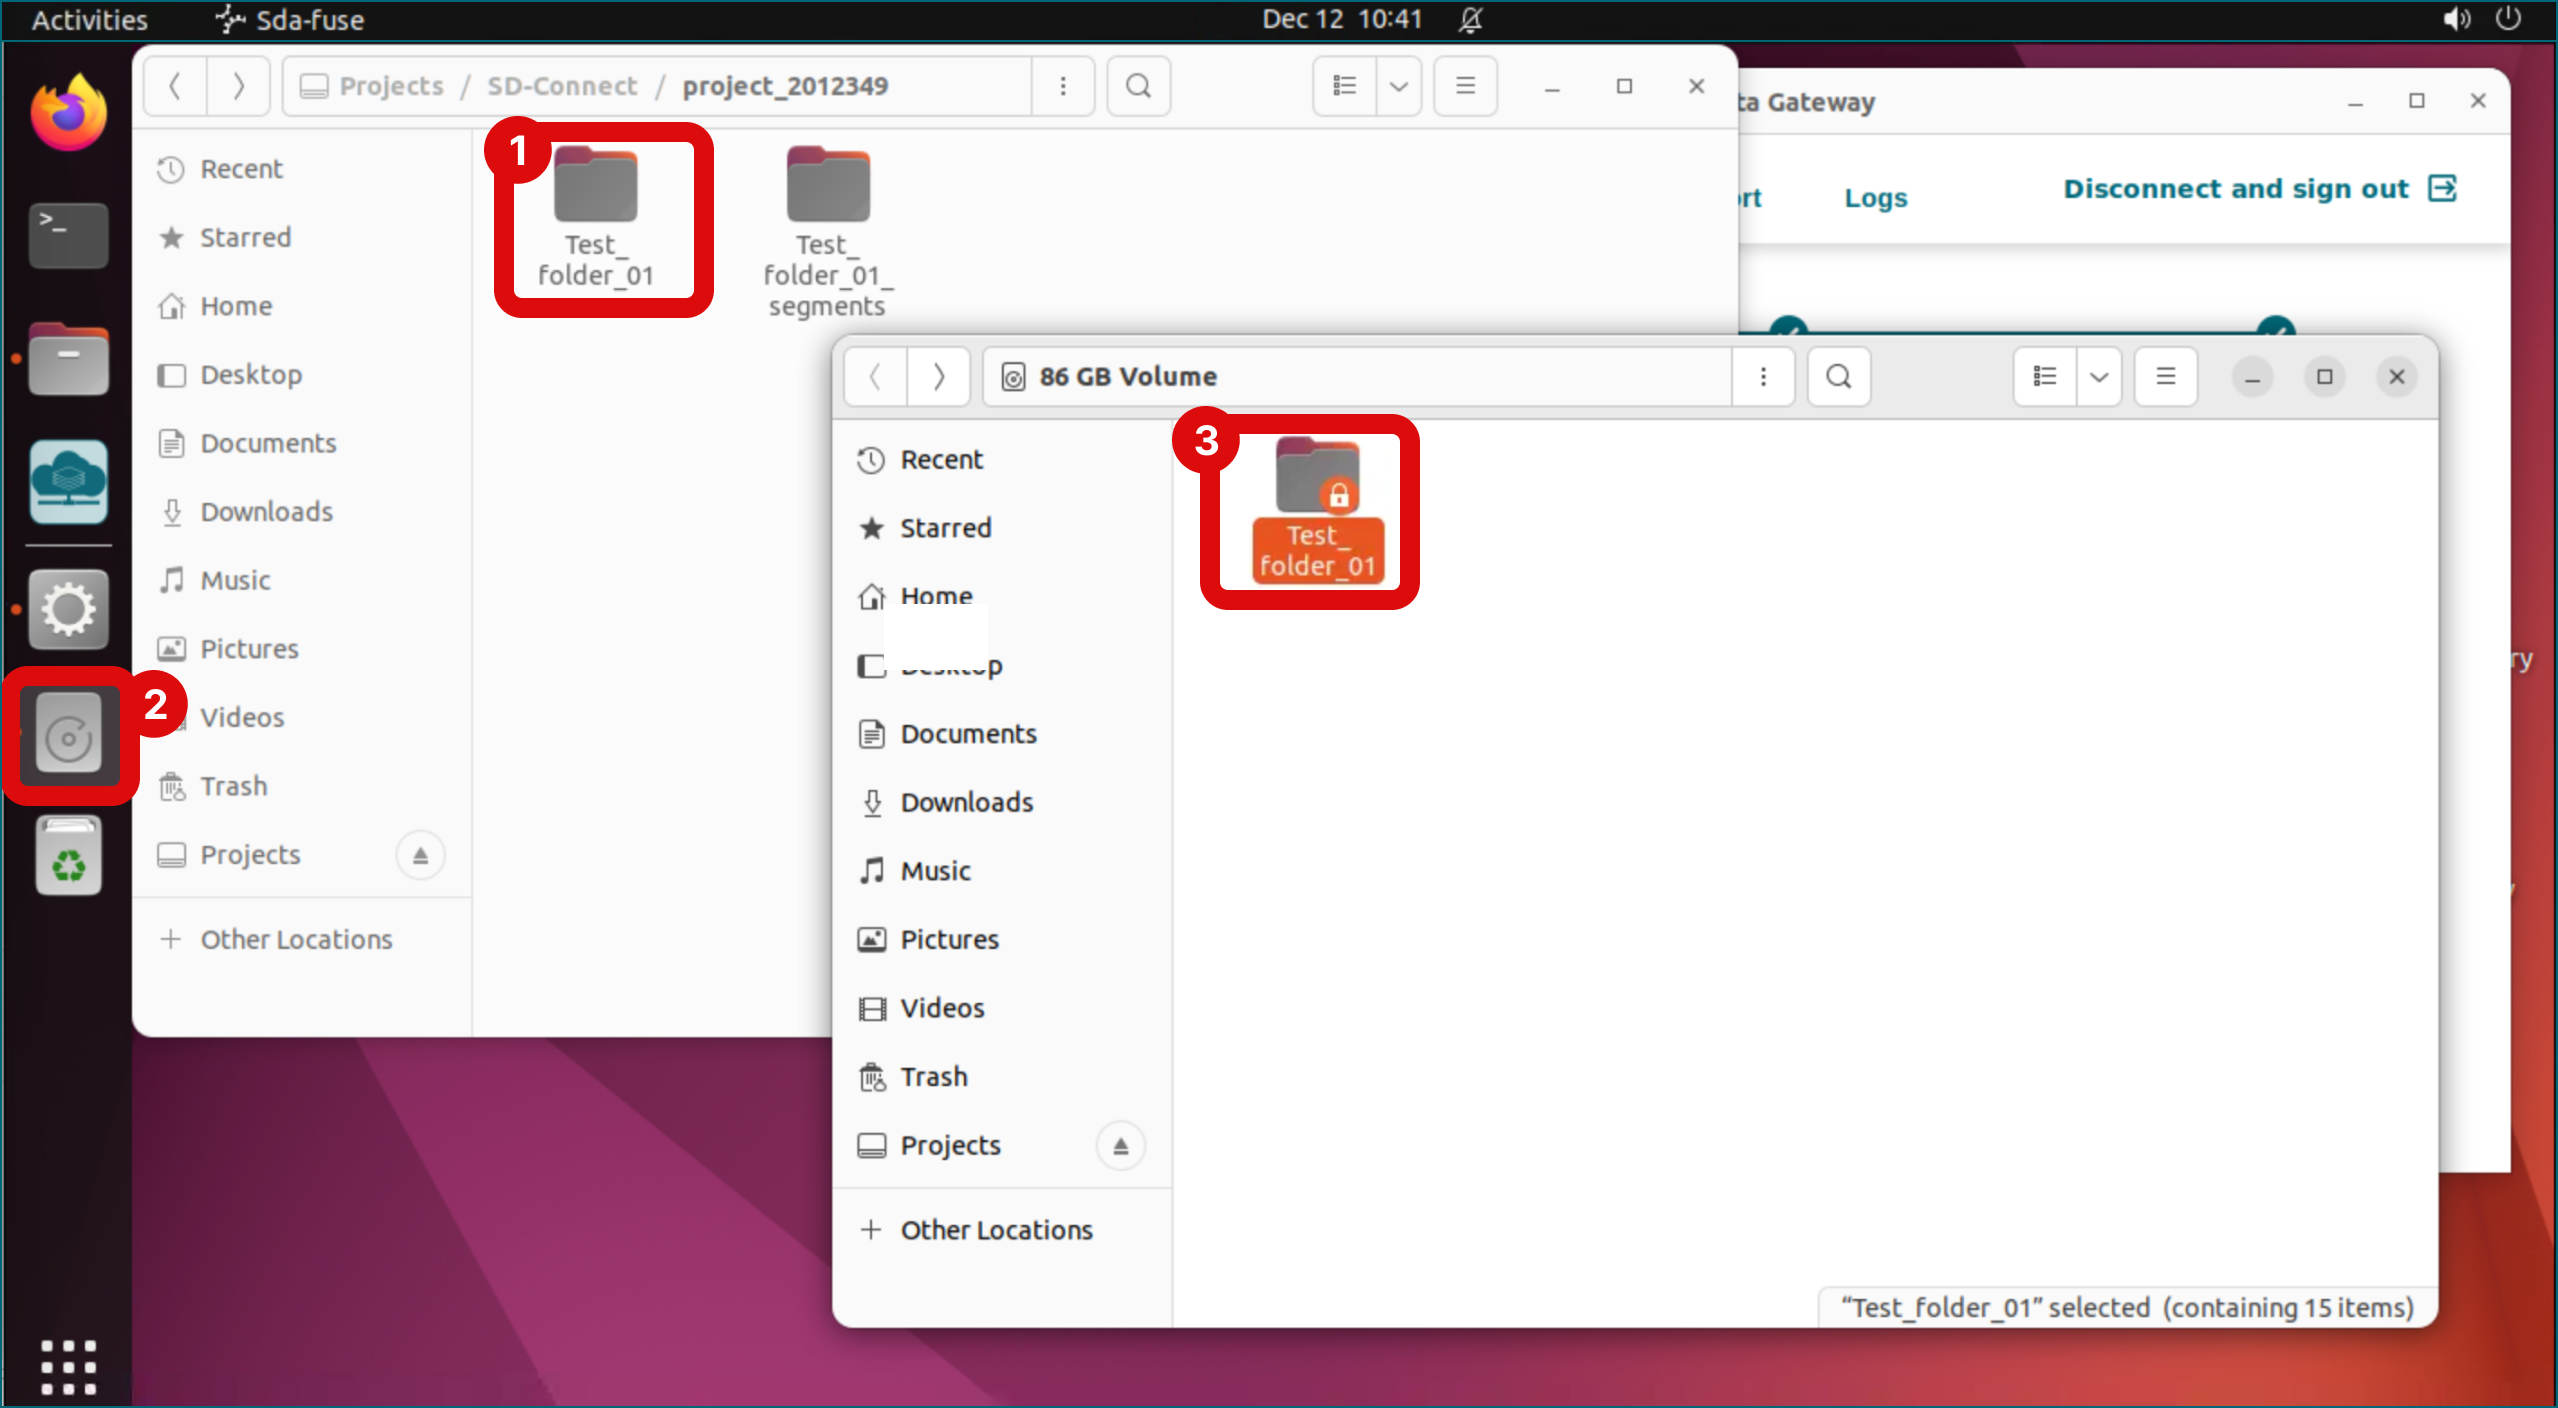
Open Volume by clicking icon on the left side of desktop.
-
Paste files or folders into Volume.
Step 4: Set permissions for shared access
Adjust permissions for folders and files to enable access for other project members. By default, permissions are limited to your access only. Permissions for all other folders and files must be adjusted by the original user who saved them on the volume to enable access for other project members.
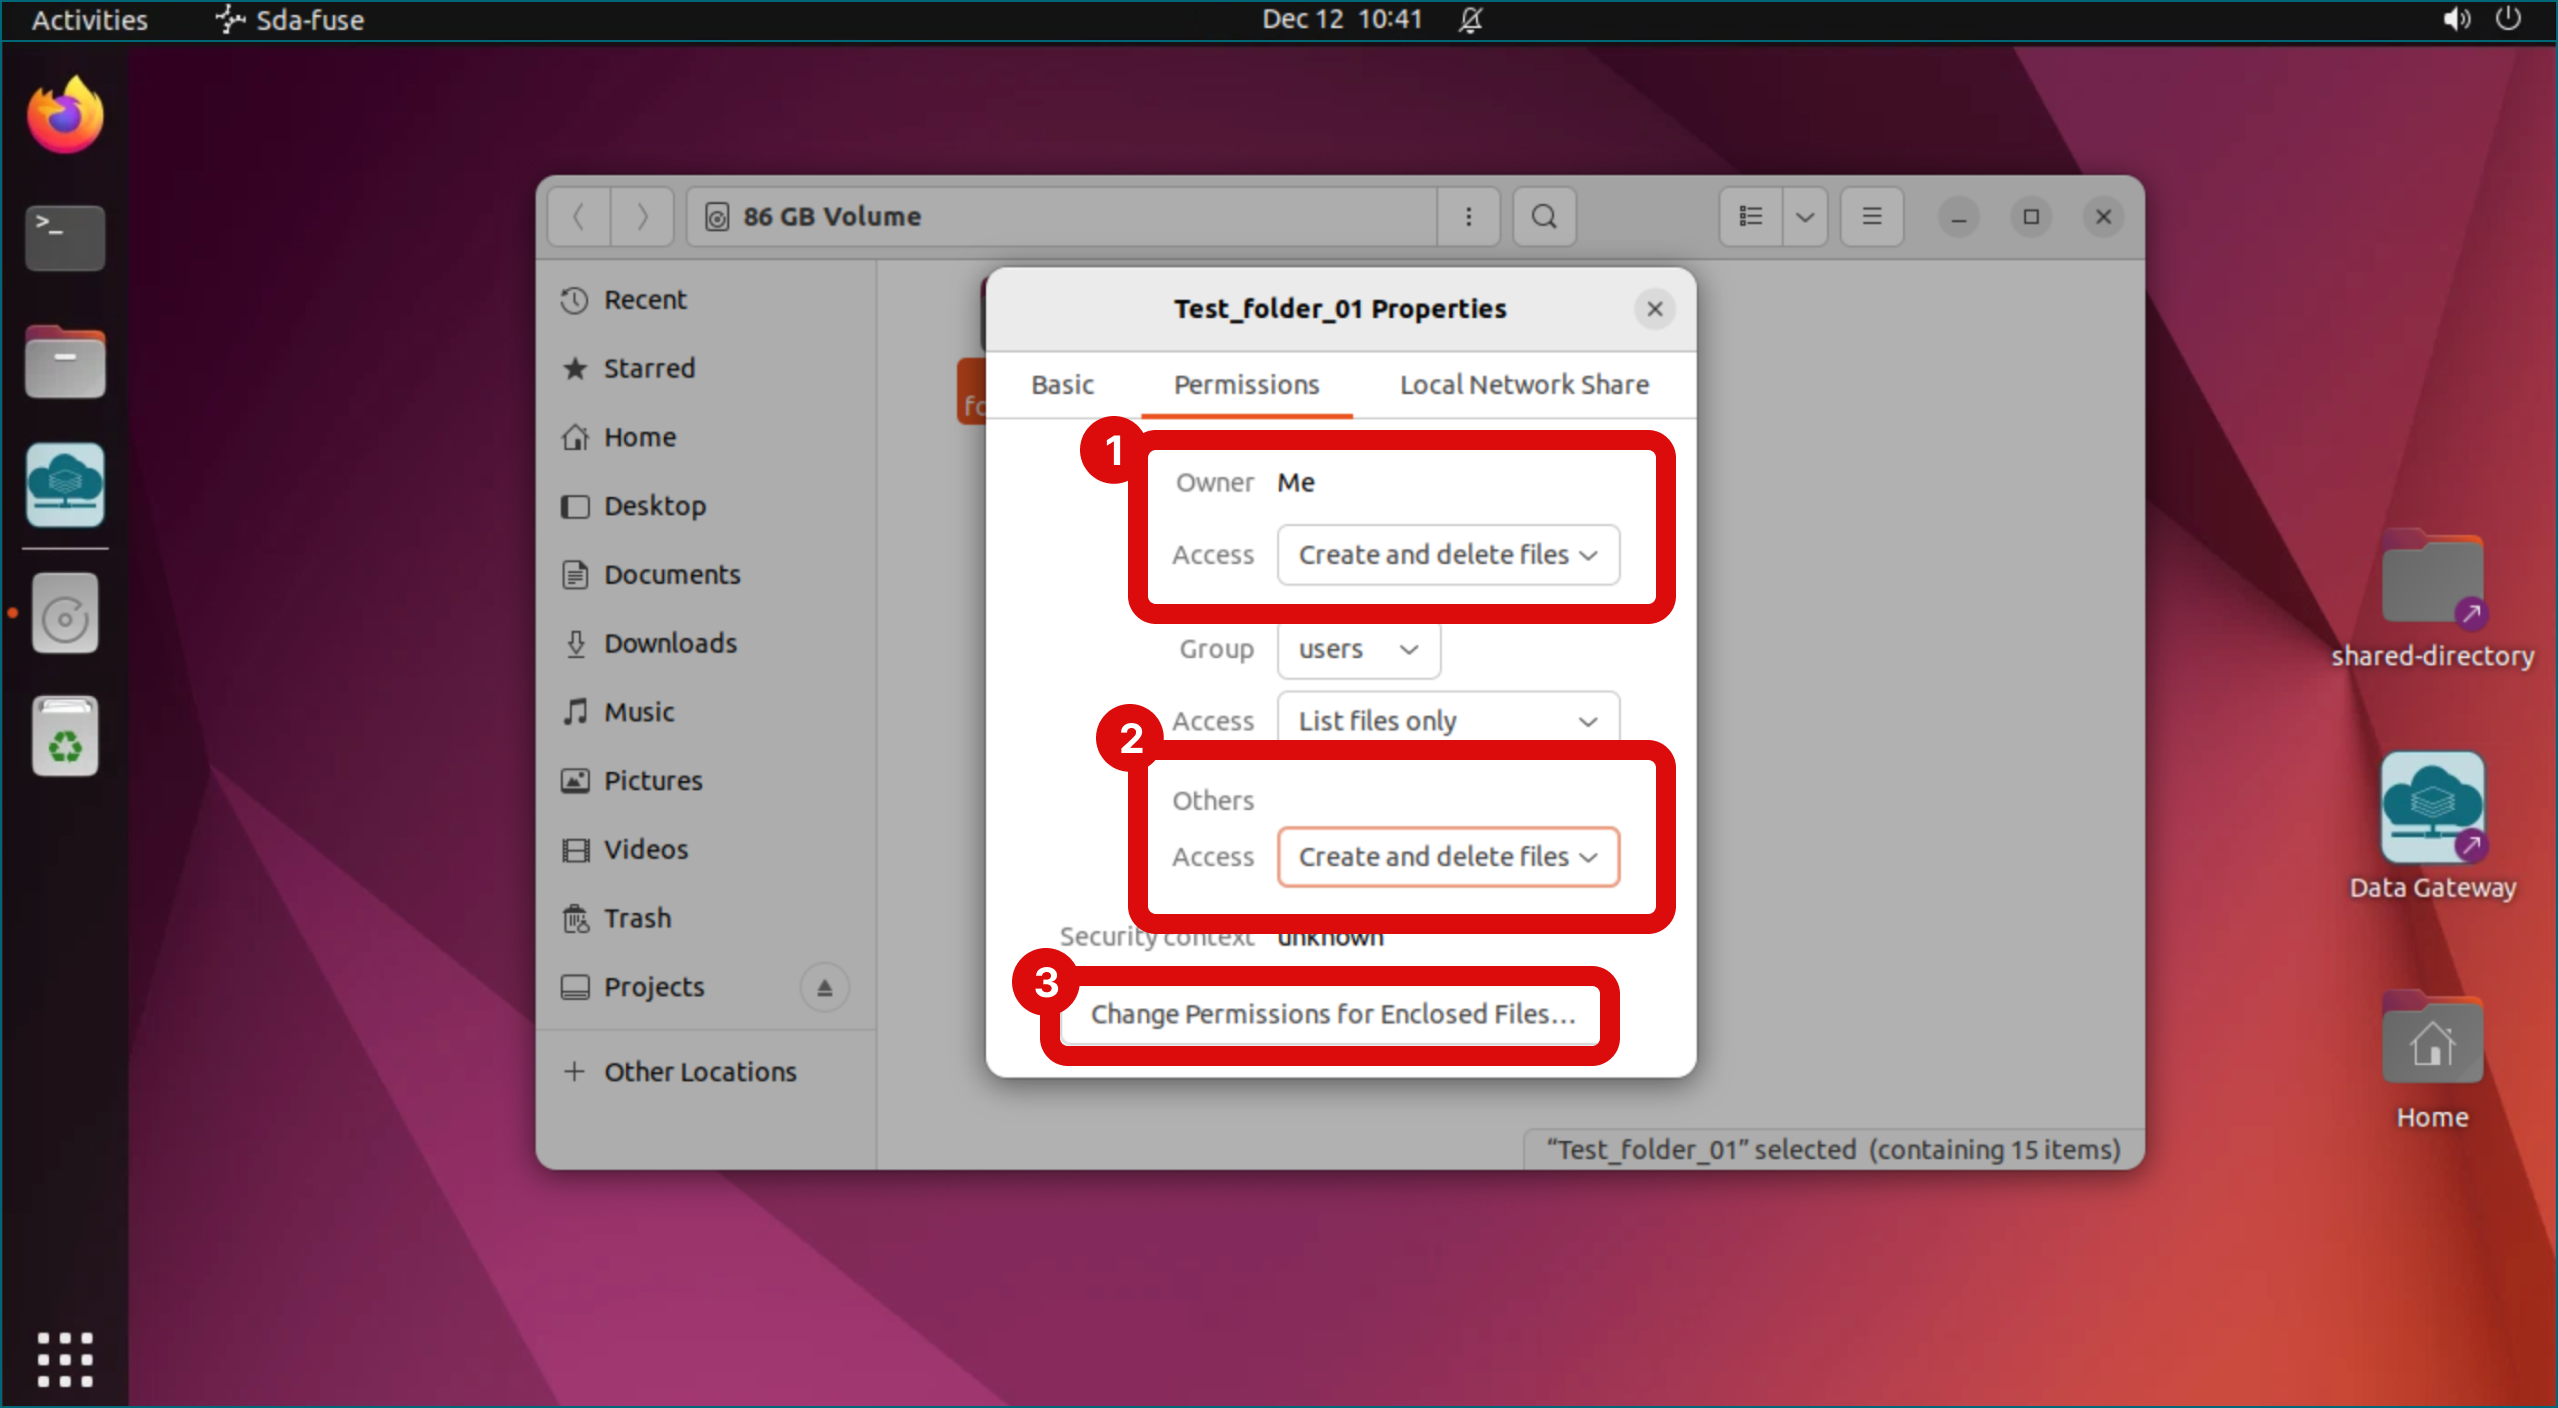
- Right-click the folder copied to Volume and select Properties to adjust folder permissions.
- Open the Permissions tab.
- Set permissions to Create and Delete Files so they remain accessible when the volume is reattached to a different virtual desktop.
- Owner -> Access -> Select “Create and delete files”.
- Group -> Access -> Select “Create and delete files”.
- Others -> Access -> Select “Create and delete files”.
- Close the permission tab (top left corner).
- The orange lock icon will no longer be visible next to the folder and can now be edited by all project members.

-
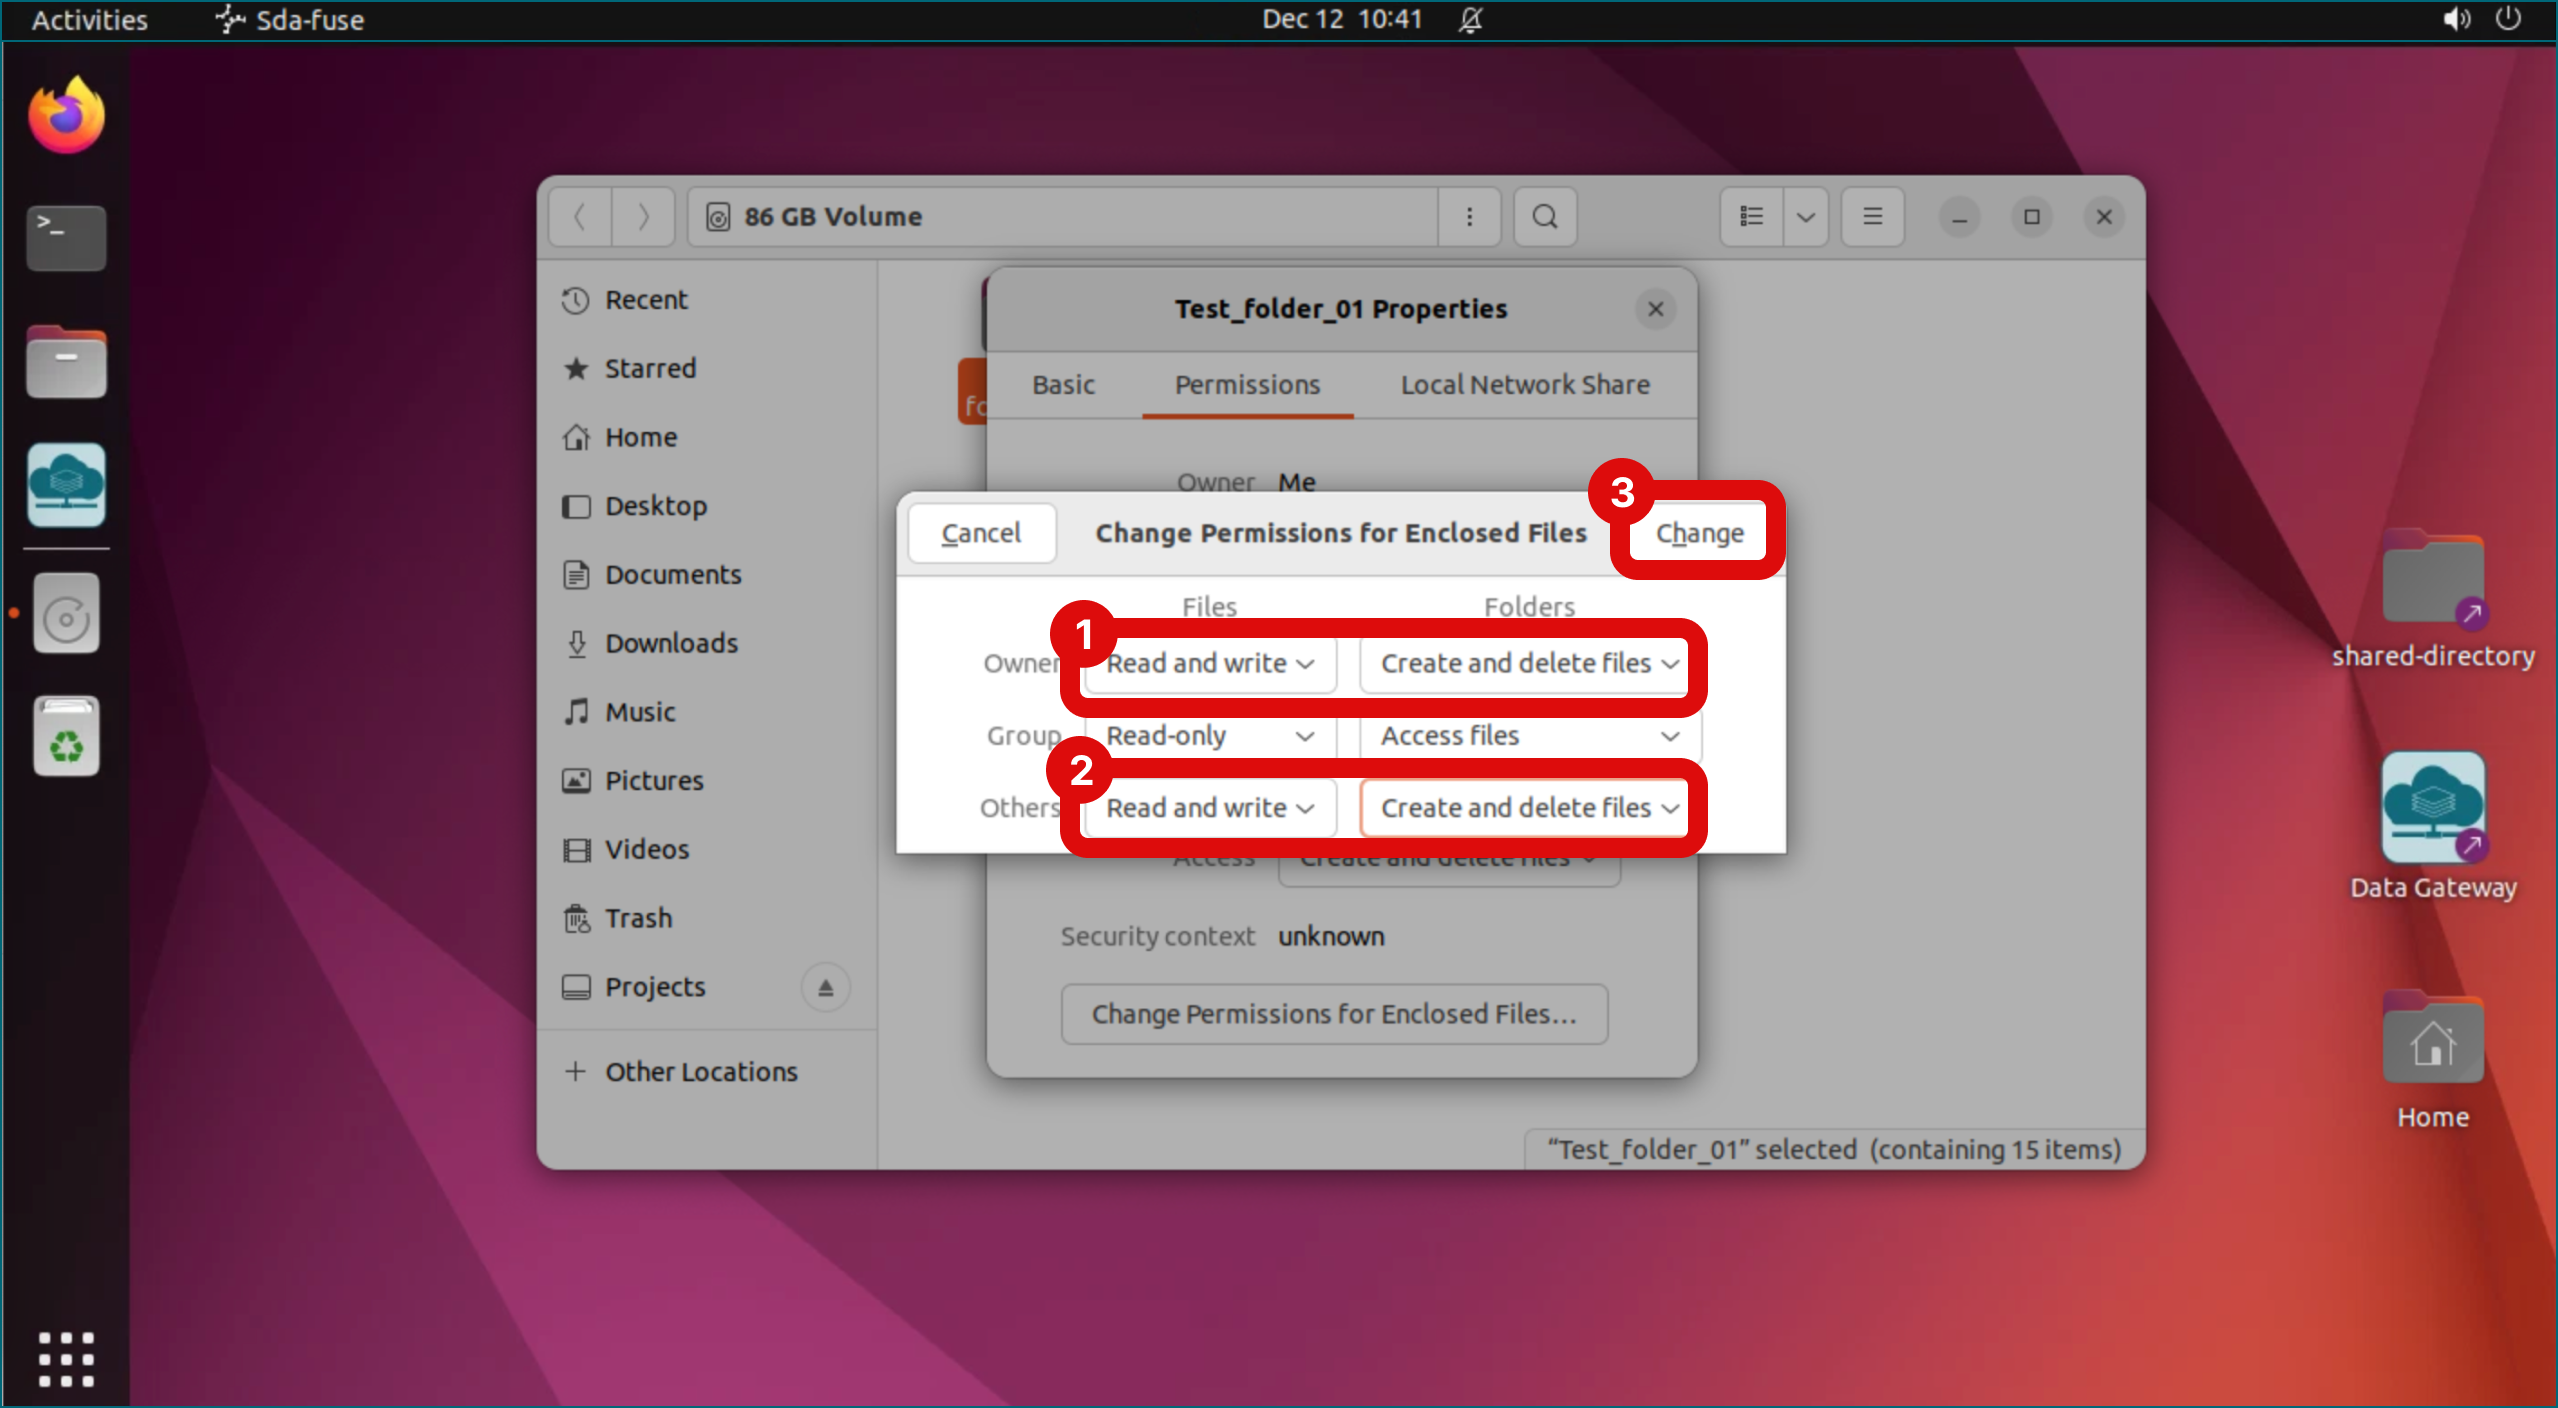
Next select Change Permissions for Enclosed Files to adjust file permissions inside the folder.
- Set permissions to:
- Owner -> Files -> Select “Read and write”. Folders -> Select “Create and delete files”.
- Group -> Files -> Select “Read and write”. Folders -> Select “Create and delete files”.
- Others -> Files -> Select “Read and write”. Folders -> Select “Create and delete files”.
- Click Change.
- Close the permission tab (top left corner).
- The orange lock icon will no longer be visible next to the files and can now be edited by all project members.
- Note that if you open the enclosed file permission settings again, it looks like the settings haven't changed even though the permissions have been set correctly.
- Set permissions to:
-
You can now log out from the virtual desktop and return to the service main page.
Step 5: detach the volume
-
On the SD Desktop service homepage, click SD Desktop management.
-
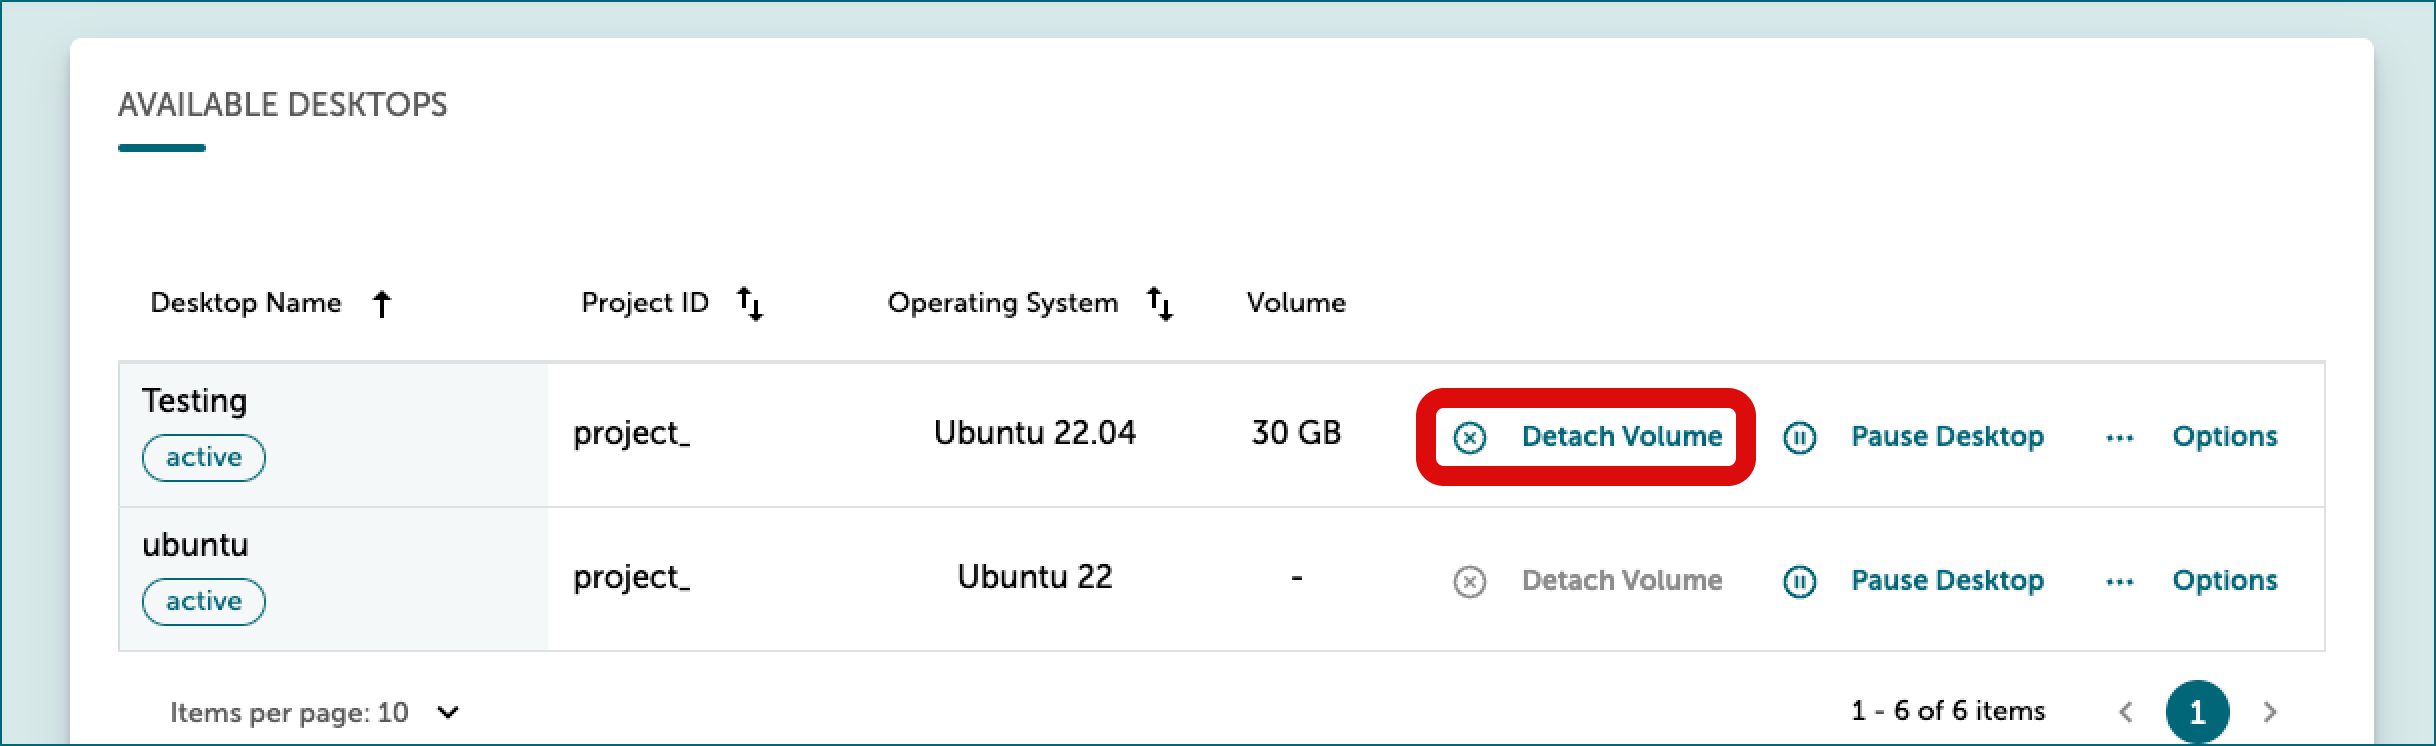
At the bottom of the page, under Available desktops choose the correct virtual desktop, and in the same row, on the right side, click Detach volume.
!
Attach the volume to a new virtual desktop with Linux Ubuntu22 operating system
You can attach the volume to a new virtual desktop by:
-
On the service homepage, click SD Desktop management.
-
Selection all the necessary options: CSC project number, Operating system: Default Linux Ubuntu 22, name, virtual desktop option.
-
Under Add External Volume (optional) click Choose from existing volumes. Dropdown will show available volumes stored in the same CSC project. Leave fields Volume size and Volume name empty.
-
Finally, click Create desktop. Please be aware that the confirmation notification may take up to 60 seconds to appear. If you are unsure whether the action was successful, please reach out to us at the service desk. We apologize for any inconvenience this may cause.

When the virtual desktop does not have a volume
Data export via airlock
Step 1: access your virtual desktop
-
All your virtual desktops are listed at the home page under All connections.
-
Select project (e.g.
project_NNNNN) and click plus icon. -
Now you can see all desktops that belongs to this project (
desktopname-NNNNNNNNNN). Access virtual desktop by clicking the name.
Note
If you encounter a black screen, your virtual desktop might be paused. To resume it, on the SD Desktop homepage, click Go To SD Desktop Management.
- At the bottom of the page, under Available desktops, select the correct virtual desktop. In the same row, click Options on the right, then choose Resume.
Note
Resuming a paused desktop is only possible for active CSC projects with available Cloud Billing Units.
Step 2: update the airlock component
If the virtual desktop has not been used in a long time, the airlock component used for data export needs to be updated. In fact, virtual desktops created before August 2025 display an incorrect error that blocks data export via the Data Gateway application and programmatically, even when accessed by the CSC Project Manager. To resolve this issue, a one time workaround is available.
Log in to your virtual desktop. Open the terminal (right-click).
-
Open the clipboard with the key combination
Ctrl + Alt + Shiftand activate the copy-paste function by selecting Input method → Text input. The Clipboard panel will close automatically after the selection, and the input bar will appear at the bottom of the virtual desktop. -
Copy the following commands into the input bar. They will be visible in the terminal.
You can paste them withCtrl + Cor by right-clicking.Press Enter
Press Enter
openssl s_client -showcerts -verify 5 -connect aai.sd.csc.fi:443 < /dev/null \
| awk '/-----BEGIN CERTIFICATE-----/{c++} c==3{print}/-----END CERTIFICATE-----/&&c==3{exit}' \
>> /shared-directory/.certs/ca.crt
Press Enter
Press Enter
-
Log out from the virtual desktop and try the export again.
Step 3: encrypt and export files
Contact servicedesk@csc.fi (SD services) for assistance in planning this step.